Blogs

Everything You Need to Know About Composite Resin Veneers
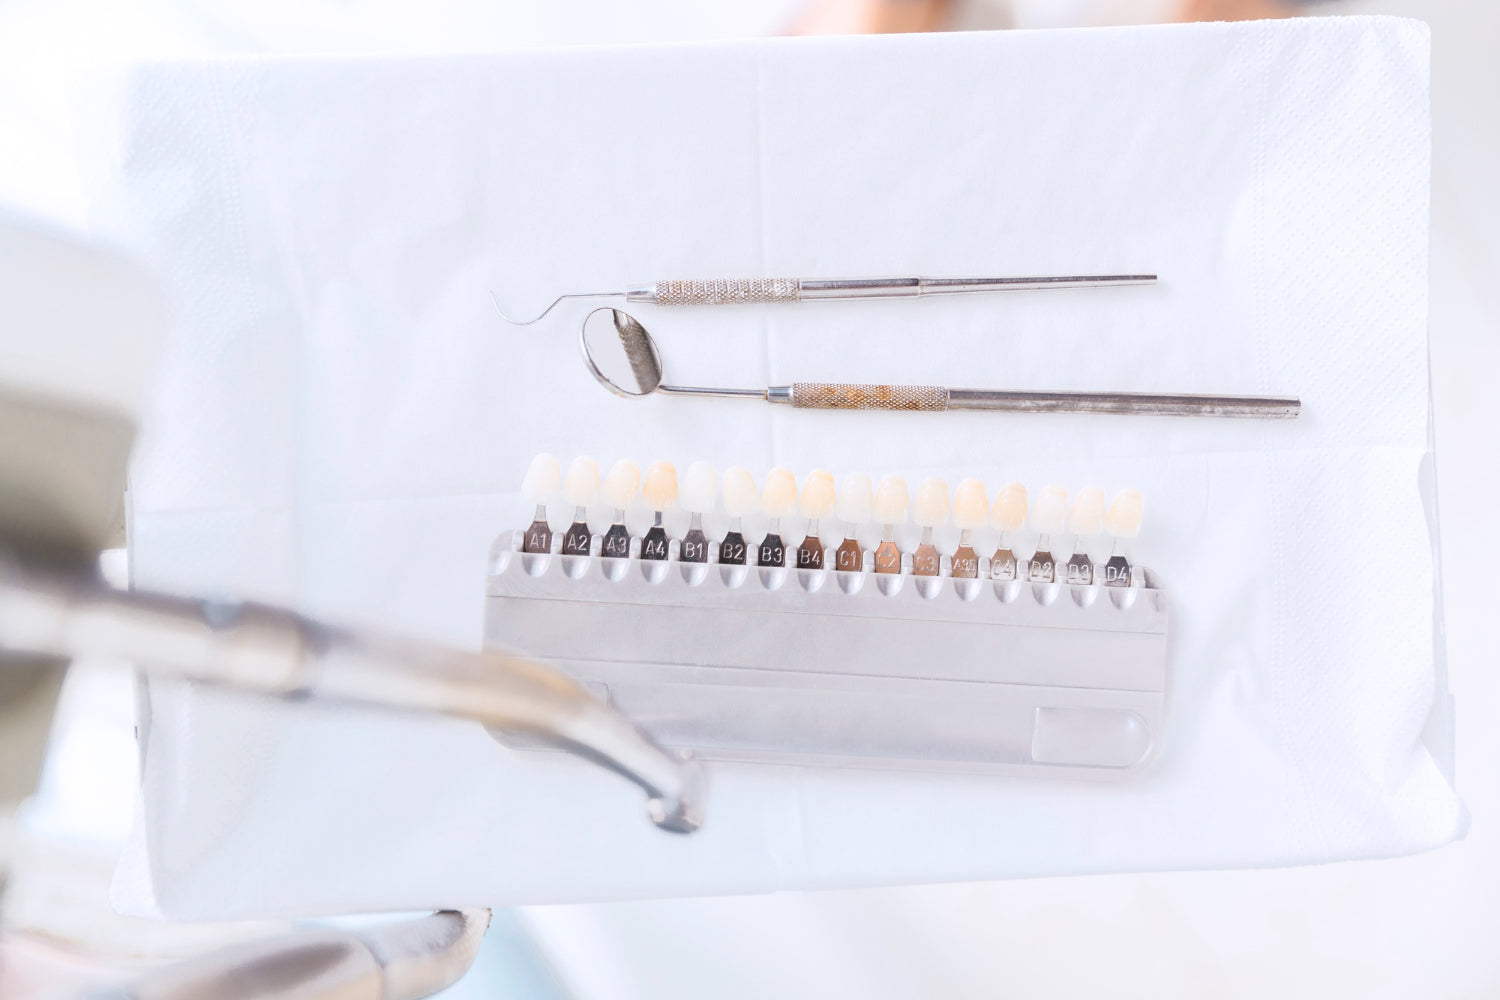
Composite resin veneers have become one of the most requested cosmetic dental procedures in the United States and one of the most misunderstood. Patients who walk into a consultation often have a vague id and one of the most misunderstood. Patients who walk into a consultation often have a vague idea that they want veneers, but a limited understanding of what composite resin actually is, how it differs from porcelain or zirconia options, what they can realistically expect in terms of results and longevity, and when it makes clinical sense to choose it over the alternatives. This guide covers all of it. Whether you are a patient researching your options, a dentist looking for a thorough resource to share with your practice, or a lab technician who wants to understand where composite fits in the broader restorative materials landscape this article gives you the complete picture. What Is a Composite Resin Veneer? A composite resin veneer is a thin layer of tooth-coloured composite material applied directly to the front surface of a tooth to improve its appearance. The composite itself is a blend of acrylic resin the polymer matrix and fine ceramic or glass filler particles. The filler particles give the material its hardness, wear resistance, and ability to reflect light in a way that mimics natural enamel. The resin matrix holds the composite together and allows it to be shaped and worked before curing. The material is applied to the tooth in layers, sculpted to the desired shape and contour by the clinician, and then hardened using a curing light that activates a photoinitiator within the resin. Once cured, the composite bonds to the tooth structure and the surface is polished to a smooth, natural finish. What distinguishes composite veneers from porcelain veneers is that the entire procedure happens chairside in the dental chair, during a single appointment in most cases. There is no impression taken, no lab fabrication, no temporary veneer to wear between visits. The dentist applies the material directly and shapes it in real time. This makes composite veneers faster and significantly more affordable than their porcelain counterparts, though the trade-offs in durability and longevity are real and worth understanding clearly. The Two Main Types of Composite Resin Veneer Direct composite veneers are the most common type. The composite is applied, built up, and sculpted freehand by the dentist during the appointment. The quality of the outcome is heavily dependent on the clinician's artistic skill and experience with the material. A skilled cosmetic dentist can produce stunning results with direct composite but the technique sensitivity is high and the consistency between cases varies more than with lab-fabricated restorations. Indirect composite veneers are made outside the mouth, either in a dental laboratory or with in-office milling technology, then bonded to the tooth at a second appointment. The fabrication environment allows for more controlled shaping, finishing, and characterisation than direct chairside application. Indirect composites also typically undergo additional curing under heat and pressure, which improves their mechanical properties higher hardness, better wear resistance, and reduced polymerisation shrinkage compared to direct composite. The trade-off is added cost and an additional appointment, though still significantly less expensive than full porcelain veneers. What Problems Can Composite Resin Veneers Fix? Composite veneers are well suited to a specific range of cosmetic concerns. Understanding where the material performs best and where it reaches its limits is essential for setting realistic patient expectations. Chips and minor fractures — composite resin is excellent at restoring chipped incisal edges and small fractures. It bonds directly to enamel through adhesive bonding protocols and can restore the original tooth contour accurately. Repairs to existing composite can also be made chairside without replacing the entire veneer. Tooth discolouration — composite can mask surface staining and intrinsic discolouration that does not respond to whitening treatment. It is particularly useful for tetracycline-stained teeth or teeth with fluorosis, where the discolouration extends through the tooth structure and cannot be addressed with bleaching. Gaps between teeth — small diastemas, particularly the central incisor gap, can be closed with composite resin build-up on the mesial surfaces of adjacent teeth. This is one of the most common applications and one of the most immediately impactful in terms of smile transformation. Tooth shape and proportion — teeth that are too short, too narrow, or irregularly shaped can be contoured with composite to improve proportion and harmony within the smile. Minor misalignment — teeth that appear slightly rotated or positioned unevenly can sometimes be optically corrected with composite, avoiding orthodontic treatment for patients with mild concerns. What composite veneers cannot effectively address? severely worn dentition, large restorative deficits, significant malocclusion, or cases where multiple teeth require substantial reconstruction are better served by more durable restorative options. When the clinical case requires a material that will handle high occlusal loads for ten or more years, composite resin is not the right starting point. Composite Resin Veneers vs. Porcelain Veneers This comparison is where patients and clinicians spend most of their decision-making energy, and it is worth going through methodically rather than with a simple bullet point summary. Appearance — both materials can produce beautiful, natural-looking results. Porcelain has an inherent advantage in light transmission it is a ceramic material whose optical behaviour more closely resembles natural enamel, with a depth and translucency that composite resin cannot fully replicate. High-quality composite applied by a skilled clinician can come very close, particularly in photographs, but side-by-side with natural teeth under clinical lighting, an experienced eye will often distinguish composite from ceramic. Durability and wear — this is the most significant practical difference. High-quality dental porcelain is extremely hard and resistant to abrasion. It does not stain from coffee, tea, red wine, or tobacco in the way that composite does. Porcelain veneers, when properly bonded and occlusally positioned, routinely last twelve to twenty years. Composite resin veneers are softer, more susceptible to surface staining, and more prone to chipping under occlusal stress. A well-maintained composite veneer in a low-stress occlusal environment might last seven to ten years before needing significant repair or replacement. In a patient who grinds or has heavy posterior contacts loading the anterior teeth, that lifespan shortens considerably. Repairability — this is composite's clinical advantage over porcelain. A chipped composite veneer can almost always be repaired chairside without replacing the entire restoration. A chipped porcelain veneer often requires a complete remake a new impression, new lab fabrication, a new delivery appointment, and significantly more cost. For patients who are concerned about long-term maintenance costs or who have habits that put their restorations at risk, the repairability of composite is a meaningful advantage. Cost — composite veneers are consistently less expensive than porcelain veneers, both because the material itself costs less and because the fabrication workflow is simpler. Direct composite avoids lab fees entirely. Even indirect composite veneers are significantly less expensive than feldspathic or pressed ceramic equivalents. Tooth preparation — composite veneers typically require little to no enamel removal. In many cases they can be applied to unprepared enamel surfaces, making the procedure fully reversible. Porcelain veneers, particularly conventional thickness veneers, require the removal of a small but permanent amount of enamel to create space for the ceramic shell. Once enamel is removed for porcelain veneers, the tooth is committed to being covered by a restoration indefinitely. Composite Resin Veneers vs. Zirconia Restorations A complete guide to veneer options in 2025 needs to address the broader restorative materials landscape, not just composite versus porcelain. Zirconia has become a dominant material in dental restoration and is increasingly used for esthetic anterior cases, not just posterior crowns. This is where the perspective of a dental lab materials supplier is valuable. Understanding what these materials are not just what they produce clinically gives patients and clinicians better tools for making decisions. What composite resin is at the material level? composite resin for teeth is a polymer-ceramic hybrid. The resin matrix is typically a dimethacrylate compound (most commonly BisGMA or UDMA), and the filler particles are barium glass, silica, or similar ceramic compounds. The filler loading — the percentage of filler by weight or volume — determines the material's mechanical properties. Higher filler loading means harder, more wear-resistant composite with better polishability. Nanofilled and nanohybrid composites represent the current generation of direct dental composites with the finest particle sizes and the best surface finish characteristics. What zirconia is at the material level? zirconia is zirconium dioxide, a crystalline ceramic oxide. It is processed in pre-sintered disc or block form zirconia blocks dental material that is loaded into a CAD/CAM milling machine, cut to shape, then sintered at high temperature to achieve its final density and strength. The flexural strength of sintered zirconia ranges from approximately 600 MPa in high-translucency formulations to over 1,200 MPa in high-strength grades roughly three to five times harder than conventional dental porcelain, and far beyond the mechanical performance of any composite resin. When does zirconia become relevant in veneer-adjacent cases? when the clinical situation moves beyond pure cosmetics into territory where durability and structural integrity matter. A patient with significant tooth wear, a history of porcelain fractures, or high occlusal forces who also wants anterior esthetic improvement is not ideally served by composite or even conventional porcelain. Thin, highly translucent zirconia crowns or veneers milled from high-translucency zirconia dental blanks can provide the esthetic result the patient wants with the durability that composite cannot deliver. Developments in ultra-translucent zirconia formulations, including 5Y-PSZ materials with translucency approaching lithium disilicate, have made zirconia viable for anterior esthetic restorations in ways that were not possible a decade ago. The zirconia blank that a lab technician loads into the milling machine for an anterior zirconia crown is the starting point for a restoration that can serve that patient for fifteen to twenty-five years. For a patient who has already gone through one or two cycles of composite veneer repair and replacement and wants a long-term solution, this conversation is worth having. What Actually Happens? Consultation and shade selection — the first appointment focuses on establishing the clinical goals. The dentist examines the teeth, evaluates the existing occlusion, and discusses the patient's expectations in specific terms. Shade selection is done with the tooth wet and before any tooth isolation, since enamel dehydrates under rubber dam or cotton roll isolation and appears lighter than it actually is. Photographs are taken as a reference. Enamel conditioning — if any minimal preparation is needed, it is performed at this stage. For most direct composite veneers, preparation is minimal or absent. The tooth surface is then cleaned, and an acid etch is applied to create microporosity in the enamel surface — the microscopic roughening that allows the bonding agent to penetrate and create mechanical retention. Bonding agent application — a dental adhesive is applied to the etched surface, worked into the enamel with a brush, air-thinned, and light-cured. This creates the bonded interface between the tooth and the composite. Layered composite application — the composite is applied in layers rather than as a single bulk mass. This is important for two reasons: controlling polymerisation shrinkage (each layer shrinks slightly as it cures; layering distributes this stress) and achieving the optical depth that makes composite look natural. A skilled clinician will typically place a more opaque dentine-shade layer first to establish value, then apply progressively more translucent enamel-shade composite toward the incisal edge to replicate the optical gradation of natural tooth structure. Shaping and curing — each layer is sculpted to the desired contour before curing. The clinician uses brushes, modelling instruments, and mylar strips at the interproximal contacts to shape the composite precisely. Each layer is cured for the time specified by the manufacturer. Finishing and polishing — once the full build-up is cured, the restoration is finished with fine diamond burs and polishing discs to remove excess material, refine contours, and achieve the final surface finish. Polishing is not a cosmetic step — it is a clinical one. A well-polished composite surface resists staining and plaque accumulation far better than a rough one. Occlusal check — the final step before the patient leaves. Articulating paper is used to check that the composite does not carry premature occlusal contacts in centric relation or on excursive movements. High spots are adjusted and re-polished. How Long Do Composite Resin Veneers Last? The honest answer is that composite veneer longevity varies substantially based on three factors: the quality of the composite material, the skill of the clinician, and the patient's habits and occlusal situation. Under ideal conditions high-quality nanofilled composite, excellent technique, low-stress occlusion, good patient compliance with care instructions composite veneers can remain functional and esthetic for eight to twelve years before replacement or major repair is warranted. Under less favourable conditions heavy grinding, staining habits, high occlusal loading on anterior teeth the same restoration may show significant wear, staining, or marginal degradation within three to five years. Research published in the Journal of Dentistry suggests that composite veneers have a survival rate of approximately 80–90% at five years and 60–75% at ten years when factoring in both minor repairs and complete replacement. These numbers are respectable for a material in this cost range, but they are clearly inferior to the survival data for ceramic restorations, where ten-year survival rates above 90% are routinely reported in the literature. The practical implication for patients is this: composite veneers are a commitment to an ongoing maintenance relationship with their dentist. They will likely need polishing at every hygiene appointment, may need small repairs periodically, and will eventually need replacement. Patients who understand and accept this — and who see the lower upfront cost as appropriate for a medium-term solution — are ideal composite veneer candidates. Patients who want to do the work once and be done for twenty years should be counselled toward ceramic or zirconia options. What Patients Need to Know? Oral hygiene — composite veneers require the same basic oral hygiene as natural teeth, with some specific considerations. Abrasive toothpastes including whitening toothpastes with high RDA values will scratch composite surfaces and accelerate staining. A smooth-surface, low-abrasive toothpaste is the right choice. Flossing is safe around composite veneers and should not be avoided. Dietary habits — composite is more susceptible to staining than ceramic. Coffee, tea, red wine, tomato sauce, and berries will stain composite over time, particularly if the surface loses its high polish. This does not mean these foods must be avoided entirely, but rinsing with water after consuming them helps. Smoking or tobacco use will stain composite significantly and quickly. Habits and parafunctions — nail biting, pen chewing, and ice chewing will chip composite veneers. Patients who grind or clench at night should be provided with a night guard to protect both the composite veneers and the opposing dentition. Regular professional maintenance — composite veneers should be polished at every hygiene appointment. A professional polish restores the surface finish that resists staining, and early detection of marginal degradation or wear facets allows small issues to be addressed before they become large repairs. Where Composite Resin Fits in the Restorative Materials Ecosystem? For dental professionals and labs, composite resin veneers represent one end of a spectrum of esthetic restorative options that extends through ceramic to zirconia. Understanding the full spectrum matters because patients who start with composite sometimes progress to ceramic or zirconia options as their needs change and the lab that handles their zirconia restorations needs to supply consistently high-quality material. Composite resin for teeth and milled zirconia are not competing materials they serve different clinical needs and different patient populations. A lab that stocks both high-quality zirconia dental blanks for permanent ceramic restorations and appropriate composite or resin materials for their full range of clinical cases is positioned to serve the complete restorative workflow. At ZirconiaGuys, we supply dental labs across the United States with premium UPCERA and Aidite zirconia discs and blocks alongside the complete Keystone and Whip Mix resin ranges. Our team is available Monday through Friday to help labs source the right materials for every application from composite-adjacent digital lab workflows to high-strength multilayer zirconia for demanding full-arch restorations. Is a Composite Resin Veneer the Right Choice? Composite resin veneers are an excellent solution for patients with specific, modest cosmetic goals closing small gaps, repairing chips, improving tooth colour and shape who want a faster and more affordable treatment with minimal tooth reduction. They are a genuine clinical option, not simply a lower-quality alternative to porcelain. They are not, however, the right choice for every patient or every clinical situation. Heavy occlusal loading, significant tooth loss, severe discolouration, and the desire for a very long-term solution all favour ceramic or zirconia restorations. The conversation between clinician and patient should be specific and honest about what composite resin can and cannot deliver and should include a discussion of when a more durable material makes better long-term clinical and financial sense. The materials are well understood. The decisions are clinical. And for the lab producing the restorations that follow composite veneers whether that is a zirconia crown, a pressed ceramic bridge, or a full-arch implant prosthesis sourcing consistently high-quality dental materials from a trusted supplier makes every case stronger from the start.
Learn more
How to Choose the Best Dental Resin for 3D Printing?
Every dental lab running a 3D printer eventually hits the same wall. The printer is up and running, the software is working, the files are printing and then a case comes out wrong. The model warped slightly. The surgical guide doesn't seat cleanly. The night guard is too stiff for the patient to wear comfortably. The try-in denture fractured during the appointment. In almost every one of these situations, the root cause is not the printer. It is the resin. Either the wrong material was used for the application, or the right material was used without a full understanding of how to get the best out of it. Dental 3D printing resin is not a commodity it is a family of highly differentiated materials, each formulated for a specific set of clinical requirements. Treating them as interchangeable is the single most common mistake labs make when they first move into digital workflows. This guide covers everything a dental professional needs to know to choose the right resin for every application: the key properties that matter clinically, the questions to ask before selecting a material, how different resin types compare, and how resins fit into the broader context of a complete digital lab workflow that also includes milled zirconia restorations. Why Resin Choice Matters More Than Most Labs Realise? The dental 3D printing market is now large enough that there are dozens of resins available for what looks like the same application. Two model resins from different manufacturers might both be marketed as "high accuracy dental model resin" but one might have significantly tighter dimensional tolerance, a better surface finish, and more consistent batch-to-batch performance than the other. The same is true across every category. Two splint resins might look identical on a spec sheet but behave very differently at the chair one staying flexible at room temperature and becoming more rigid under occlusal load, the other remaining uniformly stiff in a way that leads to patient non-compliance. Getting resin selection right is not about finding the most expensive or the most heavily marketed material. It is about understanding the specific requirements of each clinical application and matching the resin formulation to those requirements. That understanding starts with knowing what properties actually drive clinical performance. The Six Properties That Actually Drive Clinical Performance Before getting into specific resin categories, these are the material properties that determine whether a resin will perform well for a given application. These are the properties to evaluate — not the marketing claims around them. Dimensional accuracy and shrinkage — all photopolymer resins shrink slightly when they cure, because polymerisation involves a reduction in molecular volume. The magnitude of that shrinkage, and how uniformly it occurs across the part, determines how closely the finished print matches the design file. For working models, surgical guides, and aligner models, this accuracy is critical. A resin with high shrinkage or non-uniform cure behaviour produces parts that drift from the intended dimensions and every downstream clinical decision made using that model or guide inherits the error. Surface finish — the smoothness and detail resolution of the cured surface. This matters most for working models and surgical guides where fine anatomical features margin lines, tissue contours, contact areas need to be legible. A rough, pixelated, or wavy surface obscures this information and produces unreliable clinical output. Mechanical properties at the application — strength, hardness, flexibility, and fracture resistance. The right combination varies by application. A surgical guide needs rigidity and dimensional stability. A splint for a light bruxer needs comfortable flexibility. A castable resin needs clean burnout, not strength. Using a material optimised for one mechanical profile in an application that demands another is a common source of clinical failure. Biocompatibility classification — any resin intended for intraoral contact must carry the appropriate biocompatibility certification for its specific use. In the United States, this means FDA clearance as a medical device appropriate for the application. The classification is not a general claim a Class I device clearance for a surgical guide does not automatically apply to a denture base or a permanent crown. Each intraoral application has its own regulatory requirement. Model resins and casting resins that never contact the patient do not need biocompatibility certification, but anything placed in the mouth even temporarily does. Printer and wavelength compatibility — dental 3D printing resins are typically formulated for either 385nm or 405nm UV wavelengths, or dual compatibility with both. Using a resin outside its validated wavelength range produces unreliable cure depth, mechanical inconsistency, and potential surface tackiness. Before selecting any resin, confirm it is validated for your specific printer model and wavelength configuration. Shelf life and storage — photopolymers degrade with exposure to light, heat, and time. Resins stored incorrectly, used past their shelf life, or consistently exposed to ambient UV light before printing will behave inconsistently curing unevenly, producing brittle parts, or failing to reach full polymerisation even with correct print settings. How to Choose: Application-by-Application The most reliable approach to resin selection is to start with the clinical application and work backward to the material requirements. Here is how that process works for each major dental resin category. Choosing a Model Resin The requirement for a model resin is straightforward: it needs to produce a dimensionally accurate, surface-smooth physical representation of the digital scan data. The technician working from that model designing a crown, fitting an aligner, evaluating a bite needs to be able to trust what the model tells them. Key selection criteria: Dimensional accuracyLook for published accuracy specifications from the manufacturer, ideally validated on a printer configuration similar to yours. Deviation from nominal dimensions of more than 50–75 microns in critical areas is significant for crown and bridge workflows. Surface finishIs closely related to accuracy but specifically affects readability. Warm-toned model resins golden brown, grey provide better visual contrast for margin reading under typical lab lighting than white or ivory options, which can wash out under direct overhead light. Consistency across batchesMatters more for high-volume labs than small practices. A resin that prints perfectly for three months and then produces visibly different results with a new batch creates invisible accuracy problems that are hard to diagnose. Model resins do not need biocompatibility certification. They are never placed in the patient's mouth. This typically makes them more affordable than biocompatible resins of comparable dimensional performance. Choosing a Surgical Guide Resin Surgical guide selection has a non-negotiable requirement that model resin selection does not: biocompatibility for intraoral use, with the appropriate regulatory clearance for the application. Beyond biocompatibility, surgical guide resins must be clear or highly translucent. The surgeon uses the guide during an active surgical procedure and needs visual confirmation that it is fully and correctly seated before drilling begins. Opacity eliminates this visual check. Dimensional accuracy is critical in a way that goes beyond aesthetics the guide translates a digitally planned implant position from planning software into physical drill angulation and depth at the bone. A guide that distorts during printing, post-cure, or sterilisation introduces an error into the surgical execution of the digital plan. Autoclave compatibility is also essential. Sterilisation of the guide prior to surgery is the standard of care. The resin must maintain dimensional stability and biocompatibility through standard autoclave cycles. Many general-purpose resins lose dimensional integrity at autoclave temperatures, which is why surgical guide resins are specifically formulated to withstand the sterilisation process. Choosing a Splint or Night Guard Resin The soft clear resin for dental appliances category is one of the most commonly misunderstood in dental 3D printing. Many labs default to hard acrylic-type resins for all splint fabrication because hard splints are the clinical standard for bruxism management. But patient compliance is a real clinical variable a patient who finds their appliance uncomfortable will stop wearing it, and an unworn appliance protects nothing. Hard splint resins cure to a firm, dimensionally stable surface that provides a defined occlusal table for bite registration and force redistribution. They are appropriate for heavy bruxers, patients requiring TMD stabilisation therapy, and any case where a hard acrylic surface is clinically indicated. Semi-flexible or soft splint resins produce appliances with a degree of resilience and cushioning that many patients find more comfortable to wear particularly in the initial adjustment period. They are less appropriate for heavy parafunctional habits where the flexibility allows deformation under load, but for lighter occlusal habits or comfort-focused indications they often produce better clinical outcomes because patients actually use them. Both categories require biocompatibility clearance for intraoral use. The biocompatibility certification is specific to the resin a model resin that happens to be soft is not a night guard resin. Choosing a Castable or Burnout Resin Castable resin selection is driven by one property above almost all others: burnout behaviour. The resin must eliminate completely at standard furnace temperatures, leaving no residue, no carbon, and no contamination in the investment mould. Incomplete burnout produces casting defects porosity, inclusions, and surface roughness in the final metal casting or pressed ceramic restoration. Secondary to burnout, castable resins need sufficient surface definition to accurately print the fine marginal and anatomical detail that will carry through to the final casting. The investment captures what the printed pattern shows, and the final casting reproduces what the investment captured. Detail loss at any stage propagates through to the finished restoration. Castable resins are not biocompatible because they are never placed in the patient's mouth they are burned out in a furnace before any clinical use. This gives the formulation more flexibility to optimise for printability and burnout behaviour without the constraints of biocompatibility chemistry. Choosing a Try-In Resin Try-in resins need to be biocompatible for temporary intraoral contact but they do not need the long-term durability or mechanical performance of a final denture material. They need enough strength to survive the try-in appointment intact, shade accuracy that reflects the intended final shade, and biocompatibility that makes them safe for the brief period they are in the patient's mouth. The main clinical risk with try-in resins is shade mismatch. If the resin shade does not accurately reflect the intended shade of the final prosthetic, the patient's aesthetic feedback at the try-in appointment is based on the wrong information, and their approval does not reliably predict their satisfaction with the final result. Choosing a try-in resin that corresponds accurately to VITA shade references prevents this problem. What Resin Cannot Do And Why Zirconia Is Still Essential? One of the most important things to understand when building a digital lab workflow around 3D printing is where resin ends and where milled ceramics begin. This is not an either/or choice between technologies it is a clear division of labour based on material performance limits. Dental 3D printing resin even the most advanced biocompatible formulations currently available has a flexural strength ceiling in the range of 80–200 MPa for most clinical applications. The exact number varies significantly by formulation and application, but the category maximum is well below what posterior permanent restorations require. Milled zirconia starts where resin ends. Standard zirconia blocks dental material in the 3Y-TZP formulation has a flexural strength of 900–1,100 MPa. High-strength posterior grades exceed 1,200 MPa. Multilayer aesthetic grades, which balance translucency with strength, still deliver 600–900 MPa at the incisal zone. This is four to ten times the strength of any photopolymer resin currently used clinically. For a posterior crown that needs to withstand masticatory forces for a decade or more, there is no resin substitute for a sintered zirconia restoration milled from high-quality dental zirconia blanks. The workflow implication is straightforward. Resin handles everything that supports and surrounds the permanent restoration: working models for design verification, diagnostic models for treatment planning, try-in appliances for clinical evaluation, surgical guides for implant placement, and protective occlusal appliances for post-restoration management. The permanent restoration itself is milled from zirconia blocks and sintered to full ceramic density in a furnace. Both materials are active in every complex case they serve different roles, and neither replaces the other. Biocompatibility The Decision You Cannot Skip The competitor guides on this topic typically list biocompatibility as one of ten considerations. In practice, for any intraoral application, it is the first consideration and a hard filter not a weighted factor. A resin that is not cleared for the specific intraoral application you are using it for is not an option for that application regardless of how attractive its dimensional accuracy, surface finish, or price point might be. The regulatory landscape in the United States requires FDA clearance for dental devices intended for intraoral use. The classification matters: Class I, Class II, and Class III each represent different levels of regulatory scrutiny and different intended use definitions. A surgical guide resin carries a Class I clearance for its specific application. A denture base resin has a different classification and different compliance documentation. These are not interchangeable. Printer Validation The Factor Most Guides Skip The same resin will produce different results on different printers, even if both printers operate at the same wavelength. This is because curing behaviour depends on the interaction between the resin chemistry and the specific light source intensity, layer exposure time, lift speed, and build platform characteristics of a given printer model. Resins that have been validated and optimised for a specific printer configuration will consistently outperform resins used without validated settings on the same machine. Most professional dental resin manufacturers publish validated print profiles for specific printer models. Before selecting a resin, confirm that validated settings exist for your printer. If they do not, factor in the time and material cost of developing and validating settings yourself which is achievable but adds meaningful setup time. For labs considering sourcing zirconia dental blanks alongside their resin inventory, the same principle applies: validated milling parameters for specific mill-resin combinations produce better marginal accuracy and surface quality than default settings. What to Look For While Choosing a Supplier? Choosing the right resin is inseparable from choosing the right supplier. The resin category is not immune to the quality variation common to dental lab materials generally, and buying from a supplier with strong quality control, consistent batch performance, and genuine technical support matters practically. The qualities to look for in a dental lab material supplier for 3D printing resins: Verified regulatory status — the supplier should be able to provide FDA clearance documentation for their intraoral resins. This is not optional. Batch consistency — ask specifically about batch-to-batch colour, viscosity, and mechanical property consistency. In high-volume labs running hundreds of cases per month, batch variation creates downstream problems that are expensive to troubleshoot. Validated printer profiles — a supplier that has invested in validating their resins across multiple printer platforms is easier to work with and produces more predictable results than one that simply states 385/405nm compatibility without validated settings. Technical support — when print problems arise and they will, particularly during workflow setup or when introducing a new resin access to knowledgeable technical support that can help diagnose the issue quickly is genuinely valuable. Full portfolio — labs benefit from being able to source model resins, splint resins, surgical guide resins, and castable resins from a single supplier with consistent product standards. Managing multiple supplier relationships for different resin categories adds administrative overhead and introduces the risk of compatibility issues between different workflow components. ZirconiaGuys stocks the complete Keystone KeyPrint and Whip Mix VeriRESIN lines alongside zirconia blank and zirconia block materials from UPCERA and Aidite covering the full range of resin and milled material needs for a complete digital lab workflow from a single US-based supplier.
Learn more
What Is Dental Resin for 3D Printing? A Beginner’s Guide
3D printing has moved from a novelty to a standard production tool in dental labs faster than most expected. And at the centre of every dental 3D printing workflow is the resin the photosensitive liquid material that the printer converts, layer by layer, into a finished appliance or model. If you're new to 3D printing in dentistry or evaluating whether to add it to an existing milling workflow, understanding what dental resin is and how it works is the right starting point. This guide covers the fundamentals clearly what dental resin is, how it cures, the different types and what each one is for, how printing compares to milling, and what the post-processing requirements look like. It's written for lab technicians, lab owners, and clinicians who want a practical understanding rather than a product pitch. What dental resin for 3D printing actually is? Dental resin for 3D printing is a photopolymer a liquid monomer mixture that undergoes polymerisation (chain-linking into a solid polymer network) when exposed to light at a specific wavelength, typically 385nm or 405nm UV-visible light. The printer exposes the liquid resin in precise patterns, curing it layer by layer until the complete three-dimensional object is formed. The base chemistry of most dental resins involves methacrylate monomers the same monomer family used in conventional dental acrylics combined with photoinitiators that trigger polymerisation on light exposure, diluent monomers that control viscosity and handling properties, and inorganic fillers that improve mechanical properties in higher-performance formulations. What distinguishes dental resins from general-purpose 3D printing resins is biocompatibility formulation, clinical-grade accuracy requirements, and regulatory compliance. Dental resins used for intraoral applications temporary crowns, surgical guides, splints must meet biocompatibility standards (ISO 10993) and in the US market, FDA 510(k) clearance for the specific clinical indication. Not all 3D printing resins marketed to dental labs meet these requirements, and the distinction matters clinically. How dental 3D printing works: SLA vs. DLP Most dental 3D printers use one of two light-curing technologies. Understanding the difference helps when evaluating which platform suits a lab's workflow. SLA (stereolithography) uses a single laser point that traces each layer precisely across the resin surface. The point-source nature of the laser produces very fine detail and smooth surfaces particularly valuable for surgical guides and diagnostic models where marginal accuracy is the primary criterion. Formlabs' Form 3B is the most widely used SLA dental printer, with 25-micron XY resolution. The tradeoff is speed tracing each layer point-by-point is slower than curing an entire layer at once. DLP (digital light processing) projects a complete image of each layer onto the resin surface simultaneously, curing the entire layer at once. This makes DLP significantly faster than SLA a meaningful production advantage in labs running multiple units daily. The image projection can introduce slight edge distortion at the boundary of the build platform, which makes calibration and build platform positioning more important than in SLA systems. Most high-volume dental lab printers use DLP. For most dental lab applications models, temporaries, splints both technologies produce clinically acceptable results when calibrated correctly. The accuracy difference matters most in surgical guide applications where implant angulation tolerances are tight. The main types of dental resin and what each is for This is where beginner confusion is most common. "Dental resin" isn't a single material it's a product category covering several formulations with very different properties, indications, and regulatory status. Model resin The most widely used resin in dental labs. 3D printing dental model resin is formulated for producing accurate diagnostic casts, study models, aligner models, and working models for removable appliance fabrication. The primary requirements are dimensional accuracy, surface detail, and hardness the model needs to survive handling and thermoforming without deforming. Model resins are not biocompatible for intraoral use they're designed for indirect contact only. Using a model resin to produce a temporary crown or splint is a clinical error that labs new to 3D printing sometimes make. The biocompatibility status of every resin should be verified against its intended use before clinical application. Surgical guide resin Surgical guide resins are biocompatible formulations designed for guides placed intraorally during implant surgery to control drill angulation and depth. These resins must be optically clear the surgeon needs to verify drill positioning visually and mechanically rigid enough to maintain guide accuracy under surgical drilling forces. Regulatory clearance for intraoral use is mandatory. Most clinical protocols also require sterilisation compatibility, which should be verified for the specific resin before clinical use. Temporary crown and bridge resin Temporary C&B resins are biocompatible formulations for short-to-medium-term intraoral wear temporary crowns and bridges during healing or waiting periods. They need adequate flexural strength (typically 80–120 MPa for most temporary applications), shade availability across standard prescriptions, and surface finish that resists staining over the wearing period. It's worth noting that milled PMMA from industrial-grade pre-polymerised blanks produces better mechanical properties and lower porosity than most 3D-printed temporary resins particularly in fatigue resistance and surface hardness. For longer-term temporaries worn during implant integration (three to six months), milled PMMA is clinically the more durable choice. 3D-printed temporary resins have a throughput advantage for batch production of short-term temporaries. Splint and night guard resin Splint resins produce occlusal appliances night guards, occlusal splints, and bruxism appliances. They need to balance hardness (to resist wear under parafunctional load) with some flexibility (to allow chairside adjustments without fracturing). Some formulations are available in hard and soft variants for different clinical requirements. Denture resin Denture base resins produce the acrylic base of full and partial dentures. The requirements include tissue-matching gingival shades, dimensional stability during post-processing, and mechanical properties adequate for long-term prosthetic use. For labs running denture workflows in both 3D printing and milling, the Aidite Denture Base PMMA milling disc is an alternative approach producing denture bases with lower porosity and better dimensional accuracy than most printed alternatives in labs with existing CAD/CAM milling capability. Clear and diagnostic resin Clear resins serve diagnostic and orthodontic applications whitening trays, thermoforming templates, clear retainer models, and diagnostic mockups where optical transparency is required. For labs needing a clear milled alternative, the Aidite Clear PMMA disc provides a transparent milling option compatible with standard open-system CAD/CAM platforms. Post-processing: the step labs underestimate A printed dental resin part is not finished when it comes off the printer. Every photopolymer resin used in dental 3D printing requires two post-processing steps before clinical use, and skipping or shortchanging either produces inferior results and potential biocompatibility issues. Washing removes uncured liquid resin from the surface and interior of the printed part. This is typically done in isopropyl alcohol (IPA) or a purpose-formulated resin wash solution, using a dedicated wash unit for consistent results. Insufficient washing leaves residual monomer on the surface in biocompatible applications, this creates tissue sensitivity risk. It also affects surface finish and adhesion of characterisation materials. Post-curing uses UV light exposure in a dedicated curing unit to complete polymerisation throughout the part. Without post-curing, the printed resin retains a proportion of unreacted monomer that reduces mechanical properties flexural strength, hardness, and wear resistance all increase with proper post-curing. Most manufacturers specify the curing time and light intensity required for their resin, and those parameters should be followed exactly. Overcuring can cause colour shift and brittleness in some formulations; undercuring leaves the part mechanically and biologically suboptimal. 3D printing vs. milling: how they fit together in a dental lab For labs evaluating whether to add 3D printing to an existing zirconia milling workflow, the right frame is complementarity rather than competition. Each technology handles different parts of the production spectrum better than the other. Milling from zirconia dental material whether a zirconium block for single units or a zirconia disc for multi-unit production produces permanent restorations with mechanical properties that no current 3D-printed resin approaches. High-strength 3Y-TZP zirconia reaches 900–1,200 MPa. Even the best 3D-printed crown resin reaches 150–200 MPa. For permanent crowns, bridges, and implant prostheses, zirconia blanks milled via CAD/CAM remain the clinical standard and zirconia blocks price is appropriate for a permanent restoration with a 10-15 year expected lifespan. 3D printing adds value in the applications that milling handles less efficiently: high volumes of diagnostic models where batch production overnight is more efficient than individual milling cycles; complex surgical guides with internal channels that milling tools can't reach; orthodontic models at scale for aligner fabrication; and multi-unit temporary appliances where the speed of printing and the complexity of form suits additive manufacturing better than subtractive. The practical implication for most digital labs: milling handles permanent restorations (zirconia multilayer for anterior aesthetic work, high-strength zirconia for posterior and implant cases), and 3D printing handles models, guides, temporaries at volume, and orthodontic applications. Stocking both workflows zirconia blanks in the milling system and appropriate resins in a validated printer covers the complete clinical range of a modern digital dental lab. Regulatory and biocompatibility basics every lab should know Every dental resin used for patient-contact applications in the US requires FDA 510(k) clearance for that specific indication. "Biocompatible" on a product label is not the same as FDA-cleared for intraoral use the regulatory documentation should specify the cleared indication explicitly. In practice, this means labs should verify the regulatory status of each resin product for each application before clinical use. A model resin cleared for indirect contact is not cleared for use as a temporary crown. A surgical guide resin cleared for single-use intraoral application may not be cleared for sterilisation-dependent reuse. These distinctions are the lab's clinical and legal responsibility, not just the resin manufacturer's. Getting started: what labs need to evaluate For labs new to 3D printing, the evaluation sequence that makes sense is: define which applications the printer will serve; select a printer platform validated for those applications; then select resins validated for that printer and those clinical indications not the other way around. Printer compatibility constraints often narrow resin choices significantly, which is one reason open-system printers (those that accept third-party resins with appropriate exposure profiles) provide more sourcing flexibility than closed systems tied to proprietary resin lines. For labs with existing milling capability, 3D printing can be added incrementally. Start with model printing the lowest regulatory barrier, the most forgiving application, and the one that creates immediate workflow value for aligner and removable appliance cases. Once the printing and post-processing workflow is consistent, expand to more demanding applications with appropriate resin validation. Zirconia Guys supplies both Aidite zirconia and resin-adjacent PMMA materials including milled PMMA alternatives for labs that want to run temporary and denture workflows on existing milling equipment rather than adding a separate printing system. Get in touch with the team to discuss which combination of milling materials and printing resins suits your lab's case mix and current equipment.
Learn more
Understanding Dental 3D Printer Resin Types: A Guide for Dental Professionals
The resin you select for your dental 3D printer matters more than the printer itself in determining clinical outcomes. Printer hardware establishes the resolution ceiling and build volume. The resin determines whether the printed part is biocompatible for the intended application, mechanically adequate for the clinical load it will face, and chemically stable enough to behave consistently across batches. A correctly specified resin on a mid-range printer outperforms a misspecified resin on a premium system every time. The range of dental 3D printing resins now available each formulated for a specific clinical indication reflects how far the technology has matured since early model resins were the only option. For dental professionals evaluating which resins to stock or how to expand a 3D printing workflow, understanding the distinctions between resin types is the essential starting point. This guide covers each category in technical depth, including the properties that matter most and where the limits of each type lie. The core principle: resin type follows clinical indication The most common resin specification error in dental labs is selecting a resin by price or by printer compatibility alone, without reference to the specific clinical indication. A model resin that produces excellent diagnostic casts is not cleared for intraoral use and should never be used for temporary crowns. A splint resin that works well for night guards is not the same material as a surgical guide resin, despite both being "biocompatible." These distinctions have clinical and regulatory consequences. The correct selection sequence is: define the clinical application first, identify the required properties and regulatory status for that application, then select a resin that meets those requirements and is validated for your specific printer. Every other consideration cost, brand preference, printer ecosystem is secondary to this sequence. Model resins: the foundation of every 3D printing workflow Key model resin and its equivalents represent the highest-volume resin category in most dental labs. Model resins are formulated for dimensional accuracy, surface detail, and hardness the combination required to produce diagnostic casts, working models for removable appliances, and implant analog models that survive handling and thermoforming without deforming. The critical clinical properties for model resins are dimensional accuracy (typically specified as deviation from the digital reference within ±100 μm or better for clinically acceptable models), surface hardness (Shore D values typically above 80), and adequate stiffness for use as a thermoforming base. Heat resistance matters specifically for thermoforming applications a model that deforms under thermoforming temperature and pressure produces inaccurate appliances regardless of its print accuracy. Model resins are not biocompatible for intraoral use. This is the most frequently misunderstood constraint in labs new to 3D printing. Model resins are tested and cleared for indirect contact the model touches the appliance, not the patient not for direct patient contact in the mouth. Using a model resin as a temporary crown is a regulatory and clinical error. Orthodontic model resins: accuracy as the primary requirement Orthodontic model printing is one of the highest-volume 3D printing applications in modern dental labs, driven by in-house clear aligner fabrication. The orthodontic model printing resin category is distinct from general model resin in one important respect: the printed model is used directly as a thermoforming substrate for aligner sheets. This imposes stricter requirements on dimensional accuracy, heat resistance, and surface smoothness than standard diagnostic model work. For orthodontic aligner production, the dimensional accuracy of the model directly determines the fit of the printed aligner. A model with 200 μm of systematic error produces an aligner with equivalent fit error which compounds across a series of 20–30 aligners in a treatment plan. Resins validated specifically for orthodontic models are tested for thermoforming accuracy under the temperatures and pressures used in standard aligner production equipment (typically 120–140°C for vacuum thermoforming). General model resins may not meet these specifications. Orthodontic model resins also typically offer a smooth, hard surface finish that allows aligner sheets to release cleanly without tearing or distorting. A surface that's too rough or too soft produces aligner seams and edge inaccuracies that require chairside trimming. Surgical guide resins: precision and sterilisation compatibility Surgical guide resins are among the most technically demanding resin categories. A surgical guide placed intraorally during implant surgery must be optically clear (for visual verification of positioning), dimensionally accurate (the sleeve positions the drill at the planned angulation and depth), mechanically rigid under surgical drilling forces, and biocompatible for intraoral use. Sterilisation compatibility is the constraint most often overlooked. Most dental surgical guide workflows require the guide to be autoclaved before intraoral use. Standard biocompatible resins that have not been specifically validated for autoclave sterilisation may warp, discolour, or mechanically degrade under steam sterilisation temperatures (134°C). Any resin specified for a surgical guide that will be autoclaved must carry explicit manufacturer validation for that sterilisation method at those temperatures and cycle times. Transfer accuracy how faithfully the guide translates the planned implant position to the actual drill position is the key clinical outcome measure for surgical guides. Published studies report that resin selection and post-curing protocol account for a significant proportion of the transfer accuracy variance, separate from the printer hardware. [2] Resins with higher Young's modulus (stiffer) typically show better guide stability under drill pressure, which directly affects transfer accuracy. Temporary crown and bridge resins: matching strength to wear duration Temporary C&B resins are biocompatible formulations for short-to-medium-term intraoral wear temporary crowns, bridges, and veneers worn while permanent restorations are fabricated or during implant integration periods. The clinical requirements are adequate flexural strength (typically 80–120 MPa for most temporary applications), shade availability, surface hardness for stain resistance, and wear resistance over the planned temporisation period. The performance gap between 3D-printed temporary resins and milled PMMA is clinically relevant for longer-term temporisation. For an implant temporary worn for three to six months, milled PMMA from industrial-grade pre-polymerised blanks produces better fatigue resistance and lower surface porosity than most 3D-printed equivalents characteristics that matter across months of daily functional loading. For short-term temporaries (days to a few weeks), the 3D-printed approach has throughput and form-complexity advantages that typically outweigh the mechanical property difference. Post-curing completeness is the variable most directly under a lab's control for printed temporary resins. Incompletely post-cured temporary resin retains residual monomer that reduces mechanical properties and in an intraoral application, may cause soft tissue sensitivity reactions. Following the manufacturer's specified wash and cure protocol exactly is the most important quality control step in temporary resin workflows. Splint and night guard resins: the hardness vs. flexibility balance Splint resins produce occlusal appliances night guards, occlusal splints, and bruxism appliances. The defining clinical challenge is that these appliances face opposing requirements: they need to be hard enough to resist wear under parafunctional load (which can exceed normal biting forces by a factor of three to five in heavy bruxers), and flexible enough to survive chairside adjustment without fracturing. Hard splint resins typically reach Shore D hardness values above 85, with flexural strength in the 100–150 MPa range. They resist wear well but can fracture if over-adjusted. Flexible splint resins sacrifice some hardness for improved impact resistance and adjustability. Most labs stock both and select based on the patient's bruxism severity and the clinician's preference. Clear resins used for soft splints and thermoformed appliances have different requirements again optical clarity for aesthetics in night guards that patients will wear visibly, and biocompatibility for extended intraoral use. Clarity must be maintained after post-curing and polishing, and some resins yellow or cloud over time under UV exposure a relevant factor for patients who wear appliances in daylight conditions. Denture resins: a two-component challenge Full denture fabrication via 3D printing involves two separate resin categories: denture base resin (for the gingival-toned acrylic base) and denture teeth resin (for the tooth-coloured prosthetic teeth). Both must be biocompatible for extended intraoral wear, and both must be colour-stable over years of use a requirement that many resins fail to meet adequately. Printed denture bases offer better dimensional accuracy than conventionally processed acrylic and lower porosity than many PMMA alternatives which has tissue health implications for patients wearing the prosthesis long-term. The fit accuracy advantage of printed denture bases over conventional processing is well-documented. For labs with existing milling capability that want to produce denture bases without a separate printing workflow, the Aidite Denture Base PMMA disc is a proven milled alternative producing accurate, low-porosity denture bases on the same CAD/CAM platform used for dental zirconia, without the post-processing requirements of 3D-printed resin. Castable resins: for metal-casting workflows Castable resins produce patterns for lost-wax metal casting used to fabricate metal crowns, bridges, and partial denture frameworks via investment casting. The primary requirement is clean, complete burnout: the resin must leave no ash or residue in the investment after burnout, which would contaminate the cast metal. Incomplete burnout produces porosity and surface defects in the final casting. This resin category is the most technically specific in terms of processing requirements. Burnout temperature profiles must follow the resin manufacturer's validated schedule precisely deviations produce inconsistent results. Castable resins are also the most sensitive to overcuring during post-processing, which can cross-link the polymer structure in ways that resist clean burnout. How 3D printing resins fit alongside dental zirconia in a complete lab For dental professionals building or evaluating a digital lab workflow, the right frame is complementarity 3D printing resins and dental zirconia blocks handle different parts of the production spectrum. Dental zirconia whether as zirconia blocks for single-unit cases or dental zirconia discs for multi-unit production handles permanent restorations where mechanical performance over 10–15 years is the requirement. High-strength 3Y-TZP dental zirconia reaches 900–1,200 MPa. No current 3D-printed resin approaches that mechanical range for permanent use. Zirconia dental blanks milled via CAD/CAM remain the clinical standard for permanent crowns, bridges, and implant prostheses. For labs evaluating dental lab materials across both technologies, zirconia blocks dental labs use daily remain irreplaceable for the permanent restoration category. 3D printing adds genuine value in the applications zirconia milling handles less efficiently: high-volume model production for orthodontic aligner workflows, complex surgical guides with internal channels, batch production of short-term temporaries, and orthodontic appliances requiring patient-specific geometry. The two workflows together zirconia blanks for permanent and resin printing for models, guides, and temporaries cover the complete scope of a modern digital dental lab. As a North American dental lab material supplier stocking both dental zirconia and resin-adjacent PMMA materials, Zirconia Guys covers the milling side of this equation across Aidite and UPCERA ranges. Get in touch with the team to discuss which dental lab materials suit your workflow, case mix, and milling system.
Learn more
Why High-Strength PMMA Blocks Are Used for Temporary Restorations?
A temporary restoration has a specific job: protect the prepared tooth or implant site, maintain occlusion, preserve aesthetics, and condition the soft tissue emergence profile all while the permanent restoration is being fabricated or while an implant integrates with bone. It's a functional role that can span a few days or several months, and the material it's made from needs to be appropriate to that role. High-strength PMMA blocks have become the standard for milled temporary restorations in digital dental labs because they serve that role better than the alternatives not because they're the strongest material available, but because their combination of properties fits the clinical requirement precisely. This guide explains why, with the technical context that sourcing and clinical decisions need to be grounded in. For labs specifying PMMA teeth and temporary restorations alongside dental zirconia permanent cases, the distinction between what PMMA does and what zirconia does is the most important framework to understand. What "high-strength" means for PMMA blocks and what it doesn't? The term "high-strength" in PMMA blocks refers to the improvement in mechanical properties achieved by milling from industrially pre-polymerised blanks rather than processing conventional powder-liquid acrylic. It does not mean the material approaches the strength of ceramic or zirconia and understanding that distinction prevents misspecification. Industrial-grade milled PMMA blocks achieve flexural strength of 80–120 MPa, with lower variance and better consistency than conventionally processed acrylic. That strength range is adequate for: Temporary crowns and bridges worn days to weeks while a permanent restoration is fabricated Implant temporaries worn during osseointegration (3–6 months) Long-term provisionals in complex full-mouth rehabilitation cases Diagnostic wax-up equivalents for patient evaluation It is not adequate for permanent posterior crowns, bruxism patients under heavy parafunctional load, or any case where the restoration is expected to function permanently without replacement. For those cases, dental zirconia in zirconia blocks or dental zirconia discs is the correct specification. The two materials are complementary, not interchangeable. Why milled PMMA blocks outperform conventional acrylic for temporaries? Most labs running digital workflows have already made the switch from conventional acrylic temporaries to milled PMMA, but it's worth being explicit about why particularly for labs evaluating the transition. Residual monomer is substantially lower. Conventional powder-liquid acrylic retains residual methyl methacrylate monomer from incomplete polymerisation. Residual monomer leaches into the oral environment and is the primary cause of tissue sensitivity reactions associated with acrylic temporaries. Industrial PMMA blocks are fully polymerised before machining the monomer has already reacted, and there is essentially none left to leach. For implant temporaries placed adjacent to healing tissue, this is a meaningful clinical advantage. Porosity is significantly reduced. Conventionally processed acrylic develops microporosity during the polymerisation and curing process. This porosity provides sites for bacterial colonisation and stain absorption. Milled PMMA from dense industrial blanks has a non-porous, smooth surface that resists both directly relevant for temporaries placed adjacent to soft tissue during a healing period where microbial load management matters. Dimensional accuracy is better. Conventional acrylic processing introduces polymerisation shrinkage that complicates fit. The restoration has to be adjusted chairside to compensate. Milled PMMA is cut from a dimensionally stable blank to CAD specifications the restoration comes off the machine at the intended dimensions. Initial fit is better, chairside adjustment time is lower, and the tissue-conditioning profile of an implant temporary is more precisely maintained. Mechanical consistency is higher. Conventional processing produces variation in polymerisation completeness across the restoration. Pre-polymerised PMMA blocks have homogeneous properties throughout the flexural strength measured at any point across the blank is consistent. That consistency translates to more predictable clinical performance over the service life of the temporary. Why PMMA is chosen over zirconia for temporary restorations? The question of why labs use PMMA instead of zirconia for temporaries has a simple answer: the clinical role of a temporary restoration doesn't require zirconia's properties, and zirconia's properties are actually disadvantageous for a temporary. Adjustability. A sintered dental zirconia crown whether milled from zirconia blocks dental labs run for permanent work or from dental zirconia discs cannot be meaningfully adjusted chairside. It can be spot-ground to a limited degree, but the hardness that makes zirconia clinically valuable as a permanent material makes it impractical for a temporary that needs to be modified as tissue heals, as the patient's bite settles, or as the clinician refines the emergence profile of an implant case. PMMA trims and polishes with standard chairside instruments in minutes. Cost proportionality. A permanent zirconia crown from a zirconia blank is designed for 10–15 years of clinical service. A temporary restoration is designed to be replaced after weeks or months. Specifying a permanent-grade dental zirconia material for a case that will be followed by a permanent restoration uses a high-cost material for a temporary purpose. PMMA at significantly lower cost per unit than any zirconia dental material is economically correct for the clinical role. Shock absorption during healing. PMMA's lower stiffness compared to sintered zirconia dental blanks provides a degree of force dampening during the osseointegration period. While occlusal design is the primary protection for a healing implant, the material's compliance contributes to a more forgiving mechanical environment during the period of greatest vulnerability. Turnaround speed. PMMA mills in a fraction of the time required for zirconia, with no sintering step. A temporary crown can be designed, milled, finished, and delivered in a single clinical session. Dental zirconia even with fast-fire sintering requires a furnace cycle of at least 90 minutes. For same-day temporary delivery, PMMA is the practical choice. Clinical applications that require high-strength PMMA blocks specifically Implant temporization during osseointegration The clinical case for high-quality PMMA blocks is strongest in implant temporization. During the three-to-six-month osseointegration period, the temporary crown worn by the patient actively shapes the soft tissue emergence profile that the permanent crown will inherit. A poorly fitting or incorrectly contoured temporary creates a soft tissue environment that complicates the permanent restoration tissue that hasn't been correctly conditioned requires additional procedures to correct. A milled PMMA temporary from a digital design file replicates the planned permanent restoration geometry precisely. The soft tissue emergence, interproximal contacts, and occlusal design established by the temporary are the same as what the permanent dental zirconia restoration will occupy. This eliminates one of the most common sources of difficulty at permanent crown delivery: a tissue environment that doesn't match the planned restoration because the temporary was made differently. Full-mouth rehabilitation provisionals Complex full-arch cases whether implant-supported or tooth-supported often require long-term provisionals while the occlusal scheme is verified and the patient adapts to the new vertical dimension. These provisionals can be worn for months. High-strength PMMA blocks provide the durability needed for extended provisional service, and the material can be repaired or modified in the lab if changes are needed during the verification period. Anterior aesthetic provisionals For anterior cases where the temporary will be worn in a visible position for weeks or months, single-shade PMMA looks flat next to natural teeth. Multilayer PMMA blocks address this by building a colour gradient into the blank itself the cervical is deeper and more saturated, the incisal lighter and more translucent. The result is an anterior temporary that satisfies patient expectations during the provisional period without requiring additional chairside characterisation work. The temporary crowns Aidite PMMA multilayer disc is designed for exactly this indication pre-shaded across standard VITA shades with a gradient built in, milling on standard open-system CAD/CAM platforms. Denture try-ins and diagnostic bases Before committing to a final milled denture base, many complete denture workflows include a diagnostic trial a full-contour PMMA try-in that allows the clinician and patient to verify aesthetics, occlusion, and phonetics in the mouth before the definitive prosthesis is processed. High-strength PMMA blocks produce these try-ins accurately from a digital design, and the same blank type used for the try-in can transition directly to the final denture base in the same workflow. The Aidite Denture Base PMMA covers this application a high-density milling disc formulated for denture base workflows with consistent gingival shade matching across batches. Choosing the right PMMA block: key specifications to evaluate Not all PMMA blocks in the dental lab materials market perform consistently. The specifications that matter most for clinical reliability are: Flexural strength. The meaningful range for a temporary restoration is 80–120 MPa. Within that range, variance across the blank is more important than the peak figure a block with consistent 90 MPa throughout is more clinically reliable than one with a peak of 120 MPa and significant variation. Ask for batch data, not just headline specs. Residual monomer content. For any PMMA in contact with oral tissue particularly implant temporaries adjacent to healing bone and mucosa residual monomer should be as low as possible. Industrial-grade pre-polymerised blanks from established manufacturers meet this requirement. Cheaper blanks may not disclose residual monomer data. Shade stability across batches. Pre-shaded PMMA should produce the same shade outcome after milling on batch 50 as it did on batch 1. Shade drift between deliveries forces labs to reverify every new shipment eliminating the efficiency benefit of pre-shaded material. CAD/CAM compatibility. PMMA blocks need to fit the milling system's chuck dimensions and match the cutting parameters for carbide tooling. All Aidite PMMA products are open-system compatible with major platforms including Roland, vhf, and Imes-icore the same platforms most labs already use for their dental zirconia discs and zirconia blocks dental workflows. How PMMA blocks fit into the complete digital lab workflow? In a complete digital dental lab, PMMA and dental zirconia operate in sequence: PMMA for temporaries and diagnostic work, zirconia dental blanks for the permanent restorations that follow. The two materials run on the same CAD/CAM equipment, from the same digital design files, requiring only a material and tooling change between temporary and permanent production runs. Labs that have integrated this workflow report cleaner handoffs between provisional and permanent phases, fewer surprises at permanent crown delivery, and less chairside adjustment time overall. The PMMA temporary establishes and verifies the clinical parameters; the dental zirconia permanent restoration inherits an environment that's been correctly prepared. Zirconia Guys stocks the complete Aidite PMMA range multilayer, denture base, and clear variants alongside Aidite and UPCERA dental zirconia in blocks and disc formats, covering the full digital workflow from provisional to permanent from a single dental lab material supplier. Get in touch with the team to discuss which PMMA formats and zirconia dental materials suit your milling system and case mix.
Learn more
PMMA Dental Prosthetics: Benefits and Considerations
Polymethyl methacrylate has been a foundational dental prosthetics material since the 1940s introduced as a replacement for vulcanite rubber denture bases, it quickly became the standard because it offered biocompatibility, processability, and acceptable aesthetics in a single material. In the decades since, every major shift in dental technology has been accompanied by an updated role for PMMA: from conventional heat-cured processing to CAD/CAM milling to 3D printing. The material has adapted rather than been replaced, and for good clinical reason. This guide covers what makes PMMA dental prosthetics clinically valuable its genuine benefits, the applications where it performs best, the considerations that limit its use, and how it integrates with dental zirconia and other dental lab materials in a complete digital workflow. For labs and clinicians specifying PMMA teeth and prosthetics, this is the practical context that sourcing decisions need to be grounded in. What makes PMMA well-suited for dental prosthetics? PMMA's sustained presence in dental prosthetics isn't inertia it reflects a genuine fit between the material's properties and the clinical demands of the applications it covers. Published prosthodontic research identifies five properties as the foundation of PMMA's clinical utility: Low density.PMMA is considerably lighter than ceramic, metal, or composite alternatives. For full-arch dentures where the patient wears the prosthesis continuously the weight difference directly affects comfort, retention, and the muscular effort required for daily use. A full upper denture in milled PMMA is noticeably more comfortable to wear than a heavier alternative, and patient-reported satisfaction with denture weight is consistently linked to prosthesis retention. Aesthetic quality.PMMA's optical properties allow it to be manufactured in shades that closely replicate tooth enamel and gingival tissue. In multilayer formats, the colour gradient built into the blank produces natural-looking PMMA teeth and denture bases without extensive manual characterisation. For prosthetics that patients wear visibly and interact with socially, this aesthetic competence is clinically essential. Biocompatibility.Properly polymerised PMMA is well-tolerated by oral mucosa. Residual monomer in incompletely processed conventional acrylic can cause tissue sensitivity, but milled PMMA from pre-polymerised industrial blanks where polymerisation is complete before the blank is machined essentially eliminates this concern. The residual monomer content of milled PMMA is substantially lower than conventionally processed acrylic. Ease of fabrication and adjustment.PMMA machines on standard CAD/CAM equipment, adjusts chairside with standard instruments, and repairs with additional acrylic. No sintering furnace, no press cycle, no specialist equipment beyond what a modern digital lab already owns. That fabrication simplicity translates directly into workflow efficiency and lower per-unit production cost. Cost-effectiveness.Across the dental lab materials spectrum, PMMA is one of the most economical options per unit of finished prosthetic surface. For applications where the material's mechanical limitations aren't clinically constraining temporaries, dentures, provisionals this cost profile makes PMMA the correct specification economically as well as clinically. Clinical applications: where PMMA prosthetics perform best Complete and partial dentures Full and partial dentures represent PMMA's longest-standing clinical role and remain the application where its properties align most comprehensively with the clinical requirement. The combination of low weight, gingival shade availability, adjustability, and reparability makes PMMA the standard denture base material in most labs globally. Milled PMMA denture bases from high-density industrial blanks offer meaningful improvements over conventionally processed acrylic: lower porosity, better dimensional accuracy, and more consistent mechanical properties across the base. Lower porosity reduces bacterial infiltration into the denture material over time an important hygiene consideration for patients who wear the prosthesis continuously. The Aidite Denture Base PMMA is formulated specifically for milled denture workflows a high-density disc producing dimensionally accurate bases with consistent gingival shade matching across batches. Temporary crowns and bridges PMMA temporary crowns and bridges cover two clinical scenarios: short-term temporaries placed for days or weeks while a permanent restoration is being fabricated, and longer-term implant temporaries worn during osseointegration. The clinical demands differ between these two uses, and the PMMA product specification should reflect that. Short-term temporaries can be fabricated from standard single-shade PMMA the aesthetic requirement is low, the duration is short, and chairside adjustability matters more than shade precision. Implant temporaries worn for three to six months require more attention: the right emergence profile to condition soft tissue, adequate strength for the healing period, and acceptable aesthetics particularly in anterior positions. Multilayer PMMA is the appropriate specification for visible anterior implant temporaries the colour gradient built into the blank produces a result that satisfies patient expectations without additional chairside characterisation. Anterior PMMA teeth for dentures and prosthetics PMMA teeth the individual tooth-shaped components set into denture bases are a distinct product category from PMMA denture bases. Pre-fabricated PMMA teeth offer shade-matched, anatomically accurate tooth forms that are bonded to the base material. In digital denture workflows, PMMA teeth can also be milled directly from multilayer blanks as part of the denture unit eliminating the separate tooth-setting step and producing a monolithic prosthesis with better interfacial bond strength. For labs producing milled anterior sections, the Aidite Multilayer PMMA disc covers both temporary crown and anterior denture tooth applications the gradient shading produces natural colour transitions from cervical to incisal in a single milling operation, appropriate for both aesthetic provisionals and visible anterior denture sections. Orthodontic appliances and splints PMMA's rigidity and dimensional stability make it suitable for removable orthodontic appliances, retainers, and occlusal splints where rigidity is the clinical requirement. It adjusts easily for activation and trimming, and the material's history in these applications is well-established across decades of clinical use. Benefits of milled PMMA over conventionally processed acrylic The transition from conventionally processed acrylic to milled PMMA from pre-polymerised blanks represents a genuine clinical improvement rather than a workflow preference. The differences are measurable: Residual monomer content — conventional acrylic processed in powder-liquid systems retains residual methyl methacrylate monomer that can leach into the oral environment. Milled PMMA from industrial blanks has essentially completed polymerisation before machining, substantially reducing residual monomer and the tissue sensitivity risk it carries. Porosity — conventionally processed acrylic develops microporosity during processing that provides sites for bacterial colonisation and stain absorption over time. Milled PMMA from dense industrial blanks has a non-porous surface that resists both relevant for dentures worn continuously and for temporaries in implant sites where soft tissue health is the priority. Dimensional accuracy — conventional heat-curing introduces processing shrinkage that affects fit. Milled PMMA is cut to CAD specifications from a dimensionally stable blank, producing restorations that fit the digital model accurately without the shrinkage compensation required for processed acrylic. Fewer chairside adjustments and better initial fit are consistent outcomes of the milled workflow. Mechanical consistency — milled PMMA has homogeneous mechanical properties throughout the blank, whereas conventionally processed acrylic can vary in polymerisation completeness and therefore in strength across the restoration. Flexural strength of properly milled industrial PMMA averages 80–120 MPa with lower variance than conventional processing. Key considerations: where PMMA has limitations Honest clinical use of PMMA requires understanding where its properties are insufficient as well as where they're appropriate. Flexural strength is not adequate for permanent posterior crowns.At 80–120 MPa, PMMA cannot withstand permanent posterior occlusal loading. Dental zirconia whether as zirconia blocks dental labs use for single units or dental zirconia discs for multi-unit production provides the 900–1,200 MPa needed for permanent posterior restorations. Using PMMA as a permanent crown material in posterior positions is a clinical error, not an economy. Wear resistance is lower than ceramic.PMMA abrades faster than zirconia dental blanks or lithium disilicate under occlusal contact. For temporary restorations this is acceptable the material is designed to be replaced. For long-term denture bases where the opposing dentition is ceramic, wear management through occlusal design is important. Long-term colour stability requires quality material.PMMA can absorb water and stain over time if the base material quality is poor. Industrial-grade milled PMMA from established manufacturers shows better colour stability than lower-grade alternatives, which is one of the strongest arguments for sourcing from a reliable dental lab material supplier rather than optimising purely on unit price. Temporary doesn't mean indefinite.Implant temporaries are designed for the osseointegration period typically three to six months. Extended wear beyond the clinical indication reduces both aesthetic and mechanical performance. Labs should communicate the intended service life in crown delivery documentation. PMMA prosthetics alongside dental zirconia: the complete workflow In a complete digital dental lab, PMMA and zirconia dental lab materials aren't alternatives they're sequential. PMMA handles the prosthetic and temporary phases: dentures, implant temporaries, diagnostic provisionals, orthodontic appliances. Dental zirconia in zirconia blocks for single units or dental zirconia discs for multi-unit production handles the permanent crown and bridge work that follows the provisional phase. Labs that run both from the same digital workflow same scan, same design file, different material at milling produce cleaner handoffs between temporary and permanent phases. The PMMA temporary establishes the occlusion and emergence profile; the zirconia dental restoration inherits a tissue environment that's been correctly conditioned. This sequencing produces better permanent restoration outcomes than skipping the PMMA provisional phase entirely. Zirconia Guys stocks the full Aidite PMMA rang multilayer discs, denture base PMMA, and clear variants alongside Aidite and UPCERA zirconia blanks and zirconia dental discs, covering the complete digital workflow from provisional to permanent from a single supplier. Get in touch with the team to discuss which PMMA products and zirconia grades suit your lab's case mix and milling system.
Learn more
Why Implant Patients May Need a Night Guard After Restoration?
Getting a dental implant is one of the most significant investments a patient can make in their oral health. The procedure takes months, the restoration takes precision, and the materials from the titanium post in the bone to the crown seated on top are chosen specifically to last. So when a patient gets their implant restored and walks out of the clinic, the expectation is simple: this should hold. For many patients, it does. But for a surprisingly large number particularly those who clench or grind their teeth at night the restoration remains at risk even after successful osseointegration. The culprit is bruxism, and the most effective clinical tool to protect against it is a well-fitted night guard. This is why an increasing number of dentists and prosthodontists are recommending occlusal protection as a standard part of implant aftercare, not just for patients who already know they grind, but for anyone whose bite history suggests parafunctional risk. Why Implants Are More Vulnerable Than Natural Teeth? Before understanding why night guards matter for implant patients specifically, it helps to understand what makes implants different from the natural dentition they replace. Natural teeth sit in the jawbone via the periodontal ligament a thin, flexible tissue that acts as a shock absorber between root and bone. When you bite down hard, the periodontal ligament compresses slightly, distributing force and providing the tooth with a degree of proprioceptive feedback. Your nervous system senses that force, and the jaw muscles modulate accordingly. Dental implants have no periodontal ligament. They integrate directly into bone a process called osseointegration which is what gives them their stability and longevity. But the trade-off is that there is no natural cushion between the crown and the bone. Force applied to an implant crown transfers directly to the bone-implant interface. In patients who grind or clench at night, this means the same forces that wear down enamel are instead concentrating at the junction between titanium post and jaw repeatedly, for hours at a time, while the patient is asleep and completely unaware. Clinical research supports this concern. A study published in the International Journal of Implant Dentistry found that parafunctional habits are a recognised risk factor for peri-implant bone loss and implant prosthesis fracture. The forces generated during nocturnal grinding can be two to three times higher than those produced during normal chewing and unlike chewing, bruxism is not a controlled, purposeful movement that stops when the job is done. What Happens to the Implant Restoration Without Protection? The crown or prosthetic component sitting on top of the implant is the most directly exposed element when a bruxing patient has no occlusal protection. Depending on the restoration material, the outcomes of prolonged unprotected grinding vary: Porcelain and ceramic crowns are susceptible to chipping and fracture under repeated lateral loading the exact type of force that bruxism generates. A restoration that looks perfect at the six-month check may show significant wear or even a fracture line at the twelve-month mark if the patient has been grinding unprotected every night. Zirconia restorations, including crowns milled from zirconia blocks or cut from zirconia blank material, fare significantly better due to zirconia's exceptional flexural strength. This is one reason why zirconia has become the dominant restorative material for implant crowns — its resistance to fracture under load is far superior to feldspathic porcelain. However, even the toughest restoration is not immune to the cumulative effect of nightly grinding without any force distribution. Screw loosening, abutment wear, and accelerated wear on opposing dentition are all documented complications in unprotected bruxing patients regardless of the crown material used. The bone around the implant is also at risk. Excessive lateral forces particularly the non-axial loading that bruxism produces have been associated with crestal bone loss in the peri-implant region. Once bone recedes around an implant, the structural foundation that keeps the entire restoration stable is compromised. Protecting the restoration from bruxism is, in this sense, also protecting the bone. The Role of a Night Guard in Implant Aftercare A night guard also called an occlusal splint or bite guard is a custom-fitted appliance worn over the upper or lower arch during sleep. Its function is to create a protective barrier between upper and lower teeth, redistribute occlusal forces more evenly across the arch, and prevent the concentrated lateral loads that bruxism generates from focusing on any single tooth or implant. For implant patients, the night guard serves several specific purposes: Force redistribution — instead of grinding forces bearing down on the implant crown and bone interface, the guard spreads those forces across the entire arch, reducing peak stress at any single point. Prevention of screw loosening — abutment screws in implant restorations are the first thing to show signs of mechanical fatigue in bruxing patients. A well-fitted night guard reduces the frequency and severity of the torsional forces that gradually work screws loose. Protection of the crown surface — whether the restoration is zirconia or ceramic, the night guard absorbs the abrasive contact that would otherwise occur between upper and lower restorations during grinding episodes. Peri-implant tissue preservation — by reducing the abnormal loading at the bone-implant interface, the guard helps preserve the crestal bone that supports long-term implant stability. Who Needs One and How Labs Play a Role? The clinical recommendation for a night guard is typically straightforward when a patient presents with obvious signs of bruxism wear facets on existing teeth, fractured restorations in their history, muscle hypertrophy, or a sleep partner who confirms nocturnal grinding. But the reality is that many patients with parafunctional habits are unaware of them. Bruxism during sleep is involuntary, and without a bed partner to observe it, it often goes unreported until physical evidence accumulates. This is why many clinicians now recommend night guard fabrication as a standard protocol for all implant patients, not only those with a confirmed bruxism diagnosis. The cost of fabricating a guard is significantly lower than the cost of repairing or replacing a failed restoration or managing peri-implant bone loss. For dental labs, this represents both a clinical responsibility and a workflow consideration. The guard needs to be fabricated from a material that is durable enough to withstand grinding forces, comfortable enough that the patient actually wears it every night, and accurate enough in its fit that it does not itself introduce occlusal problems. Modern digital fabrication has made this significantly more achievable — guards designed from intraoral scans and printed or milled from high-performance resins offer consistency and precision that traditional thermoforming methods cannot always match. Labs stocking dental zirconia discs and dental zirconia blanks for their implant crown production are already working in the digital workflow environment where guard fabrication fits naturally. The same digital models used to design the implant restoration can be used to design the protective appliance reducing turnaround time and eliminating the need for additional impressions. Choosing the Right Guard Material for Implant Cases Not all night guards are appropriate for implant patients. Over-the-counter boil-and-bite guards are generally inadequate they don't fit precisely enough to distribute forces correctly and can in some cases worsen occlusal loading rather than reduce it. For implant patients specifically, a custom-fabricated guard is the standard of care. In terms of material, hard acrylic guards remain the clinical standard for heavy bruxers because of their durability and their ability to maintain a stable occlusal surface over time. Softer materials are more comfortable for mild grinders but may not offer adequate protection for patients with significant parafunctional habits. For labs and clinicians looking for a digitally fabricated option, the Key Guard Sportguard Resin by Keystone represents a purpose-built solution for 3D printed mouthguards and protective appliances. Designed for precise digital fabrication from DLP and LCD printers, it delivers the custom fit and protective durability that implant patients need without the manual labour and variability of traditional thermoforming. After the Implant: The Complete Picture A successful implant outcome is not just about what happens in the operating chair or at the lab bench. It is about what happens every night for the following years. A patient who grinds their teeth and has no occlusal protection is exposing a significant clinical investment and all the upcera dental zirconia materials and precision lab work that went into it to forces that accumulate silently until something fails. The recommendation to wear a night guard after implant restoration is not overcautious. It is practical, preventive, and increasingly considered best practice across the implant community. For the clinician, it is an easy conversation to have at the delivery appointment. For the lab, it is a natural extension of the same digital workflow already in use. And for the patient, it is one of the most cost-effective ways to protect one of the more significant investments they have made in their own health. The implant and its restoration deserve to last. A night guard helps make sure they do.
Learn more
What Matters Most When Choosing Zirconia Discs for Dental Restorations?
Not all zirconia discs perform the same way and the difference shows up not at the ordering stage, but months later in remake rates, sintering surprises, and shade mismatches that are difficult to trace back to their source. Labs that evaluate discs carefully at the procurement stage avoid most of these problems. Labs that choose on price alone tend to discover the limitations at the most inconvenient moment. This guide covers the factors that actually determine disc performance in a real lab environment grade, multilayer construction, thickness, shade configuration, sintering behaviour, batch consistency, and system compatibility. These are the questions worth asking before committing to a disc product, not after the first problematic batch arrives. Grade selection: the foundational decision The first and most important choice when selecting a zirconia disk is grade the yttria content that determines where the disc sits on the strength-to-translucency spectrum. This decision should follow the clinical indications the lab runs, not personal preference or marketing language. 3Y-TZP (3 mol% yttria) is the high-strength formulation: 900–1,200 MPa flexural strength, low translucency, and transformation toughening that resists crack propagation under direct implant loading. This is the correct grade for posterior implant crowns, multi-unit bridges, and full-arch prostheses. Any disc marketed for these indications at 5Y translucency is misspecified aesthetics don't compensate for inadequate strength in high-load posterior cases. 4Y-PSZ sits in the middle: 700–900 MPa with moderate translucency. A practical specification for premolar crowns and moderate-span bridges where both strength and aesthetics are relevant. Labs running high volumes of premolar cases often find 4Y an efficient single-grade solution for that position range. 5Y-PSZ reaches 500–700 MPa with high translucency appropriate for anterior single-unit crowns where optical quality is the primary requirement and bite load is genuinely light. Specifying 5Y for posterior implant work is a clinical error, not just a materials preference. Most labs that run a mixed case type posterior crowns, anterior aesthetic work, implants should stock across grades rather than trying to use a single disc for every indication. The efficiency temptation of one-disc-fits-all is outweighed by the clinical risk of under-specifying strength for high-load cases or over-specifying opacity for aesthetic cases. Multilayer construction: what it actually does Multilayer zirconia discs are now the standard choice for anterior and premolar work in most digital labs. The principle is straightforward: rather than stocking separate 3Y and 5Y zirconia blanks and choosing between them by case, a multilayer disc builds the gradient into the blank itself 3Y-equivalent strength at the cervical margin, graduating to 5Y-equivalent translucency at the incisal edge. The quality of the multilayer construction varies significantly between manufacturers, and this is where careful evaluation matters. The key questions are whether the gradient is continuous or stepped, how many distinct layers exist, and whether the disc uses a ratio-based design or fixed-thickness layers. A ratio-based multilayer design where the translucent incisal zone consistently represents a fixed percentage of the disc regardless of thickness is clinically superior to fixed-layer designs for one practical reason: it performs the same across disc thicknesses. A 12mm disc and a 20mm disc from a ratio-designed multilayer line produce equivalent incisal translucency. A fixed-layer design at 20mm may have a proportionally smaller incisal zone, which changes the aesthetic outcome. The TT Multilayer zirconia from UPCERA is a well-established option in this category a graduated multilayer disc that covers both anterior and premolar indications in a single product, available in pre-shaded and white configurations across standard VITA shades. Disc thickness: matching to case type Disc thickness is a practical constraint that many labs underestimate when building initial inventory. A 12mm disc handles single-unit crowns and short-span bridges efficiently for the majority of standard cases this thickness is adequate and minimises material cost per unit. Full-arch prostheses and long-span bridges change the calculation entirely. A full-arch zirconia dental material restoration requires 18–25mm of disc depth to accommodate the vertical dimension of a complete arch, depending on the clinical design. Attempting to nest a full arch into a 12mm disc is not viable — it's one of the most common sourcing errors labs make when entering the full-arch market. For multi-unit bridges in the 3–6 unit range, 14–18mm is typically required depending on pontic span and vertical dimension. Labs that run bridge work should stock both 12mm for single units and at least one thicker format for multi-span cases. The zirconia blanks inventory a lab holds should reflect its actual case mix. Over-stocking thick discs for a lab that primarily runs single-unit posterior crowns is a capital allocation problem. Under-stocking them for a lab running full-arch implant work creates production delays. Pre-shaded vs. white: the shade configuration decision The choice between pre-shaded and white zirconia disc configuration is a workflow decision that compounds across the week. Pre-shaded discs where the VITA shade gradient is built into the blank before sintering exit the furnace with natural colour already established. For standard A2 and A3 prescriptions, which cover the majority of posterior cases in most labs, this eliminates most or all external staining time per unit. At ten units per day, eliminating five minutes of staining per unit is fifty minutes of recovered bench time daily roughly four hours per week. That adds up to meaningful capacity gains for high-volume labs that standardise on pre-shaded material for their regular posterior workflow. White discs preserve full characterisation control. For complex or unusual shade prescriptions, cases requiring precise shade matching to adjacent natural teeth, or labs where custom staining is a service differentiator, white blanks are the right choice. Most labs run both: pre-shaded for standard production, white for custom cases. Shade stability across batches is where pre-shaded performance varies most between suppliers. A pre-shaded disc that produces different post-sintering shade outcomes between batch deliveries eliminates the efficiency advantage entirely the lab ends up verifying each new batch, which takes longer than liquid staining from white would have. Batch-to-batch shade consistency should be verified before committing to a pre-shaded product line. Sintering behaviour: the variable labs overlook Every zirconia disc has a manufacturer-specified sintering curve a precise ramp rate, hold temperature, and cool-down profile. Deviating from that curve, even modestly, reduces the final flexural strength of the restoration by 20–30% with no visible sign of failure at delivery. The crown seats correctly, looks fine, and fails under load months later. When evaluating a new zirconia disc product, the sintering curve documentation should be one of the first things requested not as a formality, but as a genuine workflow compatibility check. The disc's curve must be compatible with your specific furnace brand and model. Sintering program settings that work precisely for one furnace may diverge meaningfully for another due to thermocouple calibration differences and heating element behaviour. Fast-fire programs sintering cycles completed in under 90 minutes are now available for several product lines and enable same-day sintering cycles completed in under 90 minutes are now available for several product lines and enable same-day crown delivery in digital workflows. Fast-fire compatibility should be verified per disc product, not assumed. Some discs that perform correctly on standard programs show strength reduction on fast-fire programs due to different crystal development kinetics at accelerated temperature profiles. Batch consistency: the most underrated evaluation criterion Spec sheet numbers describe potential performance under controlled conditions. Batch-to-batch consistency determines whether that performance is reproducible in your lab across a full year of production. The variables that matter most are pre-sintered density uniformity, shade stability in pre-shaded products, and hardness consistency. Pre-sintered density variation causes uneven shrinkage during sintering the same CAD file produces different marginal gaps from batch to batch, which manifests as variable fit that's difficult to diagnose without raw material traceability. Labs evaluating a new disc supplier should request batch test reports, not just product brochures. A supplier who can provide ISO 6872 test results per lot rather than "typical values" based on single-batch testing is demonstrating manufacturing accountability that translates directly into production predictability. Zirconia blocks price comparisons should account for this consistency factor. A disc that costs 15% more per unit but delivers consistent fit, shade, and sintering outcomes across twelve months of production costs less in total than a cheaper disc that generates two remakes per month each remake representing material cost, milling time, and sintering time that exceeds the price differential many times over. Open-system compatibility: a non-negotiable for most labs Most dental labs operate milling systems from a range of manufacturers Roland, vhf, Zirkonzahn, Imes-icore, and others. Open-system zirconia discs are compatible with any platform that accepts standard disc dimensions, without proprietary software keys or machine-specific restrictions. This matters practically when labs upgrade milling equipment, when a second machine is added to the production line, or when a disc product is being evaluated before full commitment. A disc that only mills on the manufacturer's own equipment creates long-term dependency that's worth understanding before purchase. All Aidite zirconia discs and UPCERA products available through Zirconia Guys are open-system compatible with standard 98mm disc holders across major milling platforms. No proprietary restrictions apply. Disc vs. block: when format matters Discs and zirconia blocks (also called zirconium blocks or pucks) contain the same zirconia dental material. The format choice is entirely about workflow and volume. A zirconia disc typically 95–98mm in diameter allows multiple restorations to be nested in a single milling cycle using nesting software. High-volume labs running ten or more units daily find discs substantially more efficient than blocks: fewer machine setups, lower cost per unit, better throughput. For a full-arch case requiring the full disc dimension, a disc is the only viable format. Zirconia blocks are the right format for lower-volume labs, atypical cases, or shades and grades not currently stocked in disc format. Many labs maintain a small inventory of blocks across different grades as flexible backup a specific 3Y white block for a posterior implant case when the regular pre-shaded disc is temporarily out of stock, for example. The per-unit material cost is higher than disc milling, but the flexibility is worth it as a secondary inventory. Choosing a supplier: what to evaluate beyond the product The zirconia disc itself is only part of the supplier relationship. What the supplier provides around the product technical documentation, sintering support, batch traceability, response time when issues arise determines whether a disc specification can be implemented consistently in production. A domestic supplier who can answer technical questions about sintering curves for your specific furnace, confirm milling parameters for your machine, and provide batch documentation on request is operationally more valuable than an imported product with equivalent specs and no accessible support. For North American labs, this is often the decisive practical factor in supplier selection when two products are otherwise comparable. Zirconia Guys supplies both Aidite and UPCERA zirconia disc and block ranges to dental labs across North America covering high-strength, multilayer, pre-shaded, and white configurations across standard thicknesses. Get in touch with the team to discuss which disc grade, thickness, and shade configuration suits your milling system and case mix and to get current pricing across the range.
Learn more
Why PMMA Remains a Popular Material for Dental Restorations?
It's a reasonable question to ask: in an era where dental zirconia has become extraordinarily strong and aesthetically sophisticated, why is PMMA dental material still so widely used? Zirconia reaches 900–1,200 MPa. Lithium disilicate produces anterior aesthetics that rival natural enamel. Composite resins have improved significantly. And yet, polymethyl methacrylate first used in dentistry in the 1930s remains a standard dental lab material in almost every modern digital workflow. The answer isn't inertia. It's that PMMA does specific things that no stronger material does better and those things are clinically essential. This guide explains what keeps PMMA relevant, why it resists replacement, and how it fits into a contemporary digital dental lab alongside ceramic and zirconium dental materials. PMMA didn't survive by accident — it survived by being irreplaceable The reason PMMA has remained central to dental restorations despite the availability of far stronger materials is that the cases where it's used don't require high strength they require something different. They require a material that can be milled and delivered the same day, adjusted chairside without specialist equipment, and replaced at a cost that's proportionate to a temporary role. No ceramic does this. A zirconia crown sintered to 900 MPa cannot be trimmed with a handpiece and a carbide bur at the chair. A lithium disilicate provisional that fractures during the healing period creates a clinical problem. PMMA at 80–120 MPa flexural strength is precisely what an implant temporary needs: strong enough to function during osseointegration, weak enough to be adjusted and repaired without sending it back to the lab. The persistence of PMMA is, in that sense, a sign of good clinical reasoning in the profession not a failure to upgrade. The material hasn't been replaced because it hasn't been bettered for its actual role. The workflow argument: PMMA fits digital dentistry perfectly One of the reasons PMMA dental material has grown in use rather than declined since the arrival of digital workflows is that it integrates into CAD/CAM milling seamlessly. The same machine, the same software, the same scan just a different blank loaded into the spindle. A digital lab that mills zirconia all day can produce a PMMA temporary from the same case file without any additional equipment, any additional training, or any additional workflow step beyond swapping the disc. This matters operationally. Labs that couldn't previously offer same-day temporaries with consistent fit because conventional acrylic mixing and forming was slow and variable can now produce PMMA provisionals that emerge from the milling machine already at the right dimensions and shade. The chairside adjustment that used to take ten minutes is now two minutes of polishing. That's a genuine clinical service improvement driven by digital workflow, and PMMA is at the centre of it. The economic argument: PMMA keeps costs proportionate to clinical purpose Dental lab materials need to be costed appropriately for their clinical role. A temporary crown worn for three to six months while an implant integrates with bone should not cost the same as a permanent zirconia crown designed to last fifteen years. The economics of clinical care require that temporary restorations are priced as temporaries and PMMA makes that possible. Zirconia blocks price is significantly higher than equivalent PMMA discs per unit. Running a permanent zirconia restoration as a temporary which some labs do produces a higher-quality temporary than the clinical situation requires, at a cost that doesn't reflect the temporary nature of the restoration. PMMA, priced correctly as a temporary dental lab material, keeps the economics of implant workflows sensible for both the lab and the patient. This isn't a compromise on quality it's appropriate material specification. The right material for the clinical indication, at the right cost, is better clinical and commercial practice than using premium materials indiscriminately. The clinical argument: PMMA enables better permanent restorations Perhaps the most underappreciated clinical argument for PMMA is that a well-designed temporary enables a better permanent restoration. This is particularly true in implant cases, where the temporary PMMA crown worn during osseointegration actively shapes the soft tissue emergence profile that the permanent crown inherits. A temporary that doesn't maintain the correct emergence geometry, or that applies inappropriate pressure to healing tissue, creates a soft tissue environment that compromises the final result. The permanent zirconia dental restoration however well it's milled and sintered seats into a tissue environment shaped entirely by the temporary. This is why the quality of the PMMA temporary matters clinically, even though it will be replaced. The practical implication is that labs should invest in appropriate PMMA products multilayer discs for anterior aesthetics, correct shade matching, good surface finish rather than treating the temporary as a throw-away step. A well-executed PMMA temporary reduces chairside adjustment at permanent crown delivery, reduces the risk of soft tissue complications, and produces a better final outcome for the patient and clinician. Multilayer PMMA: aesthetics that matter for longer-term temporaries Standard single-shade PMMA looks flat in anterior positions next to natural teeth with colour gradients and incisal translucency. For a temporary worn for a week before a simple crown replacement, this rarely matters. For an implant temporary worn for three to six months in a visible aesthetic zone, a single-shade result is noticeably suboptimal for the patient. Multilayer PMMA discs resolve this by building a shade gradient into the blank itself deeper and more saturated at the cervical, lighter and more translucent at the incisal. The multilayer PMMA disc from Aidite covers this indication in VITA classical shades, producing anterior temporaries with natural-looking colour depth from the same milling workflow used for standard single-shade work. No additional characterisation is needed for most prescriptions, which keeps the per-unit bench time low while delivering a significantly better aesthetic result than single-shade alternatives. PMMA for dentures: a long-term application, not just a temporary one It's worth clarifying that not all PMMA use is temporary. For full and partial dentures, milled PMMA from high-density blanks serves as a permanent prosthesis one that a patient may wear for years. Here, PMMA's low weight is the primary clinical advantage over alternatives: a full-arch denture in PMMA is comfortable to wear in a way that heavier prosthetic materials can't match. Milled PMMA denture bases also produce lower porosity than conventionally processed acrylic. Lower porosity means less bacterial infiltration into the base material over years of use a tissue health and hygiene advantage that accumulates over the life of the prosthesis. The Aidite Denture Base PMMA is formulated specifically for this application a milling-grade disc that produces dimensionally accurate bases with good surface finish and tissue-matching gingival shades. PMMA alongside zirconia: the complete digital lab picture In a complete digital dental lab workflow, PMMA and zirconia aren't competing they're sequenced. PMMA handles the provisional phase: the same-day temporary, the implant temporary during integration, the diagnostic trial. Zirconia handles the permanent phase: the crown, the bridge, the implant restoration that replaces the PMMA provisional after healing is confirmed. For labs building this workflow, working with a single dental lab material supplier who carries both PMMA and zirconia simplifies inventory management, technical support, and material compatibility across the sintering and milling program. Zirconia Guys is a North American dental lab material supplier stocking both Aidite PMMA multilayer, denture base, and clear variants alongside Aidite and UPCERA zirconium dental and ceramic ranges, covering the complete digital workflow from provisional to permanent.
Learn more