Blogs

When Should Dental Labs Choose Hard Splint Resin Over Soft Splint Resin?
Occlusal splints are one of the highest-volume appliance categories in most full-service dental labs, and yet the hard-versus-soft material decision is made by habit more often than by clinical reasoning. A lab stocks one resin, uses it for every case, and adjusts the prescription to fit the material rather than the other way around. The result is a predictable pattern of problems: hard splints returned by sensitive patients who won't wear them, soft splints ground through within months by heavy bruxers, and remake conversations that could have been avoided at the material selection stage. What follows is a practical framework for making the hard-versus-soft decision based on the clinical factors that actually predict which material will perform for a given patient not based on what happens to be loaded in the printer. The Mechanical Difference That Drives Everything Else Hard and soft splint resins are not versions of the same material at different thicknesses. They are mechanically different materials designed for different loading conditions, and the distinction matters in ways that go beyond patient comfort. Hard splint resin is a rigid, high-modulus polymer. Under occlusal load, it does not deform. This means force is distributed broadly across the appliance surface rather than concentrating at individual contact points the same physics that makes a rigid floor more durable under point loads than a foam mat. That even force distribution is also what makes hard resin adjustable: because the material doesn't compress, a technician can create a balanced occlusal scheme by grinding to contact, and that scheme stays geometrically stable in the patient's mouth. Soft splint resin is a lower-modulus, flexible polymer. It absorbs and cushions impact, which patients experience as more comfortable, particularly at first wear. The tradeoff is that flexible materials concentrate wear at high-contact points the same spots where bruxism force is greatest and the contact scheme is harder to verify and maintain because the material's flex changes how contacts feel both at chairside adjustment and during function. Neither is the wrong choice categorically. The question is which loading condition the patient presents with. When Hard Resin Is the Correct Specification? Severe bruxism with documented tooth wear or appliance history. When a patient presents with faceting, enamel loss, or a history of grinding through previous soft appliances within months, if the lab is specifying hard resin for dental splints it will last significantly longer under that force pattern than any soft alternative the material's rigidity means wear distributes rather than concentrates, and heavy bruxers don't perforate it at canine contacts the way they do soft resin. Long-term nightly wear cases. Duration of use is one of the strongest predictors of which material performs better. Over a 12–36 month wear period: Dimensional stability under repeated loading favors rigid material Occlusal scheme maintenance the contact pattern set at delivery holds in hard resin; soft resin contact patterns drift Key splint hard resin meets the flexural strength threshold needed for extended nightly use without requiring interim remakes on moderate-to-heavy bruxers Polishability after adjustment remains consistent throughout the appliance's lifespan with hard resin; soft resin surfaces micro-roughen faster at adjustment points TMJ stabilization protocols. Stabilization splints managing temporomandibular dysfunction require a full-coverage rigid surface where even, simultaneous posterior contact can be verified and maintained over a treatment course measured in months. Soft resin's compressibility makes it impossible to verify true simultaneous contact clinically the material gives slightly under the pressure of the articulating paper tap, masking actual contact distribution. Hard resin does not. Any case where the prescribing dentist will be adjusting occlusion at delivery. If the dentist is going to grind the appliance to establish contacts, hard resin holds the adjusted surface. Soft resin recovers slightly after grinding, and the adjusted contacts can shift enough to undermine the adjustment within the first few nights of wear. Why Soft Resin Has a Legitimate Clinical Role? The durability case for hard resin in heavy-bruxism cases is strong, but it is not universal. Soft resin is the correct specification in clinical scenarios where the appliance's primary job is compliance, not durability. First-time appliance wearers. tients who have never worn an occlusal splint particularly those with gag sensitivity, tight arches, or general intolerance to oral hardware adapt to soft resin at significantly higher rates than hard resin in the first two to four weeks. A patient who doesn't wear the appliance because it's uncomfortable delivers zero clinical benefit regardless of how durable the material is. Mild bruxism and clenching-dominant patterns. Patients whose parafunctional activity is primarily vertical clenching rather than lateral grinding generate concentrated vertical force rather than the shear forces that destroy soft resin at contact points. For these patients, a soft appliance may comfortably outlast the typical treatment review period without showing significant wear and the comfort advantage supports consistent nightly use. Short-term diagnostic use. When the splint is being prescribed to test whether occlusal appliance therapy changes a patient's symptom pattern before committing to a long-term protocol, the lower cost and faster patient acceptance of soft resin make it the more pragmatic choice for a 6–8 week evaluation period. Where hard resin cannot deliver acceptable comfort for a new or sensitive patient, key splint soft resin for night guards provides a structured alternative not as a permanent solution for heavy bruxers, but as the right material for the cases above where compliance risk outweighs durability risk. A Decision Table for Daily Lab Workflow Clinical Factor Hard Resin Soft Resin Bruxism severity Moderate–severe Mild, clenching-dominant Appliance history Previous soft splints worn through First-time wearer Treatment duration Long-term (12+ months) Short-term or diagnostic TMJ stabilization Yes No Occlusal adjustment at delivery Required Minimal Patient comfort tolerance Established Low or unknown Pediatric / mixed dentition No Yes The dual-protocol approach soft resin for the first 4–6 weeks of a new patient's treatment, transitioning to hard resin once they are adapted and tolerant is worth standardizing for moderate-bruxism new patients. It addresses the compliance risk without conceding on long-term durability. Material Consistency Matters as Much as the Hard/Soft Decision The clinical decision framework above assumes the resin you are printing with actually performs to its labeled specification. This is less guaranteed than it sounds. Shore D values vary between manufacturers even at the same nominal hardness rating, and post-cure behavior how much the material continues to harden after initial cure and how it responds to chairside adjustment varies enough between products that a lab's adjustment protocol calibrated to one resin will not transfer cleanly to a different brand labeled with the same hardness category. Dental splint printing resin whether hard or soft should be sourced from a supplier that provides consistent batch documentation, because the adjustment and finishing protocols your technicians build around a specific material depend on that material behaving predictably across every order. ZirconiaGuys carries both Keystone hard and soft splint resin formulations with full product documentation. This material-consistency logic applies equally across other resin categories in the lab. The same principle of matching material rigidity to application duration and loading conditions and verifying that the specific product meets the mechanical threshold the application requires runs through how labs should think about PMMA provisional materials (see our piece on how material rigidity maps to clinical durability in PMMA provisionals, where the tradeoff between flexibility and durability appears in a different clinical context). Hard resin handles high force, long duration, and precision occlusal control. Soft resin handles comfort, compliance, and low-to-moderate force over shorter treatment periods. Neither is a universal default. The labs that produce the fewest splint remakes are the ones that have both materials in inventory, a clear protocol for which cases go to which resin, and a reliable source for consistent batch quality because even the correct material decision fails if the resin isn't performing to specification when it comes off the printer.
Learn more
How to Choose Between HT White Zirconia and Pre-Shaded Zirconia Discs?
Every dental lab running a CAD/CAM workflow eventually arrives at the same fork in the material decision tree: white disc or pre-shaded disc? On the surface, this looks like a simple procurement choice. In practice, it is a workflow architecture decision that affects bench time, remake rates, shade consistency, and production economics on every zirconia case your lab runs. Getting it right means understanding what each format actually delivers and where each one is the wrong tool for the case. This guide gives you a clear, practical framework for choosing between HT white and pre-shaded dental zirconia discs based on case type, lab volume, and the specific demands of your clinical production workflow. What the Format Decision Actually Controls? Before comparing the two formats, it is worth being precise about what the white vs. pre-shaded distinction means at the material level because it is often described in vague terms that do not help labs make informed decisions. A zirconia blank in white (unshaded) format leaves the manufacturing process without pigmentation. The disc is a uniform, bright white throughout. Every shade value applied to the final restoration comes from the lab through liquid shade immersion, brush-on staining, or both after the restoration has been milled and before final sintering. White discs give the technician complete control over the shade outcome, but that control comes with a corresponding labor requirement on every unit. A pre-shaded zirconia blank is pigmented during manufacturing to match specific VITA Classic or 3D-Master shade values. The shade gradient is built into the material itself from a warmer, more saturated cervical zone to a more translucent incisal zone before the disc reaches your mill. The lab mills the restoration, sinters it, and the shade is already there. For standard cases, the finishing step reduces to a glaze application rather than a staining protocol. The format decision is therefore a decision about where shade control lives: in the material (pre-shaded) or in the technician's hands (white). Neither answer is universally correct. The correct answer depends on the case. When HT White Is the Right Choice? High-translucency white zirconia is the correct format when shade control requirements exceed what a fixed pre-shaded gradient can deliver. This includes four specific clinical scenarios. Complex or unusual shade requests. Cases involving strong B or C chroma values, shade requests outside the standard VITA A–D range, or cases requiring close matching to teeth with unusual coloring staining from tetracycline, fluorosis, heavy characterization, or significant hypocalcification cannot be reliably addressed with a pre-shaded disc. The pre-shaded format is calibrated to cover the standard range. Complex cases need the full flexibility of a white starting point. Multi-unit cases requiring precise shade matching across units. When a multi-unit case requires shade matching that must be verified and adjusted unit by unit particularly in cases adjacent to natural teeth with unusual optical character white discs allow the technician to calibrate each unit individually rather than relying on a fixed factory gradient. Cases requiring surface characterization effects. Craze lines, incisal halo effects, hypocalcification spots, and custom translucency mapping are all achievable with white discs and targeted stain application. Pre-shaded discs make these effects more difficult to control, since the existing gradient influences how surface stains appear after firing. Labs prioritizing maximum shade flexibility over workflow speed. High-end cosmetic dental labs where every case is treated as a custom esthetic challenge and where technician time is the expected investment will typically run white discs as their primary stock, accepting the staining labor in exchange for unlimited shade flexibility. The ht white zirconia disc from Upcera is specifically formulated for this use case. Its high-translucency composition gives technicians a predictable optical baseline to stain from the material transmits light consistently enough that shade layering produces reliable, repeatable results rather than the unpredictable outcomes that lower-translucency white discs can produce when stain penetrates unevenly. When HT White Creates Unnecessary Work? The honest counterpoint to white disc flexibility is that the vast majority of dental lab cases do not need it. Most labs find that 70–80% of their anterior cases fall within the standard VITA A1–D4 shade range, where a pre-shaded disc delivers a clinical result indistinguishable from a carefully stained white disc in significantly less bench time. For those standard cases, the ht white dental zirconia blocks format means: mill the restoration, apply shade liquid, fire a staining cycle, evaluate, potentially re-fire, then glaze. A pre-shaded disc compresses that to: mill, evaluate shade, glaze. The difference is meaningful at volume. At 20 anterior cases per week, the staining labor saved by pre-shaded discs on standard cases represents hours of recoverable technician time. This is also where understanding the relationship between disc format and zirconia grade matters. White discs are available across all grade ranges 3Y, 4Y, and 5Y and the grade determines translucency and strength independently of whether the disc is white or pre-shaded. If your lab is unclear on the 3Y, 4Y, and 5Y distinction, our guide to the difference between 3Y, 4Y, and 5Y zirconia covers the material science and clinical selection criteria in full detail. When Pre-Shaded Is the Right Choice? Pre-shaded zirconia dental blanks are the correct default format for the majority of dental labs running standard anterior production workflows. The clinical case for them is straightforward: when the shade outcome is predictable and the case falls within the standard range, why add a staining step that the material can eliminate? The st pre shaded zirconia disc format is the most widely stocked pre-shaded format for this reason. The pre-shaded gradient is calibrated to VITA shade standards and sintered into the disc during manufacturing the shade is chemically stable and cannot chip, flake, or fade the way external surface stain can over time. This material-level stability is one of the most underappreciated advantages of pre-shaded discs: the shade is not a surface treatment, it is the material. Standard anterior crowns in A–D shade range. Single-unit anterior crowns in A1, A2, A3, B2, or any other standard VITA value are where pre-shaded discs deliver their clearest workflow advantage. The result from the sintering furnace requires at most a minor characterization touch before glazing. Most cases go straight to glaze. High-volume production labs. Labs producing 15 or more zirconia anterior cases per week benefit significantly from pre-shaded formats. The cumulative reduction in staining labor across a month's production represents a material labor efficiency gain one of the few material decisions with a directly calculable return on investment. Multi-technician environments. In labs where multiple technicians handle anterior cases, pre-shaded discs reduce technician-to-technician shade variation. The shade outcome depends on the material, not on how each technician applies and fires stain. Consistency across the production floor improves without requiring standardized staining protocols to be enforced across staff. Cases where the referring dentist specifies a standard VITA shade. When the prescription reads A2 and the patient's adjacent teeth are standard A2, there is no clinical justification for the additional staining labor that a white disc requires. The pre-shaded disc is the correct tool. Comparing the Two Formats Side by Side Factor HT White Zirconia Pre-Shaded Zirconia Shade flexibility Unlimited full manual control Fixed to VITA standard shades Post-mill staining Required for every unit Not required for standard cases Best for Complex, custom, high-chroma cases Standard A–D shade production Bench time per unit Higher Significantly lower Multi-unit consistency Technician-dependent Material-controlled Shade stability Surface stain can vary Gradient is stable and permanent Remake risk Moderate Low Cost per disc Typically lower Slightly higher Real cost per case Higher (staining labor included) Lower at production volume How to Stock Both Formats Correctly The correct answer for most full-service dental labs is not one format or the other — it is both, with clear protocols for which cases go to which disc. Default stock: Pre-shaded dental zirconia discs in your most-used shade groupings. For most labs, this means stocking A-shade range pre-shaded discs as the primary anterior production material. These cover the majority of daily cases without staining labor. Secondary stock: HT white zirconia blocks dental in your preferred grade for complex and custom cases. These handle the cases where shade flexibility is genuinely required unusual shades, strong characterization requirements, or cases where the pre-shaded gradient cannot deliver the specific optical result needed. Avoid: Using white discs as the default simply because they cost less per disc. The lower disc price is consumed by staining labor on every standard case. Pre-shaded discs at slightly higher acquisition cost deliver lower real cost per case at any meaningful production volume. As a zirconia materials distributor USA labs rely on for consistent US-stocked inventory, ZirconiaGuys carries both formats across Upcera and Aidite product lines white and pre-shaded zirconia blocks, multiple thicknesses, open-system compatible with same-day shipping on in-stock items. The choice between HT white and pre-shaded zirconia dental blanks is not a question of which format is better it is a question of which format is correct for each case type and production volume. White discs deliver flexibility. Pre-shaded discs deliver efficiency. The labs producing the best work at the lowest real cost per case are the ones who have both formats in inventory, use each in its correct application, and source them from a dental lab material supplier with consistent batch quality and US-based stock. If your current workflow runs every anterior case through a full staining protocol regardless of shade complexity, switching standard A–D shade cases to pre-shaded discs is one of the highest-return material decisions available to you measurable in recovered technician hours from the first week of implementation.
Learn more
How to Choose the Right Zirconia Disc for Single Crowns, Bridges, and Full-Arch Restorations
Choosing the wrong zirconia disc for a case is one of the most avoidable sources of remakes in dental lab production. The consequences range from restorations that look flat and opaque in anterior zones to connectors that fracture in posterior bridges — all because the disc grade, format, or architecture wasn't matched to the clinical demand. The material choice happens before milling, and it determines everything downstream. This guide gives dental labs and dental zirconia discs procurement teams a clear, case-by-case framework for selecting the right disc format across single crowns, multi-unit bridges, and full-arch restorations based on strength requirements, esthetic priorities, and production workflow realities. Start Here: The Two Variables That Drive Every Decision Every zirconia disc selection comes down to two variables: how much strength the restoration requires and how much translucency the case demands. These two properties move in opposite directions within the zirconia material class gain translucency, reduce strength; gain strength, reduce translucency. The clinical indication defines where on that spectrum each case needs to sit. For selecting a disc in production, here is the decision in practical terms: Posterior, high-load, bridge connectors → Prioritize strength → 3Y, lower yttria, monolithic or high-strength multilayer Anterior, single unit, esthetic zone → Prioritize translucency → 4Y/5Y, multilayer pre-shaded Mixed-zone full-arch → Split by quadrant → Strength-grade posterior, esthetic-grade anterior Every section below applies this logic to a specific restoration type. Single Crowns: Matching Disc Grade to Zone Single crowns are the most forgiving indication from a structural standpoint there are no connector cross-sections to worry about and the occlusal load on any single unit is manageable across all zirconia grades. The selection decision is primarily about esthetics and production workflow efficiency. Posterior Single Crowns For molars and second premolars under full occlusal load, a 3Y or 4Y disc in pre-shaded format covers the indication cleanly. The 4Y grade is the most practical daily choice: flexural strength of 600–800 MPa is well above what a posterior single crown requires, and the higher translucency of 4Y relative to 3Y provides a better natural appearance without sacrificing any clinically meaningful structural performance. Pre-shaded format eliminates the staining step on standard A-D shade cases, reducing bench time per unit. For posterior single crowns in bruxism cases or implant-supported scenarios under heavy load, step down to 3Y for the additional strength reserve. The esthetic compromise in the posterior zone is acceptable the posterior zone is low visibility, and patients rarely notice the difference in translucency between 3Y and 4Y at molar positions. Anterior Single Crowns This is where the disc selection decision carries the most clinical weight. Anterior single crowns need to match adjacent natural dentition under direct lighting, which means the disc's translucency profile in the incisal zone is the primary selection criterion. For standard anterior single crown cases in A1–D4 shades, the tt multilayer zirconia disc format delivers the incisal translucency gradient that natural enamel requires — without the post-sintering staining that white blank formats demand. The gradient architecture transitions from a stronger, more opaque cervical zone to a highly translucent incisal zone within a single blank, matching the optical zonation of natural anterior teeth. For anterior cases where the adjacent teeth have unusually high translucency common in younger patients or cases adjacent to e.max veneers the explore functional zirconia disc range provides 3Y and 4Y/5Y options across strength grades, giving labs the flexibility to match the exact esthetic demand without being locked into a single grade. Quick Reference — Single Crowns Position Recommended Grade Format Staining Needed Molar (standard) 4Y Pre-shaded multilayer No Molar (bruxism/implant) 3Y Pre-shaded or white Minimal Premolar 4Y Pre-shaded multilayer No Anterior (standard) 4Y multilayer Pre-shaded No Anterior (high translucency) 5Y multilayer Pre-shaded No Bridges: Where Strength Selection Becomes Non-Negotiable Bridges introduce a variable that single crowns don't have: the connector. The connector cross-section the narrowest point between pontic and abutment is where fracture risk concentrates. The connector must carry the full occlusal load transferred through the pontic, and the minimum safe cross-section area depends directly on the flexural strength of the zirconia grade used. 3-Unit Anterior Bridges 4Y multilayer is acceptable for most anterior 3-unit bridges when connector design meets the minimum 9 mm² cross-section for the grade's strength specification. Verify against the manufacturer's technical data before committing the design this is not a calculation to skip. The st multilayer zirconia disc is a proven format for this indication, delivering the esthetic gradient quality of multilayer architecture with sufficient structural performance for short-span anterior bridges. 3-Unit Posterior Bridges Step to 3Y for all posterior bridge indications. The 900–1200 MPa flexural strength of 3Y-TZP provides the safety margin posterior bridge connectors require under full occlusal loading. Using 4Y or 5Y for posterior bridges to gain translucency trades esthetic benefit against structural risk and the esthetic benefit in the posterior zone does not justify that trade. 4+ Unit Bridges and Long-Span Restorations 3Y monolithic is the only appropriate choice. Long-span posterior bridges carry cumulative occlusal load across multiple pontic units, increasing the bending moment at each connector. High-strength 3Y-TZP in flat monolithic format provides the uniform structural performance that gradient multilayer architecture cannot guarantee across long-span connector geometries. Connector Calculation Rule Always calculate minimum connector cross-section area against the manufacturer's published flexural strength for the specific disc not the grade category. Individual products within the same grade can vary by 100–200 MPa depending on sintering conditions and formulation specifics. Full-Arch Restorations: The Split-Grade Approach Full-arch fixed restorations whether implant-supported or tooth-supported span both esthetic and posterior structural zones simultaneously. Selecting a single disc grade for the entire arch is the most common planning error in full-arch cases. The correct approach is quadrant-level material planning: specify an esthetic multilayer grade (4Y or 5Y) for the anterior 6–8 teeth and a high-strength grade (3Y) for the posterior quadrants. This requires the CAM workflow to accommodate different disc specifications per quadrant a minor planning step that delivers a fundamentally better clinical outcome than compromising in both directions with a single mid-range disc. For labs sourcing full-arch zirconia materials, the aidite zirconia discs range covers both esthetic and structural grades from US inventory enabling single-supplier procurement for the full split-grade arch workflow without mixing documentation from multiple sources. Full-Arch Planning Checklist Anterior teeth (canine to canine): 4Y or 5Y multilayer pre-shaded esthetic priority Premolars: 4Y pre-shaded or 3Y depending on occlusal load assessment Molars and posterior pontics: 3Y monolithic or high-strength multilayer structural priority All connector cross-sections calculated per manufacturer flexural strength spec before finalizing design files Sintering profile verified per disc type do not combine different grade discs in the same sintering cycle unless profiles are confirmed compatible Sourcing: What to Verify Before Stocking a New Disc As a zirconia materials distributor usa, ZirconiaGuys supplies US dental labs with Upcera and Aidite zirconia blocks dental formats from domestic inventory no international lead times, full batch documentation, and technical support for sintering and milling parameters. When evaluating any new zirconia blank or switching suppliers, verify these four things before committing to production stock: Shade Consistency Across the Full Disc Edge zones in multilayer discs must match center specification. Batch drift in this dimension forces re-shade matching on every case and drives remakes. Published Flexural Strength Data Per Product, Not Per Grade Individual products vary. The number on the certificate for the specific batch not the grade category average is what your connector calculations should reference. Open System Compatibility Standard 98 mm zirconia dental blanks are compatible with all major open-system mills. Confirm before ordering if you are evaluating a new format or thickness. Sintering Profile Documentation Esthetic-grade discs require specific ramp rates and hold temperatures. Confirm the profile is within your furnace's capability before stocking. For a deeper look at how disc architecture, strength grades, and material properties interact across the full zirconia blocks range, our Guide to Materials & Strengths of Zirconia Dental Restorations covers the complete technical reference. The right zirconia block is the one that matches the mechanical demand and esthetic priority of the specific restoration not the cheapest disc in stock, not the same disc used for every case by default. Single crowns need translucency calibrated to zone. Bridges need connector-grade strength. Full-arch restorations need both, split by quadrant. Getting this decision right before milling begins is the highest-leverage quality control step in the entire production workflow.
Learn more
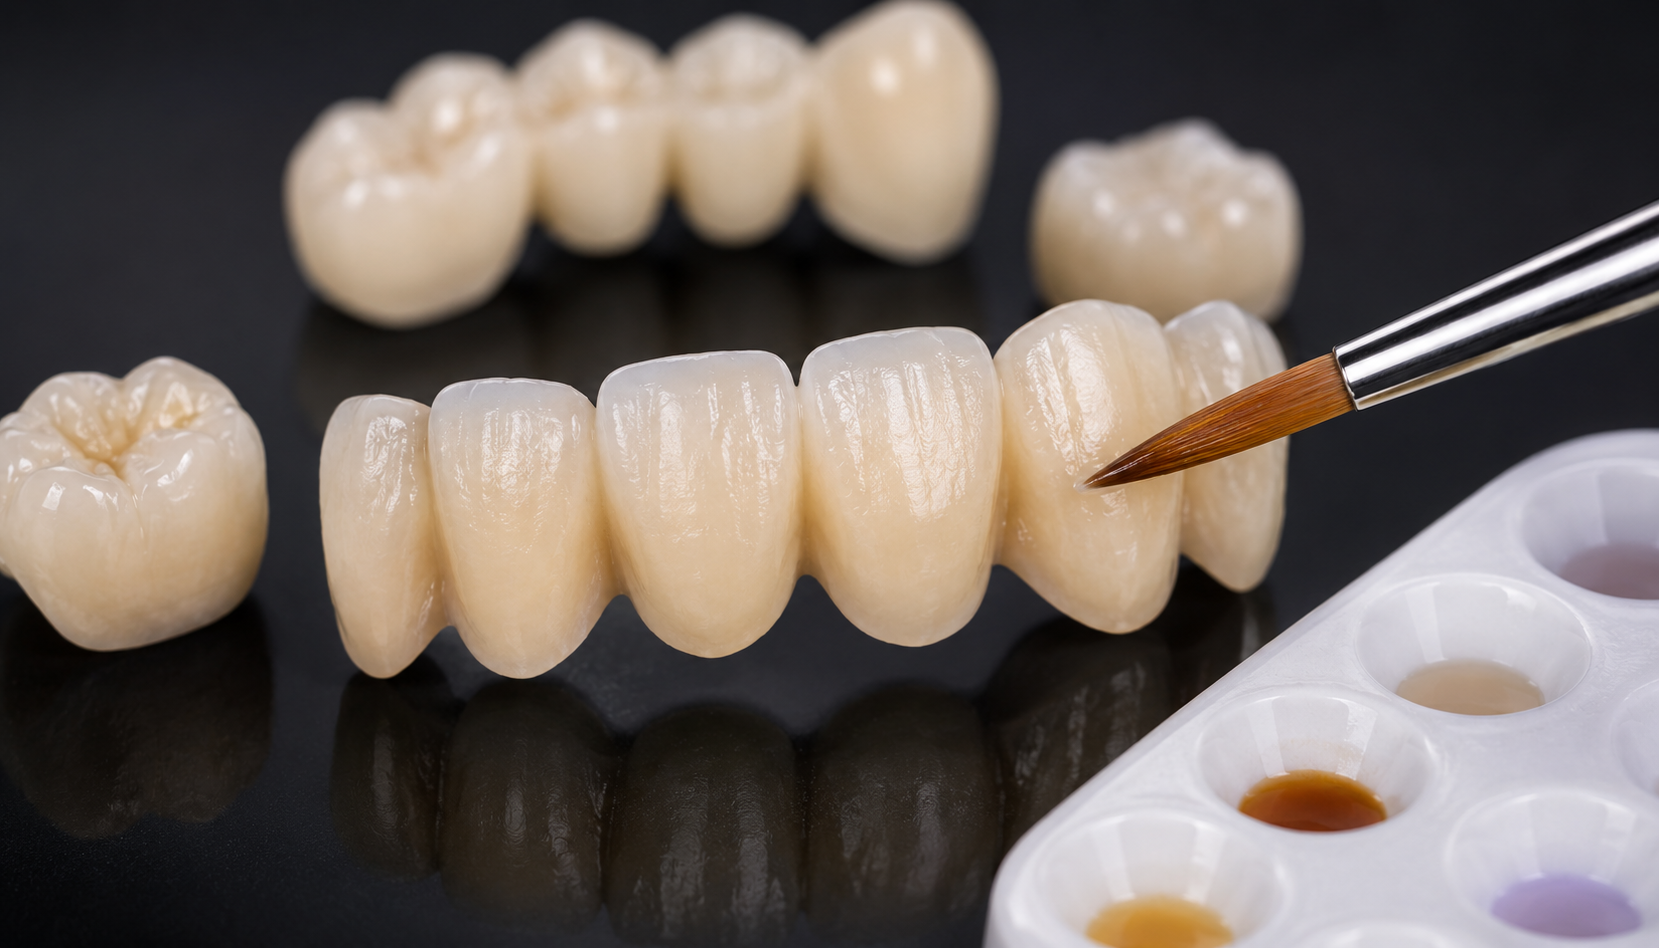
How to Choose the Right Resin for 3D Printed Bite Splints?
The shift to 3D-printed bite splints has been one of the cleaner transitions in dental lab workflows. Design digitally, send to printer, post-cure, deliver. Compared to vacuum-formed thermoplastic splints, the accuracy is better, the occlusal scheme is more precise, and the fit is more consistent across technicians. But the resin selection decision which material you print with is where labs either capture those advantages fully or squander them on a cheaper product that prints poorly, fails biocompatibility, or fractures in the patient's mouth. This guide covers the full resin selection process for 3D-printed bite splints: what properties matter, what the difference is between hard and soft formulations, how to evaluate biocompatibility, and which products dental labs in the US are using as their production standard. Whether your lab is switching from vacuum-formed splints, evaluating a new resin supplier, or troubleshooting print quality problems, this is the specification framework you need. Why Resin Selection Matters More Than Most Labs Realize? A bite splint is a long-term intraoral appliance. Unlike a temporary crown that sits for a few weeks before being replaced, a night guard or bruxism splint may be worn every night for years. The resin you choose is in contact with oral tissue for extended periods, under repeated mechanical load, and exposed to saliva, cleaning agents, and the full range of oral pH conditions. Material performance in this environment is not a theoretical concern it is a clinical requirement with direct patient safety implications. The properties that matter most are not always the ones labs evaluate first. Print resolution and layer adhesion get attention. Biocompatibility, long-term hardness retention, and fracture resistance under cyclic load often do not until a splint fractures at 18 months and the lab is fielding a remake request. The good news is that the resin evaluation framework is straightforward once you know what to look for. Five properties determine whether a resin is appropriate for 3D-printed bite splints. Everything else is secondary. The Five Properties That Determine Splint Resin Quality 1. Shore D Hardness Bite splints come in two clinical categories: hard splints for bruxism management and occlusal stabilization, and soft splints for mild bruxism, TMJ comfort, and athletic use. For hard splints which represent the majority of lab production Shore D hardness in the 75–85 range is the clinical standard. Below 75, the splint deforms under heavy bruxism load and fails to provide the occlusal stability the treatment requires. Above 85, the material becomes brittle and chips at thin margins. Soft splints target Shore A hardness in the 60–80 range flexible enough to cushion occlusal impact without the rigidity of hard formulations. For most dental labs, the clinical demand for hard resin for dental splints significantly outweighs demand for soft formulations. Stock accordingly. 2. Biocompatibility Any resin in long-term intraoral contact must meet ISO 10993 biocompatibility standards and Class II or Class IIa medical device requirements depending on your market. In the US, this means FDA clearance or 510(k) compliance for intraoral use. Resins that are not cleared for intraoral use including many 3D printing resins sold for dental models and trays are not appropriate for splint production, regardless of how well they print. Always verify that the resin you specify carries documented intraoral biocompatibility clearance before using it in a clinical splint application. This is not optional. 3. Post-Cure Dimensional Accuracy 3D-printed resins shrink slightly during photopolymerization. Incomplete curing leaves residual monomer a biocompatibility risk and a mechanical weakness. Over-curing produces excessive post-cure shrinkage that distorts fit. The correct post-cure protocol — time, temperature, light intensity varies by resin formulation and must be followed precisely for each product. Resins that deliver consistent dimensional accuracy across the post-cure cycle are the ones that produce splints that fit well on the first delivery. Poor dimensional control forces extensive chairside adjustment that defeats the efficiency benefit of the digital workflow. 4. Fracture Resistance Under Cyclic Load A bruxism splint is loaded and unloaded thousands of times per night, every night. The failure mode is not a single high-force fracture event it is fatigue fracture after thousands of cycles at lower load levels. Resins that perform well in static flexural strength tests but have poor fatigue resistance can fail clinically even when the single-event strength numbers look adequate. Evaluate fatigue data, not just static flexural strength, when comparing resin formulations for hard splint applications. 5. Surface Smoothness and Polish Retention The tissue-contacting surfaces of a splint must be smooth to prevent plaque accumulation and tissue irritation. Rough surfaces harbor bacteria, accelerate staining, and reduce patient compliance. Post-print surface smoothness is partly a function of print resolution and layer thickness, but it is also a material property some resins sand and polish to a high-gloss finish easily, while others remain micro-rough regardless of polishing effort. Hard vs. Soft Splint Resins: Knowing Which to Specify The hard/soft distinction is the most important clinical decision in splint resin selection, and it should be driven by the prescribing dentist's treatment rationale not by lab material availability. Key splint hard resin is the production standard for bruxism management splints, Michigan-style flat-plane splints, and occlusal stabilization appliances. Its Shore D hardness profile provides the rigidity needed to maintain a precise occlusal scheme across the arc of closure, which is the clinical mechanism by which these appliances achieve their therapeutic effect. Labs running Keystone's KeySplint Hard can process at 50µm or 100µm layer resolution depending on their printer's capability, with consistent dimensional accuracy across the post-cure cycle. Soft splint resins are appropriate for comfort guards, athletic mouthguards in limited clinical use, and cases where the prescribing dentist specifically requires a resilient, shock-absorbing material. The softer durometer is less effective for managing active bruxism and should not be substituted for hard formulations in cases where occlusal rigidity is clinically indicated. If you produce both hard and soft splints at volume, stock both formulations as separate inventory items. Substituting one for the other because a stock item ran out is a clinical error these are not interchangeable materials. Print Settings, Post-Cure, and Workflow Considerations Even the best dental splint printing resin underperforms when print settings and post-cure protocols are not optimized for the specific formulation. Here is the workflow framework that produces consistent results: Layer thickness: 50µm layers deliver better surface smoothness and marginal accuracy for thin splint margins. 100µm layers are faster and acceptable for posterior full-coverage designs where marginal precision is less critical. Match layer thickness to the specific clinical requirements of each design. Orientation: Print splints at 45–60° to the build platform. Flat horizontal orientation causes delamination stress across the full arch span. Vertical orientation concentrates support mark placement at the tissue surface. Angled orientation distributes both delamination stress and support attachment points most favorably. Support strategy: Place supports on the non-occlusal, non-tissue surfaces wherever possible. Support removal marks on tissue-contacting or occlusal surfaces require extensive post-processing to eliminate and can compromise fit accuracy if not fully removed. Post-cure: Follow the manufacturer's published post-cure protocol exactly — time under curing light, curing light intensity, and temperature. Under-cured resin retains residual monomer, compromising biocompatibility and mechanical properties. Over-cured resin can warp, particularly in thin sections. A calibrated post-cure unit with documented UV output is not optional for biocompatible intraoral resin production. Polish sequence: After support removal, progress through 400, 800, and 1200 grit wet-dry sandpaper on non-occlusal surfaces, then buff to high gloss with acrylic polishing compound. Occlusal surfaces should be refined by hand under articulating paper contact to verify fit before final polish. Completing Your Lab's 3D Printing Material Stack Splint resin is one component of a full 3D printing material workflow. Labs that also produce custom impression trays, surgical guides, or orthodontic models use distinct resins for each application and the same quality framework applies across all of them. Key tray resin for dental labs covers the custom tray application with a formulation optimized for rigidity, dimensional accuracy, and ease of trimming rather than the biocompatibility requirements of intraoral splint resins. This material distinction matters operationally: labs that use a single resin across multiple applications to simplify inventory are accepting performance compromises in every application. The correct resin for each application, stocked as separate inventory, produces better clinical outcomes and fewer remakes across the full lab workflow. It is also worth noting that the labs most efficiently managing their 3D printing workflow are often the same labs running mature CAD/CAM milling workflows with established zirconia blocks dental and PMMA disc inventories. The operational discipline required to manage milling materials tracking batch consistency, matching grade to indication, following manufacturer specifications transfers directly to 3D printing resin management. Labs that have built that discipline in their milling workflow adopt good resin management practices more readily than labs encountering it for the first time. If you are at the stage of building or rationalizing your full CAD/CAM material inventory zirconia blank and dental zirconia discs for milling alongside 3D printing resins for printed appliances consolidating through a single US supplier reduces ordering complexity and gives you consistent batch documentation across your full material range. ZirconiaGuys functions as a zirconia materials distributor usa and stocks Keystone resin products alongside the full Aidite and Upcera zirconia blocks and PMMA range. The resin you choose for 3D-printed bite splints is a clinical decision, not just a material procurement decision. Biocompatibility, hardness, fatigue resistance, and post-cure accuracy determine whether a splint performs therapeutically over its intended service life or comes back as a remake. The framework is straightforward: verify intraoral clearance first, match hardness to indication, follow the manufacturer's post-cure protocol precisely, and source from a supplier that provides consistent batch documentation. Getting this decision right means your lab's digital splint workflow delivers on its efficiency and quality promises case after case, without the remake and adjustment cycles that undermine the value of the digital investment.
Learn more
How to Choose the Right Zirconia Block for Different Dental Restorations?
The zirconia block you select at the start of a case determines the clinical outcome at the end. Strength grade, disc format, pre-shaded or white, monolithic or multilayer each decision compounds into the final restoration's esthetic quality, structural reliability, and the amount of bench time required to get it there. Labs that get this selection right consistently produce better restorations with fewer remakes. Labs that treat it as a commodity decision pay for it in rework. This guide cuts through the complexity and gives dental labs a clear, practical framework for matching zirconia blocks to clinical indications from simple single-unit posterior crowns to full-arch implant-supported prostheses. Whether you are building out a new CAD/CAM workflow or rationalizing an existing material inventory, this is the selection reference you need. Why Zirconia Block Selection Is More Complex Than It Looks? The term zirconia blocks dental labs work with covers a wide range of products that share a material class but differ substantially in performance. A 3Y-TZP monolithic disc used for a posterior bridge and a 5Y multilayer pre-shaded disc used for an anterior esthetic crown are both "zirconia blocks" but their flexural strength, translucency, sintering requirements, and ideal clinical applications have almost nothing in common. The key variables that define any zirconia block are: yttria content (which controls the strength-to-translucency tradeoff), disc format (white or pre-shaded), and disc architecture (monolithic flat or multilayer gradient). Understanding each variable is what enables correct selection — and getting just one variable wrong produces a restoration that requires significantly more post-sintering correction than a correctly specified block would have needed. For a detailed breakdown of how yttria content drives the performance differences between 3Y, 4Y, and 5Y grades, refer to our blog on the difference between 3Y, 4Y, and 5Y zirconia, which covers the crystal phase science, clinical strength data, and indication framework in full. Step 1 — Match the Strength Grade to the Structural Demand The first selection decision is always strength grade. Before considering esthetics, format, or price, identify the peak structural demand of the restoration. This single question determines the minimum yttria grade that is clinically safe. Posterior bridges of 3 or more units — 3Y-TZP is the only clinically appropriate grade. Flexural strength of 900–1200+ MPa is required to safely meet the connector cross-section minimums under posterior occlusal load. Any material below 700–800 MPa creates meaningful fracture risk at the connector — a risk that no esthetic benefit justifies. Posterior single crowns — 3Y or 4Y is appropriate depending on the patient's occlusal load. For bruxers or patients with documented heavy occlusion, 3Y provides the safety margin. For standard loading, 4Y delivers better esthetic integration without structural compromise. Anterior single crowns and short-span anterior bridges — 4Y or 5Y is appropriate. The occlusal demand in the anterior zone is lower than posterior, and the esthetic demand is higher. This is where the strength-translucency tradeoff works in the lab's favor — you can afford to trade some strength for significantly better optical performance. Anterior veneers — 5Y is the correct grade. The material volume in a veneer is too thin for posterior load demands to be relevant. Maximum translucency is the overriding clinical priority. Implant-supported crowns — Grade selection follows zone. Anterior implant crowns: 5Y or 4Y multilayer. Posterior implant single crowns: 4Y or 3Y. Posterior implant bridges: 3Y only. The aidite zirconia blocks range covers 3Y through 5Y across multiple disc formats including Aidite's high-strength grades for posterior structural cases and high-translucency multilayer grades for anterior esthetic work all available from US inventory at ZirconiaGuys. Restoration Type Minimum Grade Preferred Format Posterior bridge (3+ unit) 3Y-TZP Monolithic white or pre-shaded Posterior single crown 3Y or 4Y Pre-shaded or white Anterior bridge (3-unit) 4Y Multilayer pre-shaded Anterior single crown 4Y or 5Y Multilayer pre-shaded Anterior veneer 5Y Pre-shaded Implant posterior bridge 3Y Monolithic Implant anterior crown 5Y or 4Y Multilayer pre-shaded Step 2 — Choose the Right Disc Format: White vs. Pre-Shaded Once the grade is determined, the format decision follows. This is where labs often lose time and create unnecessary rework by defaulting to one format for all cases. A zirconia blank in white format gives the technician full manual control over shade. The lab applies external liquid shade after milling, building the color precisely to match any shade request including unusual chromas, complex characterization, and cases outside the standard VITA A-D range. White blanks are the right choice for custom and complex cases but they require staining labor on every unit. A pre-shaded blank has the shade built into the material during manufacturing. For standard A1 through D4 cases the significant majority of daily lab production pre-shaded discs eliminate the external staining step entirely. The shade is in the material, consistently reproducible batch to batch, without the operator variability that manual staining introduces. The upcera dental zirconia blank range covers both formats across 3Y, 4Y, and 5Y grades. Upcera's pre-shaded formulations are calibrated to both VITA Classic and 3D-Master shade guides — making them compatible with either shade-matching system your referring dentists use. For labs evaluating the full Upcera format range, ZirconiaGuys stocks the complete lineup from US inventory with no international lead times. Practical stocking guidance: Use white zirconia dental blanks as your secondary inventory for custom cases. Use pre-shaded multilayer as your primary production stock. Most labs find that 70–80% of their cases fall within standard A-D shades where pre-shaded discs deliver better consistency with less labor than white blanks and manual staining. Step 3 — Monolithic or Multilayer? The Architecture Decision The third decision is disc architecture. This choice determines how the optical properties of the finished restoration are structured and it has significant implications for both esthetic outcome and finishing workflow. Monolithic zirconia is manufactured from a single, homogeneous composition. Every point in the disc has identical strength, shade, and translucency. Monolithic discs are the correct format for high-strength posterior bridge applications where structural uniformity at the connector is critical. They are also the correct format for cases using white discs where full stain control is needed the uniform starting point enables clean, consistent shade layering. Multilayer zirconia incorporates a gradient of yttria content from the cervical end to the incisal end of the disc. This gradient produces a corresponding gradient of translucency and shade character stronger and more opaque at the cervical, more translucent at the incisal that replicates the natural optical zonation of a real tooth. When the CAD/CAM toolpath is correctly oriented to this internal gradient, the milled crown already contains the natural shade transition before any stain is applied. For labs producing high-volume anterior esthetic work, zirconia blocks with natural gradient architecture such as the Aidite Superfect ZIR SHT pre-shaded multilayer disc represent the highest-efficiency format for standard anterior cases. The internal gradient eliminates staining on the majority of A-D shade cases, reduces finishing time per unit significantly, and delivers consistent shade transitions across multi-unit cases that manual staining cannot replicate with the same reliability. For a deeper look at how multilayer esthetic disc technology works in anterior case workflows, our blog on esthetic zirconia discs covers the material science and milling workflow in detail. Step 4 — Thickness, Diameter, and Equipment Compatibility Grade, format, and architecture settled the final selection variables are physical dimensions and equipment compatibility. Disc thickness must match the restoration's minimum material requirements: 10 mm — Anterior single crowns, thin veneers 12 mm — Standard anterior and premolar crowns, anterior bridges 14 mm — Posterior single crowns, short-span posterior bridges 16–20 mm — Full-arch and long-span bridge cases Always verify the manufacturer's published minimum wall thickness and connector cross-section requirements for the specific disc. Esthetic-grade 5Y discs may require slightly more material volume than 3Y discs of the same restoration type to compensate for the lower flexural strength. Disc diameter is standardized at 98 mm for virtually all open-system dental milling machines — Roland, Amann Girrbach, Zirkonzahn, VHF, and Sirona included. Confirm open-system compatibility before committing to any new product, particularly if switching from a manufacturer whose format has historically been proprietary. The dental zirconia discs available at ZirconiaGuys are all 98 mm diameter in standard open-system format compatible with every major milling system used in US dental labs. As a zirconia materials distributor USA labs rely on for consistent domestic inventory, ZirconiaGuys ships same day or next day on in-stock items, eliminating the international lead time uncertainty that affects direct overseas sourcing. Choosing the right zirconia block for each dental restoration is a structured decision not a preference. Strength grade first, format second, architecture third, dimensions and compatibility fourth. Every variable in that sequence has a correct answer for any given clinical indication, and selecting correctly at each step produces restorations that require less post-sintering intervention, fewer remakes, and more consistent clinical outcomes. For US dental labs, sourcing zirconia blocks from a domestic zirconia materials distributor USA means consistent stock, same-day shipping, and full technical documentation without the lead time uncertainty of international supply chains. ZirconiaGuys stocks Aidite, Upcera, and other leading brands across all grades and formats from US inventory, with technical support available for sintering profiles and milling parameters on every product we carry.
Learn more
Understanding Resin Shelf Life and Its Impact on Print Consistency
Every dental lab that runs a 3D printer has encountered the same frustrating scenario: a print that worked perfectly last month suddenly produces warped bases, delaminated layers, or surfaces that won't post-cure correctly and nothing in the printer settings changed. The resin is the same product, from the same supplier, run on the same machine with the same parameters. The variable that changed is time. Resin shelf life is one of the least-discussed sources of print failure in dental 3D printing workflows, and one of the most impactful. Unlike dental zirconia discs or milled PMMA where a disc either mills correctly or it doesn't resin degradation is gradual and difficult to detect visually until it is already producing clinical failures. Understanding how dental resins age, what storage conditions accelerate degradation, how to test resin before committing it to a clinical production run, and what the shelf life parameters of specific products mean in practice is foundational knowledge for any lab running a resin-based printing workflow. What Is Dental Resin Shelf Life and Why Does It Matter? Dental 3D printing resins are photopolymer formulations liquid monomers and oligomers combined with photoinitiators, pigments, and stabilizers that polymerize when exposed to the specific wavelength of UV or visible light emitted by the printer's light source. The shelf life of a dental resin is the manufacturer's specification for the period during which the resin will perform within its validated parameters when stored correctly. Shelf life matters because every component of the resin formulation has a finite stability window. Photoinitiators the compounds that absorb light and trigger polymerization — degrade over time, particularly when exposed to ambient light, heat, or oxygen. As photoinitiator concentration drops, the resin requires longer exposure times to achieve the same degree of cure, and the cure depth profile shifts in ways that can cause interlayer bonding failures, dimensional distortion, and surface quality degradation. Stabilizers added during manufacturing slow this degradation, but they do not stop it. Even in sealed, correctly stored resin, the formulation changes over time. The manufacturer's shelf life specification is the period within which that change remains within the validated tolerance for clinical performance. After that point, the resin may still print — but it may not print to the dimensional and mechanical specifications that clinical applications require. This matters more for dental applications than for general 3D printing because dental restorations and appliances have defined clinical requirements. A model printed from degraded resin may still look acceptable but be dimensionally inaccurate at the level that affects crown fit, splint occlusion, or surgical guide positioning. The failure is not always visible — it shows up clinically, after delivery. How Resin Degrades: The Chemistry of Shelf Life? Understanding how resin degrades makes it possible to prevent and detect degradation before it affects production. There are four primary degradation mechanisms in dental photopolymer resins. Photoinitiator depletion. Photoinitiators are consumed during curing — but they also undergo slow decomposition reactions in the presence of ambient light, even at low intensity. This is why resins must be stored in opaque containers away from light sources. A bottle left on a bench under fluorescent lighting for several weeks can lose meaningful photoinitiator activity even without being opened. Once photoinitiator concentration drops below the formulation threshold, cure depth decreases, interlayer bonding weakens, and dimensional accuracy deteriorates. Monomer pre-polymerization. Dental resins contain reactive monomers that can begin slow polymerization reactions without light exposure triggered by heat, mechanical shaking, or trace amounts of radical contamination. Pre-polymerization raises the viscosity of the resin gradually. As viscosity increases beyond the formulation's validated range, the resin spreads less uniformly across the build platform, layer thickness becomes inconsistent, and the print's dimensional accuracy degrades. Heavily pre-polymerized resin develops visible cloudiness or particulate matter but this is a late-stage sign. Early-stage viscosity increase is not visually detectable without measurement. Additive separation and settling. Pigments, fillers, and other additives in dental resins are suspended in the liquid monomer matrix. Over time particularly if the resin is stored undisturbed for extended periods these additives settle toward the bottom of the container. Inadequate mixing before use means the resin drawn from the top of the container has different pigment and filler concentration than the resin at the bottom, producing shade and opacity inconsistency across a production run. Hydrolytic degradation. Dental resins absorb moisture from the atmosphere over time, particularly in humid storage environments. Water molecules disrupt the monomer-oligomer interaction, alter the resin's photochemical response, and reduce the mechanical properties of the cured material. Resins stored in opened containers in humid environments degrade significantly faster than sealed resins in controlled storage conditions. Shelf Life by Resin Type: What the Numbers Mean in Practice Different dental resin formulations have different shelf lives depending on their chemistry, photoinitiator system, and stabilizer package. Most dental-grade resins specify shelf life between 12 and 24 months from the manufacturing date when stored under manufacturer-specified conditions typically sealed, away from light, between 15°C and 25°C. For diagnostic model resins, the shelf life impact is primarily dimensional degraded model resin produces inaccurate reproductions that affect crown fit evaluation, orthodontic model accuracy, and surgical guide placement. For the dental 3d printing key mask resin used in opaque model masking applications where precise surface reproduction is required photoinitiator depletion directly affects the sharpness of surface detail reproduction. The masking function of this resin depends on complete, uniform surface cure, which degrades progressively as the photoinitiator concentration drops below the formulation threshold. Splint and night guard resins are particularly sensitive to shelf life issues because their mechanical properties hardness, flexural strength, and resistance to deformation under occlusal load are tightly specified for clinical function. A splint printed from resin with degraded photoinitiator may appear correctly cured at the surface but have subsurface layers with incomplete crosslinking, producing a restoration that fractures or deforms earlier than its clinical specification allows. This failure mode is dangerous precisely because it is not detectable at delivery it presents clinically after weeks or months of patient use. Surgical guide resins carry the highest clinical risk from shelf life failure because dimensional accuracy is directly linked to implant placement safety. A surgical guide printed from degraded resin that is off-specification by even 0.2–0.3 mm at the sleeve position can translate to a clinically significant implant angulation error. The Key Model Resin Standard: Why Consistency Begins at the Bottle For dental labs evaluating their model printing workflow, the key model resin product line from Keystone Industries sets the standard for what documented shelf life management looks like in practice. Each batch carries a manufacturing date and expiry date, with validated storage conditions specified on the label. This documentation enables labs to implement first-in-first-out inventory rotation the single most effective workflow practice for eliminating shelf life-related print failures. First-in-first-out (FIFO) inventory rotation means the oldest stock is always used before newer stock. In practice, this requires labeling each resin bottle with its receipt date when it arrives, storing newer bottles behind older ones on the shelf, and checking manufacturing and expiry dates at each new order. Labs that skip this step frequently discover after a run of unexplained print failures — that they have been drawing from a bottle received 18 months ago while newer stock sat behind it. Batch documentation also enables traceability. When a print failure occurs, batch documentation allows the lab to determine whether the resin was within shelf life, whether storage conditions were met, and whether the specific batch had any quality variation noted by the manufacturer. Without this documentation, troubleshooting print failures is guesswork. For labs that stock multiple resin types model, splint, surgical guide, denture base the documentation discipline established for one product should apply uniformly across the full resin inventory. Inconsistent documentation practices are the root cause of most shelf life-related production failures. Storage Protocols That Extend Resin Performance Correct storage is what makes the manufacturer's shelf life specification achievable. Most dental resin failures attributed to "bad batches" are actually storage failures — product that was within specification at delivery but was degraded by incorrect handling before use. Temperature control is the most critical storage variable. Dental resins should be stored between 15°C and 25°C. Heat accelerates all four degradation mechanisms simultaneously photoinitiator decomposition, pre-polymerization, additive settling, and hydrolytic degradation. Labs that store resin in rooms that reach 30°C+ during summer months are routinely consuming two to three months of effective shelf life per summer. Dedicated climate-controlled storage for resins even just a temperature-stable cabinet away from direct heat sources significantly extends practical shelf life. Light exclusion is equally critical. Resins must be stored in their original opaque containers, away from UV light sources, fluorescent tubes, and windows. Photoinitiator activation begins at light intensities far below those that produce visible curing ambient lab lighting is sufficient to trigger slow photoinitiator depletion in exposed resin. Never transfer resin to clear containers for storage, even temporarily. Sealed storage after opening is essential for preventing moisture ingress and oxidative degradation. After each use, resins should be sealed tightly and stored upright. Resin remaining in the printer's vat after a print run should be filtered back into the original container through a resin filter to remove any partially cured particles, then resealed and stored correctly. For labs managing a full range of dental resin 3d printing products from model resins through splint, surgical guide, and denture base formulations a dedicated resin storage area with temperature monitoring and light exclusion is not an optional upgrade. It is a clinical quality control measure. Testing Resin Before Clinical Production: A Practical Protocol When resin age or storage history is uncertain for example, when stock was received without clear documentation, stored in suboptimal conditions, or carried over from a previous production period testing before clinical use is essential. The test print protocol for resin shelf life evaluation involves printing a standardized test geometry from the suspect resin using the validated parameters for that resin. The test print should include: A thin-walled section (0.5–1.0 mm) to evaluate interlayer bonding and surface cure completeness. Delamination, surface tackiness, or visible layer lines in areas that should be smooth indicate photoinitiator depletion. A calibrated dimensional reference feature a circle or square of known dimension to evaluate whether the resin is printing within dimensional tolerance. Swelling, shrinkage, or distortion beyond the validated tolerance indicates monomer pre-polymerization or altered cure kinetics. A surface detail section reproducing a fine texture to evaluate whether the resin is achieving the surface resolution specified for its clinical application. Loss of detail sharpness indicates viscosity increase or photoinitiator degradation. For key splint soft resin and other mechanically critical resins, the test protocol should include a post-cure hardness check using a Shore durometer or equivalent. Hardness below specification indicates incomplete crosslinking from photoinitiator depletion a clinical failure mode that the print's visual appearance will not reveal. If the test print fails any of these criteria, the resin should be removed from clinical production regardless of its stated expiry date. A resin that was stored incorrectly may fail within its nominal shelf life. The test protocol is the definitive quality gate, not the expiry date alone. How Resin Shelf Life Connects to Your Full Material Workflow? Dental labs that run both 3D printing and milling workflows manage two fundamentally different material stability profiles. Zirconia blocks and milled PMMA discs the solid-state materials that form the backbone of most lab production do not degrade meaningfully over time in normal storage conditions. A zirconia blank stored correctly for two years performs identically to one used the week it was delivered. Zirconia dental blanks and zirconia blocks dental discs have effectively indefinite shelf lives under normal lab storage no photoinitiator degradation, no viscosity change, no light sensitivity. This stability difference has a practical implication for inventory management: the discipline required for resin inventory is significantly greater than for solid-state milling materials. Labs expanding from pure milling workflows into 3D printing need to implement dedicated resin inventory protocols FIFO rotation, temperature monitoring, batch documentation, and periodic test printing that simply do not apply to their dental zirconia discs and PMMA disc inventory. As a zirconia materials distributor USA supplying both milling materials and dental 3D printing resins, ZirconiaGuys stocks Keystone resin products from US inventory with full batch documentation. Understanding the shelf life and storage requirements of each product is part of the supplier relationship labs that have questions about specific product storage requirements or batch dates can request documentation directly. For a broader look at how impression tray resins and other dental 3D printing materials fit into the full CAD/CAM workflow, the ZirconiaGuys guide to dental impression trays covers the material selection and workflow considerations for tray-based digital impression workflows in detail. Resin shelf life is a workflow variable that rewards discipline and punishes neglect. The labs that eliminate resin-related print failures are not the ones using the most expensive resins they are the ones that implement FIFO inventory rotation consistently, store resins correctly, test before clinical production when any doubt exists, and treat resin management as a clinical quality control function rather than a supply room afterthought. The investment is minimal. The payoff in eliminated remakes, consistent print quality.
Learn more
How to Improve the Esthetics of Temporary Restorations?
Temporary restorations do more clinical work than most labs give them credit for. Beyond protecting the prepared tooth during treatment, a well-made provisional sets patient expectations for the final restoration shape, shade, translucency, and surface texture are all evaluated during the temporary phase. When the provisional looks flat, too opaque, or poorly shade-matched, patients arrive at the delivery appointment already skeptical. When it looks natural, delivery becomes significantly easier. The esthetic quality of temporary restorations is not determined primarily by the finishing technician's skill it is determined upstream, by the material selected and the workflow used to produce it. Most esthetic problems with temporaries can be traced to one of three causes: wrong PMMA formulation for the application, toolpath alignment errors that waste the disc's gradient architecture, or surface finishing shortcuts that leave the restoration looking processed rather than natural. Each of these is a fixable workflow problem, not a talent problem. This guide covers how to fix them. Why Material Selection Is the Largest Esthetic Variable in Temporary Production? The single most impactful decision in temporary restoration esthetics is made before the case reaches the milling machine: the PMMA disc format. Labs that use single-shade opaque PMMA for anterior provisional cases are working against the material from the start — no amount of staining, polishing, or glazing fully compensates for a disc that was never designed to produce natural-looking tooth anatomy. As we covered in our guide to the role of dental PMMA in temporary and long-term restorations, PMMA is a material class with distinct formulations for distinct applications. The formulation decision determines the optical ceiling of the finished restoration. Single-shade discs have a flat optical ceiling every unit looks the same regardless of how well it is milled and finished. Multilayer gradient discs have a much higher optical ceiling — the material itself contributes translucency, shade depth, and incisal character that single-shade formats cannot replicate regardless of post-processing effort. What multilayer PMMA actually does differently: A multilayer disc is manufactured with gradient yttria-analog pigmentation — transitioning from a higher-chroma, more opaque zone at the cervical end to a more translucent, cooler zone at the incisal end. When the CAD/CAM toolpath is correctly aligned with this internal gradient, the milled restoration already contains the optical character of natural tooth anatomy before any surface work is applied. The dentin zone of the crown exits sintering looking warm and saturated. The incisal zone exits looking translucent and cool. The technician's job is refinement, not compensation. For aidite pmma multilayer discs specifically, this gradient architecture is calibrated to VITA shade references meaning the internal gradient matches the chroma and value relationships of standard A-D shades across the full disc. Labs that have standardized on this product for anterior temporary production consistently report faster case turnaround and fewer shade-correction remakes compared to their previous single-shade workflow. Getting the Toolpath Right: The Step Most Labs Skip Selecting a multilayer PMMA disc and then milling it without aligning the toolpath to its internal gradient is the most common technical error in temporary production. The result is a restoration with the gradient running in the wrong direction incisal-grade translucent material at the cervical, dentin-grade opaque material at the incisal edge. The crown exits the mill looking bright white at the margin and flat at the tip. The gradient is working exactly as designed, just backwards. Every multilayer PMMA disc is directionally marked an engraved arrow or notation on the disc surface indicates the gingival-to-incisal axis. This marking must be verified against the mill's chuck orientation before every case from a new batch. For temporary crowns aidite pmma, the correct orientation places the disc's dentin-dominant zone at the base of the crown preparation margin and the translucent zone toward the incisal edge of the crown design. Beyond orientation, the CAD design itself must be positioned to capture the gradient correctly. In exocad and 3Shape, the blank orientation module allows the technician to visualize where the crown design sits within the disc's gradient layers before committing the toolpath. Use it. A crown designed with the preparation margin sitting in the incisal zone of the disc will look wrong regardless of material quality, orientation, or finishing technique. The five minutes spent verifying gradient placement before milling eliminates the most common reason temporary restorations require shade correction. Checklist before milling any anterior multilayer PMMA case: Disc directional marking verified against mill chuck orientation Crown preparation margin positioned in the body/dentin zone of the disc Incisal one-third of crown design falling within the enamel/translucent zone CAD software blank orientation preview reviewed and confirmed Feed rate appropriate for PMMA at the layer transition zones (reduce by 10–15%) Shade Selection for PMMA Temporaries: Matching the Final Restoration Intent The shade workflow for PMMA temporaries is different from zirconia and treating them the same is one of the most consistent sources of shade mismatch at delivery. Dental zirconia discs for permanent restorations are shaded to a final sintered result. PMMA provisionals are shaded in a pre-cured state that shifts slightly in value and chroma after milling and polishing. Labs that shade-match PMMA wet (immediately after milling, before polishing) consistently overshoot — the final polished and dried restoration is lighter and lower-chroma than the wet shade assessment suggested. The correct shade assessment sequence for PMMA temporaries: First, select the disc shade that corresponds to the final restoration target shade from the prescribing dentist's shade records. Pre-shaded multilayer PMMA in standard A-D formats covers the significant majority of everyday cases use the pre-shaded disc as the baseline and plan for minimal supplementary staining. Second, after milling and before any polishing, evaluate the dry milled surface under dental operatory-equivalent lighting. This is the closest approximation of the final polished result. Wet assessment distorts apparent value. Third, compare the dry milled surface to the shade tab under three light sources fluorescent, daylight, and incandescent. Shade tabs look different under each. If the shade matches under fluorescent only, it will fail in the patient's natural environment. Multilayer PMMA discs with correctly formulated internal gradients perform consistently across light sources a flat single-shade disc often metamers badly under incandescent or natural light even when it looks correct under fluorescent. Fourth, if supplementary staining is needed typically only for cases outside the standard A-D range or when the prescribing dentist requires a very specific characterization — apply at 30–50% of your normal stain concentration. Pre-shaded multilayer PMMA already carries internal chroma; full stain concentration oversaturates the cervical zone and produces a result that looks hand-painted rather than natural. Surface Finishing: Where Esthetics Are Won or Lost Material selection and toolpath alignment set the optical potential of the temporary restoration. Surface finishing determines how much of that potential is actually realized. A correctly milled multilayer PMMA provisional with poor surface finishing looks worse than a single-shade disc that has been properly finished the gradient character in the material is invisible under a hazy, scratched surface. For aidite denture base pmma and crown-and-bridge PMMA provisionals alike, the finishing sequence follows the same principle: work from coarse to fine until the surface is optically smooth, then polish to high gloss without adding heat. Four-stage finishing sequence for PMMA temporaries: Stage 1 — Gross reduction: Tungsten carbide bur or acrylic trimming bur at low speed for sprue removal and gross morphology refinement. Keep speed low PMMA heats quickly and heat generates surface smearing that makes subsequent polishing harder. Stage 2 — Surface refinement: Silicone polishing points in medium and fine grits, working all surfaces systematically. The goal at this stage is to eliminate all milling tool marks and produce a uniformly matte surface with consistent scratch depth. Any deep tooling marks left at this stage will show through the final gloss polish. Stage 3 — Pre-polish: Pumice slurry with a rag wheel or felt point at low RPM. Apply consistently across all surfaces. The pumice slurry removes fine scratches from Stage 2 and prepares the surface for high-gloss polishing. Do not rush this step pumice stage quality directly determines final gloss quality. Stage 4 — High-gloss polish: Acrylic polishing compound (tin oxide or aluminum oxide-based, not abrasive paste) with a clean dry felt wheel or muslin wheel at low RPM. Apply light, even pressure. The goal is a mirror-like surface you should be able to see reflection in the completed restoration surface before delivery. Critical error to avoid: Polishing wheels that have been used for one stage should not be reused for a finer stage without cleaning. Contaminating a fine polishing wheel with pumice residue introduces scratches that defeat the purpose of the finer step. Dedicate separate wheels to each stage. When to Use Staining on PMMA Temporaries and When Not To? Staining is where many labs add unnecessary time to temporary production. The appropriate question before reaching for the stain kit is not "how should I stain this?" it is "does this actually need staining?" For pre-shaded multilayer pmma disc formats, the answer in standard A-D shade cases is usually no. The cases where staining genuinely adds value on PMMA temporaries are narrow and specific: Custom characterization cases — when the prescribing dentist has requested replication of specific natural tooth features (craze lines, hypocalcification spots, incisal halo, fluorosis). These effects cannot be achieved through disc selection alone and require surface staining. Strong B or C shade cases — outside the standard A-shade range, where pre-shaded discs in those shades are not stocked or where the shade is unusually high-chroma. Cases adjacent to distinctive existing dentition — when the patient's natural teeth have visible and unusual optical characteristics (strong internal blue tones, deep amber cervical saturation) that standard disc shades do not match. Extended temporary cases — where the provisional will be worn for 3+ months and the prescribing dentist wants a more refined esthetic result that guides the final restoration design. In these cases, careful characterization of the temporary can provide diagnostic value for the final lab prescription. In all other cases which is the majority of daily production — the pre-shaded gradient disc correctly milled and properly finished produces a result that does not need staining. Adding stain to a correctly executed multilayer temporary case introduces variables (stain concentration, firing consistency, color shift on firing) that are more likely to degrade the result than improve it. How Temporary Esthetics Connect to Final Zirconia Outcomes? The esthetic quality of a temporary restoration directly affects the prescription accuracy for the final restoration. A correctly shaded, correctly shaped PMMA temporary gives the prescribing dentist a patient-tested prototype for the permanent case. Shape modifications, length adjustments, and shade refinements can be incorporated into the final dental zirconia discs prescription based on patient feedback during the temporary phase before the permanent restoration is milled. Labs that produce high-quality temporaries receive better-specified final prescriptions. The dentist has already resolved shape and shade at the temporary stage, which means the final lab prescription is more precise and the delivered restoration requires fewer adjustments. The downstream efficiency gain from better temporaries is not just patient satisfaction it reduces re-do requests, reduces delivery chair time, and reduces the likelihood of a remake on the permanent restoration. This connection between temporary and permanent quality is why the material investment in high-quality multilayer PMMA pays off beyond the temporary case itself. As a dedicated zirconia materials distributor USA, ZirconiaGuys supplies both the PMMA range for provisionals and the full dental zirconia discs range for permanent restorations meaning labs can align the temporary and permanent workflows around the same shade references, the same supplier documentation, and the same technical support. Improving the esthetics of temporary restorations is a systems problem, not a skills problem. The material needs to be right multilayer pre-shaded PMMA for anterior provisional cases, single-shade for posterior where esthetics are less critical. The toolpath needs to capture the gradient correctly. The finishing sequence needs to be executed completely, without skipping stages. And the staining decision needs to be disciplined reserved for cases that genuinely need it, not applied reflexively to every unit. Labs that fix the material and workflow first consistently achieve better results than labs that compensate for wrong materials through extra finishing effort. The quality is in the upstream decisions. Zirconia dental blanks and PMMA provisionals both perform at their best when the lab uses each in its correct application, in the correct format, with the workflow adapted to the specific material's requirements.
Learn more
PMMA Multilayer vs Monolayer PMMA: Which Delivers More Natural Esthetics?
The question of whether to stock multilayer or monolayer PMMA comes up in every dental lab at some point usually after a technician spends 25 minutes staining a temporary crown that should have taken 8, or after a patient rejects a provisional because it looks flat compared to the adjacent natural teeth. Both scenarios have the same root cause: using a monolayer disc for a case that needed a multilayer. PMMA is a material category, not a single product. The format decision multilayer gradient versus single-shade monolayer determines esthetic outcome ceiling as much as the grade of material itself. This guide explains the difference between the two formats, where each belongs in a dental lab workflow, and how to make the correct choice for every case type without overthinking it. What Is the Actual Difference Between Multilayer and Monolayer PMMA? The difference is architectural, not chemical. Both multilayer and monolayer PMMA discs are manufactured from the same base polymer pre-polymerized polymethyl methacrylate. The chemistry, biocompatibility, and machinability are essentially equivalent. What differs is how the shade and translucency are distributed through the disc. Monolayer PMMA is a single-composition disc. Every point through the disc thickness has the same shade value, the same opacity, and the same translucency. If you mill a crown from a monolayer A2 disc, every section of that crown cervical, body, incisal is the same A2 value. There is no internal gradient. The optical character of the restoration is uniform throughout. Multilayer PMMA is manufactured with a deliberate gradient built into the disc during production. The cervical end of the disc contains a higher-chroma, more saturated, more opaque formulation that mimics natural dentin. As you move toward the incisal end of the disc, the composition transitions to a less saturated, more translucent formulation that replicates the optical behavior of natural enamel. A correctly oriented and toolpath-mapped multilayer disc produces a crown with a built-in shade gradient warmer and more opaque at the gingival margin, cooler and more translucent at the incisal edge without any external staining. That internal gradient is the entire esthetic argument for multilayer PMMA. Natural teeth are not a single uniform shade. They are optically complex structures with distinct dentin and enamel zones that transmit, scatter, and absorb light differently. A monolayer disc cannot replicate this complexity without external staining. A well-designed multilayer disc approximates it from the mill. Why Multilayer Matters for Temporary Restorations? For labs producing temporary crowns and bridges, the aidite pmma multilayer disc format addresses the single most common complaint about PMMA provisionals: they look artificial. Not because PMMA is an inferior material, but because a flat, single-shade monolayer disc produces a flat, single-shade result and natural teeth simply do not look like that. This matters clinically beyond pure esthetics. Temporary restorations in anterior cases serve as shade and shape previews for the final restoration. If the provisional looks wrong too opaque, too uniform, lacking the natural variation that adjacent teeth show the patient may reject it, require modification, or lose confidence in the treatment plan before the permanent restoration is placed. A multilayer provisional that enters the mouth looking natural buys time, builds confidence, and gives the clinician and patient a realistic preview of the final outcome. The workflow benefit is equally significant. A multilayer disc eliminates or minimizes the staining step for standard A-shade cases. Labs that track time per unit consistently report that anterior temporary crowns produced from multilayer pre-shaded discs take 15–20 fewer minutes per unit than equivalent restorations produced from white monolayer discs requiring full external staining. At production volume, that time saving compounds quickly. The Case for Monolayer PMMA: Where It Still Belongs Monolayer PMMA is not obsolete it is misapplied when used for anterior esthetic cases, but correctly applied for a significant range of other applications where its simplicity and cost efficiency are genuine advantages. Evaluating the full multilayer pmma disc range versus monolayer options makes most sense when a lab handles multiple workflows simultaneously. For posterior single-unit temporaries where occlusal accuracy and fit matter far more than incisal translucency a monolayer disc in a standard posterior shade delivers a perfectly acceptable result at lower material cost per unit than a multilayer disc. The gradient architecture of a multilayer disc is partly wasted on a second molar where no one is evaluating the incisal esthetic zone. For hard acrylic occlusal splints and night guards, monolayer clear PMMA is the correct format optical clarity matters and no shade gradient is required. For diagnostic study models and some full-arch removable frameworks, single-shade formats are appropriate. The key distinction is whether the restoration will be evaluated esthetically at the incisal edge by the patient. If not, a monolayer disc does the job correctly and more cost-efficiently. Application Recommended Format Reason Anterior temporary crowns Multilayer pre-shaded Shade gradient essential, staining minimized Anterior long-term provisionals Multilayer pre-shaded Extended wear optical quality matters throughout Posterior single unit temporaries Monolayer single-shade Esthetics secondary to fit and occlusal accuracy Full-arch anterior bridge provisionals Multilayer pre-shaded Consistent gradient across multiple units Occlusal splints / night guards Monolayer clear Clarity required, no shade gradient needed Implant temporaries (anterior) Multilayer pre-shaded Shade matching to adjacent natural teeth critical Implant temporaries (posterior) Monolayer single-shade Strength and fit priority Shade Matching: Where Multilayer PMMA Outperforms The esthetic performance gap between multilayer and monolayer PMMA is most visible in three specific clinical scenarios. Adjacent to natural teeth in the anterior zone. Natural anterior teeth have a distinct incisal halo a zone of high translucency at the incisal edge that creates a characteristic blue-grey appearance under lateral lighting. Monolayer PMMA at any shade value cannot replicate this effect because the material is uniform in opacity throughout. A multilayer disc with a properly translucent incisal zone approximates this halo without any external characterization. For patients with high natural translucency common in younger patients and in lateral incisors this difference is visible and clinically significant. Multi-unit anterior cases. When multiple adjacent anterior crowns must match each other and blend with remaining natural teeth, shade consistency across units is critical. Multilayer discs provide this consistency by building the gradient into the material every crown milled from the same disc position has the same internal gradient. Monolayer discs in multi-unit cases require the technician to apply the same stain gradient to every unit individually, introducing operator-dependent variability across the case. Long-term provisionals. External stain on monolayer PMMA is a surface application. Over weeks and months of wear, external stain can absorb, discolor, or wear unevenly particularly in the incisal zone where occlusal contact occurs. Multilayer PMMA's internal gradient is part of the material itself and does not wear separately from the restoration. For provisionals worn for three months or longer, the stability of an internal gradient versus an applied surface stain is a meaningful clinical difference. PMMA and Zirconia: The Right Material Pairing for Complete Workflows Understanding the multilayer vs monolayer PMMA decision also requires understanding where PMMA sits relative to zirconia in the full restorative workflow. As a zirconia materials distributor usa, ZirconiaGuys works with labs that run both PMMA and zirconia workflows simultaneously and the most efficient labs use each material in its defined role. PMMA handles the provisional phase. Dental zirconia discs handle the permanent phase. The esthetic preview that a well-chosen multilayer PMMA provisional provides directly informs the shade and shape specification for the final zirconia restoration. A multilayer PMMA temporary that the patient approves gives the clinician confirmed shade data to specify the permanent dental zirconia restoration with confidence reducing remake risk on the final case. For labs that also produce zirconia blocks dental restorations alongside PMMA provisionals, this parallel workflow is the production standard. The temporary in multilayer PMMA, the permanent in multilayer zirconia using the same shade gradient architecture in both materials for a consistent clinical result through the full treatment cycle. Workflow Integration: Getting the Most From Multilayer PMMA Discs Multilayer PMMA discs deliver their esthetic advantage only when the milling workflow respects their gradient architecture. The most common source of disappointing results from multilayer discs is not the material it is incorrect disc orientation or toolpath mapping that places the wrong zone of the disc in the wrong anatomical location of the restoration. Disc orientation is non-negotiable. Every multilayer PMMA disc is directionally marked — an arrow or engraved indicator shows the gingival-to-incisal axis of the gradient. Mounting the disc backwards places the high-translucency incisal material at the cervical margin and the opaque dentin material at the incisal edge. The result looks exactly wrong — bright and flat at the gumline, dark at the tip. Always verify orientation before milling the first unit from any new batch. CAM toolpath mapping. In exocad, 3Shape, or your CAM software, use the blank orientation tool to align the crown design with the disc's internal gradient. The preparation margin should sit in the body-to-cervical zone of the disc. The cusp tips and incisal edge should sit in the enamel-to-incisal zone. Misalignment of even 5–8 mm along the gradient axis produces a visible shade shift in the milled restoration. Staining protocol adjustment. Pre-shaded multilayer discs already carry chroma. Applying the same stain intensity used on white monolayer blanks will over-saturate the cervical zone and produce artificial-looking results. For any characterization work on multilayer provisionals, start at 30–40% of your standard stain concentration and build up after a test application. Most standard A-shade cases from quality multilayer discs require no staining at all. For temporary crowns aidite pmma, Aidite publishes specific milling parameters for their multilayer disc range — including recommended spindle speed, feed rate, and step depth for optimal surface finish on the tissue-facing and occlusal surfaces. Following these parameters produces a milled surface that requires minimal polishing, reducing finishing time per unit further. A Note on PMMA Within the Broader CAD/CAM Material Decision Labs evaluating their full material inventory PMMA multilayer, monolayer, zirconia blank formats, dental zirconia discs, and supporting materials benefit from understanding the full role of PMMA as covered in our detailed guide to the Role of Dental PMMA in Temporary and Long-Term Restorations. The multilayer vs monolayer decision is one layer of the PMMA selection framework. The broader context of PMMA versus zirconia, and PMMA application types from provisionals to denture bases to splints, informs which disc formats your lab actually needs to stock. For labs sourcing both PMMA and zirconia dental blanks from a single US supplier, ZirconiaGuys stocks Aidite's full PMMA range multilayer, denture base, and clear formulations alongside Aidite and Upcera zirconia lines from US inventory. Consolidating supply reduces ordering overhead, ensures consistent batch documentation, and gives labs a single point of contact for technical support across both material categories. The multilayer versus monolayer decision is straightforward once the clinical logic is clear. Anterior esthetic cases temporary crowns, anterior bridge provisionals, long-term provisionals, implant temporaries in the esthetic zone belong on multilayer pre-shaded discs. Posterior single units, splints, models, and applications where incisal translucency is not a clinical requirement belong on monolayer formats. Running anterior cases on monolayer discs and compensating through staining is the most common avoidable inefficiency in PMMA production workflows one that multilayer discs eliminate entirely for the significant majority of standard cases.
Learn more
How to Store Orthodontic Model Resin to Maintain Consistent Print Quality?
Print failures in dental 3D printing are rarely caused by the printer. Technicians blame layer delamination, surface roughness, dimensional inaccuracy, and color inconsistency on machine settings and spend hours recalibrating exposure times, lift speeds, and layer heights looking for a fix that was never there. In most cases, the actual cause is much simpler: the resin was stored incorrectly, and its material properties changed before it ever reached the vat. Orthodontic model resin is a precision material. It is engineered to perform within tight tolerances of viscosity, photoinitiator reactivity, and pigment dispersion. Any of those properties can degrade significantly if the resin is exposed to the wrong temperature, light, air, or moisture over time. The printer settings that worked perfectly on the last batch will produce poor results on a new batch stored under different conditions and the difference can be invisible in the bottle. This guide covers every storage variable that affects orthodontic model resin performance, and exactly what your lab needs to do differently to eliminate storage-related print failures. Why Resin Storage Matters More Than Most Labs Realize Dental 3D printing resins are photopolymer materials that cure when exposed to specific wavelengths of light, typically 385 nm or 405 nm. The curing reaction is driven by photo initiators: chemical compounds that absorb light energy and trigger crosslinking of the polymer chains. These photo initiators are sensitive. They respond not just to your printer's UV array, but to ambient UV from fluorescent lighting, sunlight through windows, and even heat-driven degradation that accelerates their decomposition before the resin is used. When photo initiator concentration decreases due to pre-exposure or thermal degradation, the resin requires more light energy to achieve the same degree of cure. A resin that prints perfectly at 2.5 seconds per layer at the start of a bottle may require 3.0 seconds per layer halfway through a batch stored improperly and may produce under cured, dimensionally unstable models regardless of exposure time by the end of a degraded bottle. The model may appear complete on the build plate but fail mechanically during post-processing or lose dimensional accuracy in ways that affect orthodontic fit. Viscosity is the second critical variable. Orthodontic model printing resin is formulated within a specific viscosity range that determines how the resin flows across the FEP film between layers, how bubbles release, and how consistently each layer coats the previous one. Temperature changes alter viscosity directly resin stored in a cold environment thickens, producing uneven layer coating and increased peel forces that cause delamination. Resin stored in excess heat thins, reducing layer differentiation and causing dimensional blurring at fine detail areas like bracket pads and gingival margins. The Five Storage Variables That Determine Resin Performance 1. Temperature Temperature is the single most impactful storage variable for orthodontic model resin. Most dental photopolymer resins specify a storage temperature range of 15–25°C (59–77°F). This range is not conservative marketing language it reflects real material behavior thresholds. Below 15°C, resin viscosity increases to a point where pigment particles and photoinitiator compounds can separate from the polymer base. This separation is not always visible it may appear as subtle cloudiness rather than obvious settling. When this separated resin is used, photoinitiator distribution is uneven across the vat, producing inconsistent cure depth from one layer to the next and dimensional variation across the build platform. Above 30°C, thermal degradation of photoinitiators accelerates. The resin consumes its curing capacity at an elevated rate even without light exposure. Labs that store resin near sintering furnaces, on shelving above heating units, or in rooms that reach high temperatures during summer months are routinely working with degraded material by the time they use it often without realizing the storage conditions are the cause of their print inconsistency. What to do: Store all orthodontic model resin in a temperature-controlled environment between 15–25°C. Never store near furnaces, heating vents, or in direct sunlight. If your lab reaches high temperatures in summer, dedicate a climate-controlled cabinet or small refrigerator (set to 18°C) for resin storage. Allow refrigerated resin to warm to room temperature for at least two hours before use never pour cold resin directly into the vat. 2. Light Exposure Photopolymer resins begin their curing reaction the moment they are exposed to relevant wavelengths of light which includes not just your printer's UV array but fluorescent lab lighting, LED task lighting, and sunlight through windows. Indirect ambient light at low intensity causes partial, uncontrolled pre-cure that degrades the resin's performance progressively over time. This degradation is cumulative. A bottle left open on a bench under standard lab lighting for 30 minutes during a workflow pause accumulates more degradation than the same bottle stored correctly in the dark for a month. Labs that keep bottles open during print runs, pour excess resin back into clear storage bottles, or store resin on open shelving near windows are accelerating material degradation in ways that directly affect print quality. What to do: Store all resin in original opaque bottles or purpose-made UV-blocking amber containers. Keep bottles sealed when not actively in use. During print runs, keep the resin bottle capped between pours. Never store resin in clear containers. For the key ortho model resin specifically, original Keystone packaging is designed for UV protection do not transfer to generic containers. 3. Air and Moisture Exposure Oxygen inhibits photopolymerization this is a known property of acrylic-based photopolymers. When resin is exposed to air during storage, dissolved oxygen gradually accumulates in the liquid, which increases the light energy threshold needed to initiate curing. The practical result is undercuring at exposure settings that previously produced clean prints, requiring upward adjustment of exposure times that then overcure fine details. Moisture contamination from humidity causes a different failure mode: hydrolysis of the polymer base that reduces mechanical strength and increases brittleness of cured models. In high-humidity lab environments common in dental labs that run steam autoclaves or have inadequate HVAC resin stored in partially sealed or frequently opened containers absorbs atmospheric moisture over time. What to do: Seal bottles immediately after each use. For partially used bottles, press out excess air before sealing to minimize the air volume inside the container. In high-humidity environments, consider silica gel desiccant packets in the resin storage area. Never return resin from the vat to the original bottle vat resin has been exposed to light and air and should be treated as a separate, potentially degraded batch. 4. Agitation and Pigment Settling Orthodontic model resins contain suspended pigments that provide the tooth-like or stone-like color used for model visualization. These pigments settle over time the rate depends on particle size, resin viscosity, and storage temperature. A bottle stored undisturbed for several weeks will have pigment concentrated at the bottom and clear polymer at the top. Pouring from a settled bottle delivers inconsistent pigment distribution into the vat, producing models where color varies across the build platform lighter at the top of the build, darker at the base. The orthodontic model printing resin formulation from Keystone is engineered for low settling rates, but settling still occurs over extended storage periods and under temperature fluctuation. Agitation before use is not optional it is a required step in any reliable print workflow. What to do: Invert and gently roll each bottle for a minimum of two minutes before use. Do not shake vigorously vigorous agitation introduces air bubbles that require 30–60 minutes of settling before the resin is usable. For bottles stored longer than two weeks, extend agitation time to three minutes. Inspect the bottle bottom during agitation if pigment deposits remain after two minutes of rolling, the resin has settled significantly and may require extended agitation before the distribution is fully uniform. 5. Shelf Life and Batch Management All photopolymer resins have a defined shelf life from the manufacturing date typically 12–18 months when stored correctly. Beyond this point, photoinitiator degradation may have progressed to the point where reliable curing cannot be achieved regardless of exposure time adjustment. Labs that purchase large quantities to benefit from volume pricing but consume slowly may routinely be printing with expired resin. Batch management is equally important. Different production batches of the same resin product may have slightly different photoinitiator concentrations or viscosity specifications due to manufacturing variation. Running a new batch on the exact same settings as the previous batch without a test print can produce unexpected results particularly for thin features like gingival margins and interdental areas. For labs that also manage zirconia blocks dental and dental zirconia discs inventory alongside resin, the same batch-documentation discipline applies: track batch numbers, note print settings per batch, and test new batches before committing to production runs. What to do: Label every bottle with the date received and date opened. Apply a strict FIFO (first in, first out) inventory rotation never open a new bottle while a previous bottle of the same product remains in stock. For high-volume labs, maintain a simple resin log that records batch number, received date, opened date, and print settings used. When switching to a new batch, run a calibration print before production. Indirect Bonding Tray Resins: Same Rules, Higher Stakes Labs producing indirect bonding trays alongside orthodontic models work with a closely related but distinct resin category. The key ortho ibt resin is formulated specifically for indirect bonding tray applications flexible enough to remove cleanly after bracket bonding while dimensionally accurate enough to transfer bracket positions precisely. Storage failures in IBT resin have higher clinical consequences than in model resin. A dimensionally unstable model is a visualization tool a poorly stored IBT resin that produces bracket positioning errors translates directly into bracket placement errors on the patient. All storage protocols above apply equally to IBT resins, with one additional consideration: IBT resins are typically used in smaller volumes and less frequently than model resins, increasing the risk of exceeding shelf life or printing from settled, temperature-stressed material. Dedicate separate labeled storage for IBT resin, maintain its own batch log, and apply the same agitation protocol before every use regardless of how recently the bottle was last used. Resin Storage and Your Broader Lab Material Discipline Consistent print quality in dental 3D printing is not achieved by optimizing the printer in isolation it is achieved by treating every material input as a variable that must be controlled. The same discipline that produces consistent results with dental 3d resin applies across every material category in a modern dental lab. Labs that have invested in understanding material variables at this level understanding why zirconia blank and zirconia dental blanks from reliable sources outperform generic alternatives in milling consistency, why batch documentation matters for dental zirconia discs, and why sourcing from a consistent zirconia materials distributor USA reduces variability across the production workflow apply the same thinking to resin storage naturally. Material quality control is not department-specific. It is a lab-wide standard. If you are also evaluating your milling material supply, our guide on the difference between 3Y, 4Y, and 5Y zirconia covers the same principle applied to zirconia disc selection understanding what differentiates materials at the formulation level is the foundation of every correct procurement decision. Practical Storage Checklist for Orthodontic Model Resin Use this checklist at your lab as a standard operating procedure for resin storage and handling: Storage conditions Temperature maintained between 15–25°C at all times No storage near sintering furnaces, heating vents, or windows UV-blocking opaque containers used for all resin storage Bottles sealed immediately after each use Humidity controlled or desiccant used in storage area Inventory management All bottles labeled with received date and opened date FIFO rotation enforced — oldest stock used first Batch numbers logged with corresponding print settings Shelf life verified before opening new bottles Expired or suspect resin disposed of, not used in production Pre-use protocol Bottle rolled gently for 2–3 minutes before each use No vigorous shaking — air bubbles allowed to settle before pouring Cold resin warmed to room temperature before use Vat resin never returned to original bottle Calibration print run when switching to new batch Print failures attributed to printer settings are often caused by resin storage. Temperature fluctuation, light exposure, air contact, and pigment settling are all controllable variables and controlling them consistently is what separates labs that hit their first-print success rate targets from labs that spend production time diagnosing failures that should not have occurred. The investment in correct storage is minimal: a temperature-stable cabinet, consistent bottle sealing, a simple batch log, and two minutes of agitation before each print run. The return on that investment is consistent model quality, reliable dimensional accuracy, and the confidence that the print failures you do encounter are equipment or settings issues not material issues that have already been eliminated from the equation. For zirconia blocks and broader dental lab materials procurement guidance, see our guide to materials and strengths of zirconia dental restorations for the same level of material-first thinking applied to your milling workflow.
Learn more