Blogs
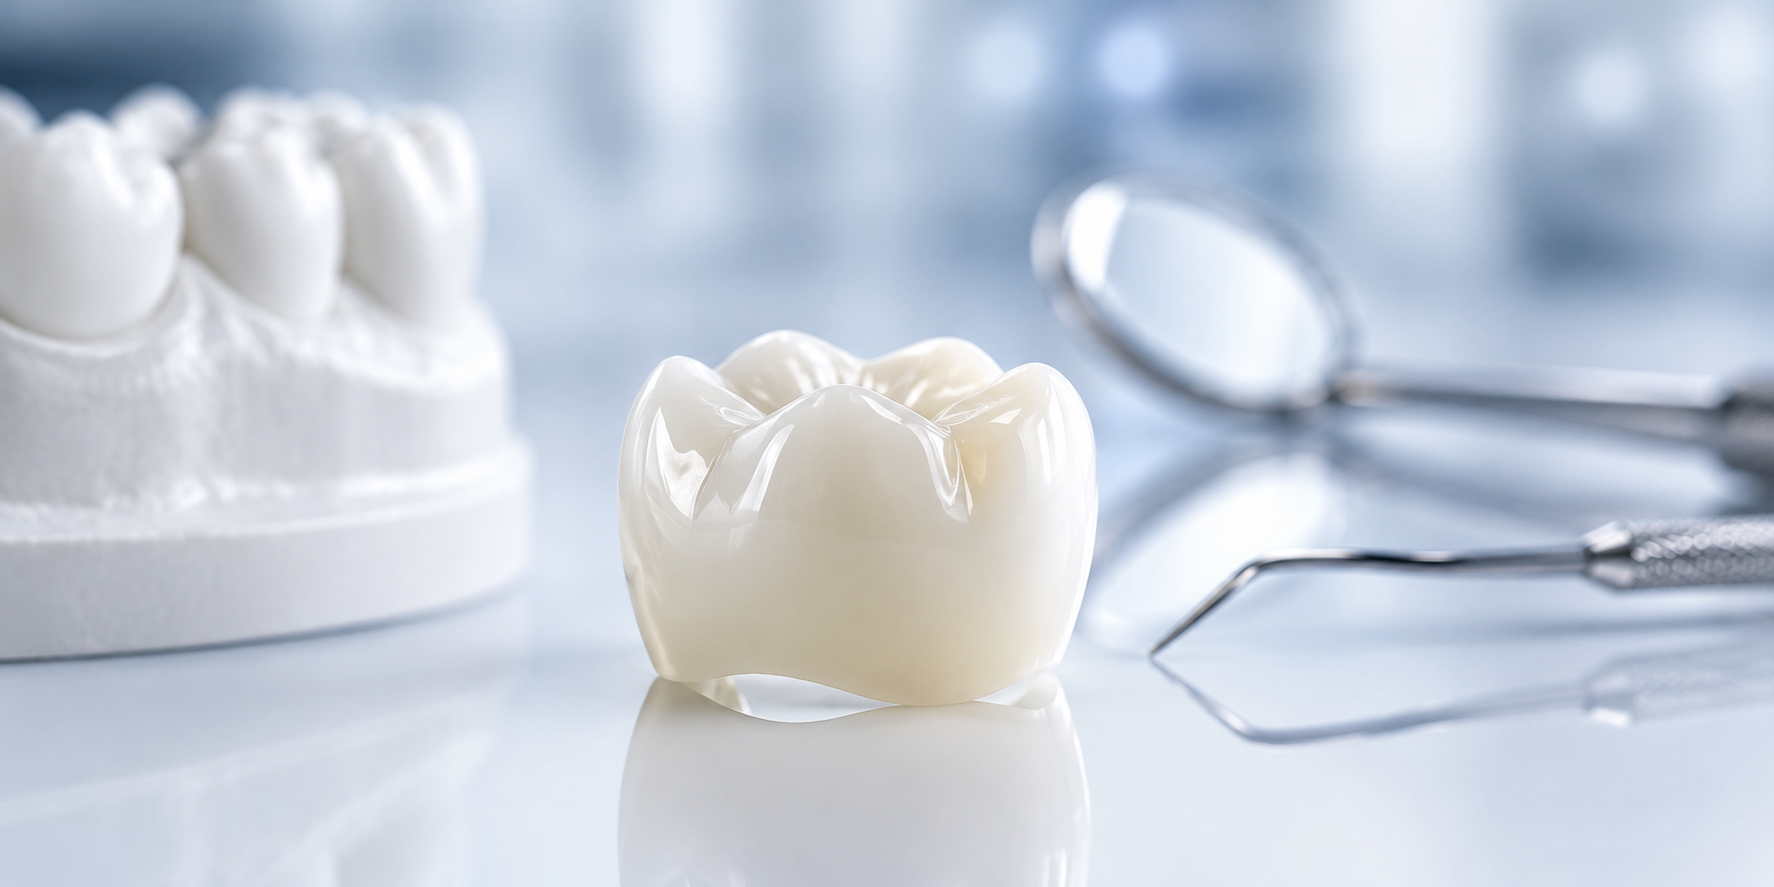

How Good Are Advanced Lithium Disilicate Crowns?
Lithium disilicate has been one of dentistry's most discussed restoration materials for over two decades and in recent years, advanced formulations have pushed its clinical performance significantly beyond what traditional glass-ceramic could deliver. Labs and clinicians evaluating it today are not looking at the same material that entered the market in the 1990s. The chemistry has evolved, the processing options have expanded, and the clinical evidence base has matured. The question is no longer whether lithium disilicate works. It clearly does. The question is exactly how good it is where it genuinely excels, where its limits are, and how it compares to the dental zirconia and other CAD/CAM materials that now compete for the same clinical indications. This guide answers all of it with the specificity that labs and prescribing clinicians need to make accurate material selection decisions. What Is Lithium Disilicate and How Does It Work? Lithium disilicate (Li₂Si₂O₅) is a glass-ceramic material composed of a glassy matrix embedded with interlocking plate-like lithium disilicate crystals. These crystals typically make up 70% of the material by volume. The interlocking plate architecture is the key to its mechanical performance when a crack initiates under stress, it encounters the plate-like crystals and is deflected, branched, and absorbed rather than propagating through the material in a straight line. This crack deflection mechanism is what gives lithium disilicate its fracture resistance of approximately 360–400 MPa far above traditional feldspathic porcelain (~80–100 MPa) and within the range needed for most single-unit restorations. The material also has a glass content high enough to produce natural optical behavior: translucency, fluorescence, and opalescence that closely mimic natural enamel. This combination of reasonable strength and excellent optical quality is what positioned lithium disilicate as the go-to material for esthetic anterior single crowns through the 2000s and 2010s. The most widely used lithium disilicate product is IPS e.max, available in both pressed (IPS e.max Press) and CAD/CAM milled (IPS e.max CAD) formats. A lithium disilicate crown produced from e.max CAD is milled in a partially crystallized "blue phase" state that is softer and easier to mill, then crystallized in a furnace to achieve final strength and optical properties. This two-stage process is what distinguishes it from dental zirconia milling zirconia is also milled pre-sintered, but achieves its strength through sintering rather than a crystallization firing. Advanced Lithium Disilicate: What Makes It Different? Advanced lithium disilicate refers to next-generation formulations that go beyond the standard Li₂Si₂O₅ chemistry. The most clinically significant example is CEREC Tessera (Dentsply Sirona), which incorporates a dual crystal structure lithium disilicate crystals combined with virgilite crystals within a glassy zirconia-containing matrix. The addition of a zirconia-containing matrix is the primary source of the strength improvement. Zirconia particles within the glass matrix provide additional crack resistance through the same transformation toughening mechanism that makes zirconium dental ceramic so effective as a structural material. The result is a material that achieves flexural strength in the range of 420–470 MPa meaningfully higher than standard lithium disilicate while retaining the optical translucency, fluorescence, and opalescence of traditional glass-ceramic. The virgilite crystal activation through matrix firing adds a further structural contribution: the crystals reinforce the matrix in a complementary orientation to the lithium disilicate plates, creating a dual-reinforcement architecture that disrupts crack propagation more effectively than single-crystal formulations. What advanced lithium disilicate improves over standard formulations: Flexural strength: 420–470 MPa vs. 360–400 MPa for standard lithium disilicate Processing speed: partially crystallized blocks enable faster shade selection and up to 44% reduction in total processing time according to manufacturer data Shade predictability: true-shade blocks match final sintered shade without additional shade correction in standard cases Optical properties: dual crystal architecture maintains translucency, fluorescence, and opalescence equivalent to standard glass-ceramic despite the higher crystal loading What it does not change: The fundamental strength ceiling of glass-ceramic. Even at 470 MPa, advanced lithium disilicate remains significantly weaker than 3Y zirconia blocks dental grade material at 900–1200+ MPa The indication boundary. Advanced lithium disilicate remains a single-unit and short-span anterior material it is not a substitute for zirconia in posterior bridges or high-load structural applications The processing requirement. Crystallization firing is still required after milling, adding furnace time that full-contour dental zirconia restorations do not need in the same workflow step Clinical Performance: Where Lithium Disilicate Actually Excels Clinical survival data for lithium disilicate single crowns is strong. Meta-analyses of IPS e.max CAD crowns consistently report 5-year survival rates above 96% and 10-year survival rates in the 91–94% range for single-unit anterior and posterior crowns. These figures compare favorably with PFM and are competitive with 4Y/5Y zirconia for the same indications. The specific areas where lithium disilicate genuinely outperforms alternatives are: Anterior esthetic integration- Glass-ceramic optical properties particularly opalescence and fluorescence behavior more closely approximate natural enamel than any zirconia grade in strong direct or UV lighting. For patients with highly translucent natural anterior dentition, lithium disilicate restorations integrate with less finishing effort than even high-translucency 5Y zirconia. Bonding characteristics- Lithium disilicate can be etched with hydrofluoric acid and silanated, enabling micromechanical and chemical bonding to tooth structure. This bonding capability allows minimally invasive preparation designs thinner preparation margins, more conservative tooth reduction that are not practical with conventional cementation protocols used for zirconia. Chairside efficiency- The CAD/CAM blue-phase milling and single crystallization firing of e.max CAD enables same-day anterior crown delivery in equipped practices. Advanced formulations like CEREC Tessera further compress this timeline. For chairside workflows, lithium disilicate is the most efficient material available for single-unit anterior cases. Veneer and inlay indications- The adhesive bonding capability of lithium disilicate makes it the standard material for porcelain veneers and posterior inlays/onlays where conservative tooth preparation and high bond strength are the clinical priorities. Zirconia does not bond adhesively in the same way these indications belong to lithium disilicate. Lithium Disilicate vs. Zirconia: The Comparison Labs Need This is the material selection decision that comes up in every dental lab that handles both materials. The correct answer is not that one is universally better it is that each has a clearly defined indication range where it outperforms the other. For labs sourcing aidite zirconia blocks alongside lithium disilicate, the workflow division is straightforward: lithium disilicate for anterior esthetic single units and veneers where bonding and optical integration are the priorities, zirconia for posterior bridges, high-load crowns, implant-supported restorations, and any application where structural performance is the primary requirement. Property Lithium Disilicate Zirconia (4Y/5Y) Zirconia (3Y) Flexural strength 360–470 MPa 500–800 MPa 900–1200+ MPa Translucency Very high High (4Y/5Y) Moderate Adhesive bonding Yes HF etch + silane Limited Limited Posterior bridges Not recommended Short spans (4Y) Standard Anterior crowns Excellent Excellent Possible with staining Veneers/inlays First choice Not typical Not typical CAD/CAM milling Yes blue phase Yes pre-sintered Yes pre-sintered Same-day delivery Yes single firing Yes sintering Yes sintering Repair chairside Limited Not repairable Not repairable zirconia blank cost N/A Moderate Moderate The strength gap between lithium disilicate and zirconia is significant and clinically relevant for anything beyond anterior single units. A posterior 3-unit bridge in lithium disilicate carries real fracture risk at the connector under occlusal load not because the material is weak in absolute terms, but because the connector cross-section requirements for the span exceed what glass-ceramic can reliably sustain. Labs that supply posterior bridges should not be using lithium disilicate for this indication regardless of the prescribing clinician's preference for esthetics. Sourcing and Workflow Considerations for US Dental Labs For US dental labs running both lithium disilicate and zirconia workflows, material sourcing efficiency matters as much as material performance. Labs that consolidate procurement through a domestic supplier avoid the lead time variability and import unpredictability of sourcing directly from overseas manufacturers. Dental zirconia discs across the full 3Y, 4Y, and 5Y range in both white and pre-shaded multilayer formats are available from ZirconiaGuys from US inventory, enabling same-day or next-day shipping without minimum order requirements. For labs that handle significant anterior volume where the lithium disilicate vs. zirconia decision comes up on every case, having reliable zirconia stock on hand ensures the material selection decision is based on clinical appropriateness, not on what happens to be available. As a zirconia materials distributor USA, ZirconiaGuys stocks Upcera and Aidite zirconia across the full grade range alongside dental lab materials for complete CAD/CAM workflows. Labs evaluating zirconia dental blanks as an alternative or complement to lithium disilicate for anterior cases can source both the standard 4Y multilayer pre-shaded format for production volume and the high-translucency 5Y format for demanding esthetic cases from the same US inventory. The per-disc zirconia blocks price comparison against lithium disilicate e.max CAD blocks favors zirconia significantly on a per-unit basis in most format comparisons an additional workflow efficiency consideration for labs running high anterior volume where both materials compete for the same cases. Advanced lithium disilicate is genuinely excellent for what it is designed to do. Its esthetic integration, adhesive bonding capability, and CAD/CAM efficiency make it the first-choice material for anterior single-unit esthetic restorations in both chairside and lab-based workflows. The advanced formulations have pushed its strength ceiling high enough to cover a broader range of posterior single-crown indications without sacrificing the optical qualities that justify using it over zirconia in the anterior zone. Its limits are also real. It is not a structural material for posterior bridges. It cannot compete with 3Y zirconia blocks on flexural strength for high-load applications. And the adhesive bonding protocols it depends on for conservative preparations require clinical technique discipline that conventional cementation for zirconia does not. Understanding both sides of this is what separates accurate material selection from marketing-driven decisions.
Learn more
How PMMA Dental Material Is Cured in Modern Dental Workflows?
PMMA polymethyl methacrylate is one of the most widely used materials in dental laboratory production. It is the standard for temporary crowns, denture bases, occlusal splints, and long-term provisionals. Yet despite its daily presence in dental labs across the US, the curing process behind PMMA is rarely explained clearly. Most technicians know that conventional acrylic requires mixing and bench curing. Fewer understand how CAD/CAM PMMA discs are cured before they arrive at the lab, why that pre-polymerization process matters clinically, and how the curing method directly determines the material performance of every restoration produced from a PMMA disc. This guide explains PMMA curing from the chemistry up covering how conventional acrylic is cured, how industrial pre-polymerization differs, why the difference matters for residual monomer content and mechanical performance, and how to select the right PMMA format for each application in a modern CAD/CAM workflow. All seven compulsory keywords are addressed in the relevant clinical contexts throughout. What Curing Means in the Context of PMMA? Curing in PMMA means polymerization the chemical process by which liquid methyl methacrylate (MMA) monomer molecules link together into long polymer chains to form solid polymethyl methacrylate. The moment this chain-linking reaction is complete, the material transitions from liquid or dough consistency to rigid solid. The quality, completeness, and conditions of this polymerization reaction are what determine whether the resulting PMMA is dense, strong, and biocompatible or porous, weak, and potentially irritating to oral tissue. There are three distinct curing mechanisms used in dental PMMA production. Each produces materially different outcomes that directly affect clinical performance. Heat-cured (hot-water bath or autoclave curing) — The conventional method used in traditional denture fabrication. Powder and liquid monomer are mixed, packed into a flask against a gypsum mold, and cured at approximately 70–100°C under water bath or pressure conditions. Residual monomer content is typically 2–5%, porosity is moderate, and fit accuracy is operator-dependent. Cold-cured (self-cured or chemically activated) — The bench-top method used for chairside repairs and direct provisional fabrication. A chemical activator triggers polymerization at room temperature without external heat. Residual monomer content is higher than heat-cured acrylic — often 5–7% — and mechanical properties are inferior due to lower conversion rate and higher porosity. Industrial pre-polymerization (CAD/CAM PMMA discs) — The manufacturing process used for all modern CAD/CAM PMMA disc stock. Monomer is polymerized under high pressure (50–200 bar) and elevated temperature (above 100°C) in industrial autoclaves. The result is residual monomer below 0.5%, near-zero porosity, uniform mechanical properties throughout the disc, and the dimensional stability that accurate CAD/CAM milling requires. Why the Curing Method Determines Clinical Performance? The difference between a cold-cured bench provisional and a milled CAD/CAM restoration is not just workflow — it is a fundamental material quality difference rooted in the curing process. Residual monomer is the clearest clinical consequence. MMA monomer is a known irritant associated with tissue sensitivity, allergic contact reactions, and mucosal inflammation in susceptible patients. Conventional cold-cured PMMA at 5–7% residual monomer represents a meaningful exposure risk for patients with documented acrylic sensitivity. Industrial pre-polymerized PMMA at below 0.5% residual monomer is classified as biocompatible under ISO 20795-1 for denture base polymers — a threshold that bench-cured materials rarely achieve consistently. Porosity is the second consequence. Bench-mixed acrylic traps air during the mixing and packing process, producing microscopic voids throughout the cured material. These voids are sites for bacterial colonization, stain absorption, and structural weakness. Industrial pre-polymerization under 50–200 bar pressure eliminates void formation entirely the resulting PMMA has near-zero porosity and a homogeneous polymer matrix that resists staining, supports higher polished surface quality, and delivers better mechanical properties throughout the disc. Dimensional accuracy is the third consequence. Polymerization shrinkage is a direct result of monomer-to-polymer conversion. Bench-cured PMMA shrinks as it polymerizes and that shrinkage varies depending on the powder-to-liquid ratio used, the packing technique, and the curing temperature profile. CAD/CAM PMMA discs complete their polymerization before the lab receives them. There is no residual curing shrinkage to account for in the milling process — the disc dimensions are stable, predictable, and consistent across every unit milled from it. How PMMA Is Cured for Denture Base Applications? The pmma denture [→ zirconiaguys.com/products/aidite-denture-base-pmma] base application places the strictest demands on PMMA curing quality of any dental application. The denture base sits in direct contact with oral mucosa for extended periods often 12–16 hours per day. Residual monomer at the tissue interface causes mucosal irritation that patients experience as chronic soreness or sensitivity. A properly cured industrial PMMA denture base eliminates this risk at the material level. In a CAD/CAM denture workflow, the curing has already occurred before the lab touches the disc. The lab scans the patient model, designs the denture base digitally, mills the base from a pre-polymerized PMMA disc, polishes it, and delivers a dimensionally accurate, biocompatible result. There is no mixing step, no flask packing, no curing oven, and no polymerization shrinkage to manage. The curing quality is built into the disc not dependent on lab conditions or technician technique. For the denture base to perform correctly in long-term tissue contact, the disc must meet ISO 20795-1 requirements for residual monomer, flexural strength, and surface hardness. Aidite's pre-polymerized PMMA denture base discs consistently meet these thresholds — which is one of the primary reasons they have become the preferred choice among US dental labs that have moved to CAD/CAM denture production. PMMA Curing for Temporary Crown and Bridge Applications Temporary crown and bridge provisionals have different curing requirements than denture bases. The tissue contact period is shorter typically two to eight weeks for standard temporaries but the esthetic and dimensional requirements are higher. The temporary must accurately represent the intended shade of the final restoration, maintain its fit over the provisional period without dimensional drift, and polish to a surface quality that patients accept as esthetically appropriate. This is why aidite denture base pmma should not be used for crown and bridge temporaries. Denture base PMMA is pigmented to simulate gingival tissue pink, red-toned, opaque. For a temporary crown, you need tooth-shade PMMA formulated with dentine-to-incisal gradient or standard tooth shades. The curing chemistry is similar, but the pigmentation, shade calibration, and optical formulation are entirely different. For crown and bridge temporary applications, the pre-polymerized industrial curing process delivers the same dimensional accuracy and biocompatibility advantages as for denture bases but in a tooth-shade formulation calibrated to VITA shade standards. The pre-polymerized disc eliminates the dimensional variability of bench-mixed provisional materials while delivering a consistent shade result that the technician can rely on from the first blank to the last in a multi-unit case. A critical practical point: polymerization for CAD/CAM PMMA temporaries is complete before the disc reaches the lab. The lab's post-milling steps polishing, glazing, occlusal adjustment do not involve any additional curing. There is no light-curing step, no chemical activation, and no heat-curing oven required. This is a fundamental workflow simplification over chairside direct provisional materials, which require a curing step at the point of fabrication. Multilayer PMMA: How Gradient Curing Architecture Works The multilayer pmma disc format adds a manufacturing complexity to standard single-shade PMMA a gradient of shade and translucency engineered into the disc from cervical to incisal during production. Understanding how this gradient is created and why it holds through milling requires a brief look at the manufacturing process. Multilayer PMMA discs are produced by sequentially casting and partially curing multiple formulations each with a different pigmentation and translucency profile into the disc mold in distinct layers. The layers are then final-cured together under the same high-pressure, high-temperature industrial conditions used for single-shade discs. The interface between layers is a chemical bond formed during the co-curing step, not a mechanical joint which is why multilayer discs do not delaminate during milling or clinical service. The result is a disc where the cervical end contains warmer, more saturated, more opaque PMMA that approximates dentin color, while the incisal end contains cooler, less pigmented, more translucent PMMA that approximates enamel. When the digital design is oriented correctly in the disc cervical margin at the cervical end, incisal edge at the incisal end the milled crown exits the mill already expressing the correct shade gradient for the anterior tooth without any staining. This gradient architecture is what makes multilayer PMMA the most efficient format for anterior provisional production in high-volume labs. The curing quality of the gradient interface is what makes it possible a poorly bonded interlayer would delaminate at the thin incisal edge or at the proximal margin areas where material thickness is lowest. Selecting the Right PMMA Format Based on Curing and Application The correct PMMA format selection depends on matching the curing quality, pigmentation, and optical architecture of the disc to the clinical application. Aidite pmma multilayer covers the anterior crown and bridge provisional workflow. Aidite denture base PMMA covers full and partial denture applications. Clear PMMA formulations cover splints, retainers, and clear appliances. Single-shade tooth-color PMMA covers posterior provisional crowns where shade precision is secondary to fit and occlusal accuracy. For US dental lab materials procurement, the key advantage of sourcing Aidite PMMA from a domestic inventory is the elimination of batch-to-batch variability that can affect shade consistency and curing quality in overseas-sourced generics. As a dedicated dental lab material supplier, ZirconiaGuys stocks the full Aidite PMMA range from US inventory with full batch documentation — including residual monomer certificates and ISO 20795-1 compliance records on request. Labs that also run zirconia workflows benefit from consolidating material supply. Dental zirconia discs and PMMA discs share the same 98 mm format and open-system mill compatibility meaning the same milling equipment handles both materials. The workflow difference is post-milling: zirconia requires sintering, PMMA requires only polishing. Both start from the same CAD/CAM design file, and both can be ordered from the same US zirconia materials distributor usa inventory to simplify procurement. PMMA vs. Zirconia: Understanding When Each Material Is the Answer The curing distinction between PMMA and zirconia is the clearest way to understand why they serve different applications. PMMA is fully cured before the lab receives it the disc is the finished polymer, and milling simply reveals the restoration shape within it. Zirconia blocks are milled in their pre-sintered chalk state and require furnace sintering to densify to final strength and dimensions. Zirconia blocks dental production therefore always includes a sintering step that PMMA production does not. A zirconia blank milled and delivered without sintering is a fragile pre-sintered form with none of the material's clinical strength. A PMMA disc milled and delivered without any additional processing is a finished, clinically acceptable restoration polishing is the only post-milling step required. This fundamental difference is why PMMA is the temporary material and zirconia dental blanks are the permanent restoration material. The processing requirements match the clinical lifespans fast, simple PMMA production for provisionals; furnace-processed dental zirconia discs for restorations designed to last decades. The curing process is not a manufacturing footnote it is the foundation of every material property that determines whether PMMA performs correctly in clinical service. Industrial pre-polymerization is what separates CAD/CAM PMMA from bench-mixed acrylic on residual monomer, porosity, dimensional accuracy, and mechanical consistency. Selecting pre-polymerized PMMA from a documented, reliable supply chain is the single highest-leverage procurement decision available to labs building or refining their PMMA workflow.
Learn more
How 3D Printed Surgical Guides Improve Dental Implant Accuracy?
Dental implant surgery has a narrow margin for error. An implant placed two millimeters off-axis can compromise the final prosthetic outcome, damage adjacent root structure, or violate critical anatomical boundaries like the inferior alveolar nerve or maxillary sinus floor. Freehand placement even in experienced hands introduces variability that digital workflows exist specifically to eliminate. The 3D printed surgical guide is the physical mechanism through which that digital precision transfers from the computer screen to the patient's mouth. This guide explains how surgical guides work, why the material they are printed from determines their clinical effectiveness, and how dental labs can build a reliable guide production workflow using the right resins. For labs that already stock dental zirconia discs, zirconia blocks, and fixed restoration materials, surgical guide resin is a natural workflow extension and one that adds significant clinical value to the services you offer. What a Surgical Guide Actually Does and Why Accuracy Matters? A surgical guide is a custom-fabricated template that seats over the patient's remaining teeth, soft tissue, or bone during implant surgery. Metal sleeves embedded in the guide constrain the drill to a predetermined trajectory controlling angulation, depth, and three-dimensional position simultaneously. The surgeon does not judge drill path freehand. The guide does it mechanically. The accuracy of that constraint determines clinical outcomes directly. Studies on guided versus freehand implant placement consistently show that surgical guides reduce mean angular deviation from planned position by 50–70% and mean apical deviation by 40–60% compared to freehand technique. In practical terms, this means implants land where the prosthetic plan requires them to land not approximately where anatomy and surgical judgment suggested. For full-arch cases All-on-4, All-on-6, full-arch immediate load this precision is not optional. A misplaced implant in a full-arch case cannot be corrected by adjusting the final prosthesis. The guide is what makes the prosthetically driven treatment plan executable. The Digital Workflow That Produces a Surgical Guide Every surgical guide begins with data, not with a physical impression. The workflow has four stages that run entirely in the digital domain before a single gram of resin is printed. Stage 1 — CBCT and intraoral scan acquisition The CBCT provides volumetric bone data density, quantity, and the exact three-dimensional position of critical structures. The intraoral scan or scan of the diagnostic cast provides surface anatomy. These two data sets are merged in planning software to create a unified patient model. Stage 2 — Virtual implant planning The clinician places virtual implants in planning software (coDiagnostiX, Nobel Clinician, Implant Studio, or equivalent) based on the final prosthetic design. Implant position, angulation, and depth are optimized for prosthetic emergence profile, bone engagement, and clearance from anatomical structures. The plan is reviewed and approved before any physical fabrication begins. Stage 3 — Guide design The software generates the guide geometry around the approved implant positions. Metal sleeve positions and orientations are calculated from the virtual plan. The guide body is designed to seat stably on the patient's reference anatomy — tooth-supported, tissue-supported, or bone-supported depending on the clinical scenario. Stage 4 — 3D printing The guide STL file is exported to a dental 3D printer. The print is produced in biocompatible surgical guide resin, post-processed, and sterilized for use. The accuracy of the final guide is determined by two factors: the precision of the planning software and the dimensional accuracy of the printed material. A guide printed in low-accuracy resin will not reliably reproduce the planned sleeve positions regardless of how precisely the digital plan was created. Why Guide Resin Material Is the Critical Variable? Not all 3D printing resins are appropriate for surgical guide fabrication. A surgical guide must meet four material requirements that general-purpose 3D printing resins do not reliably satisfy. Dimensional accuracy The guide must reproduce planned sleeve positions to within fractions of a millimeter. Resins with high post-cure shrinkage or warping tendency will shift sleeve positions from their designed locations directly degrading the accuracy advantage that guided surgery is supposed to deliver. Biocompatibility A surgical guide sits in direct intraoral contact during surgery. ISO 10993 cytotoxicity compliance and class IIa medical device compatibility are the minimum requirements for any resin used in this application. Non-biocompatible resins must never be used in surgical guide fabrication regardless of print accuracy. Sterilization compatibility Surgical guides are sterilized before use typically by autoclave or chemical sterilization. Resins must maintain dimensional stability and mechanical integrity through the sterilization process. Resins that warp, discolor, or lose hardness during sterilization are clinically unusable. Adequate hardness and fracture resistance The guide must withstand the mechanical forces of drilling without flex or fracture. Soft or brittle resins that deform under drilling pressure allow the drill to deviate from the planned trajectory defeating the purpose of the guide. For labs sourcing key guide resin for implant surgery, Keystone's Key Guide resin meets all four of these requirements. It is formulated specifically for dental surgical guide fabrication — not adapted from a general 3D printing resin and its dimensional accuracy, biocompatibility certification, and sterilization compatibility make it a clinically reliable choice for surgical guide production. Selecting the Right Resin: Key Guide vs. Veriguide Dental labs producing surgical guides in volume will encounter two primary resin options from the leading biocompatible dental 3D printing resin manufacturers. Understanding the distinction between them enables labs to make the correct selection for each guide type. The surgical guide dental resin from Keystone Key Guide is a high-rigidity, biocompatible formulation designed for fully guided implant surgery with metal sleeves. Its hardness profile ensures that the drill sleeve seats remain mechanically stable under continuous drilling pressure, and its post-cure dimensional accuracy is consistent enough for multi-implant full-arch cases where cumulative positional error must be minimized across all implant positions simultaneously. For labs that need a transparent guide option allowing visual verification of guide seating and drill position during surgery the dental key guide resin supplier relationship with Keystone also covers their clear formulations optimized for visibility during the surgical procedure. The whip mix veriguide clear is the transparent surgical guide material specifically engineered for cases where intraoperative visibility is a clinical priority. Its optical clarity enables the surgical team to confirm guide seating against the patient's reference anatomy before drilling begins a meaningful safety advantage in complex cases with limited access. Veriguide Clear meets biocompatibility requirements and maintains its dimensional integrity through standard sterilization protocols. Property Key Guide Resin Veriguide Clear Transparency Opaque / translucent Fully clear Primary use Standard fully-guided surgery Visibility-priority cases Biocompatibility ISO 10993 compliant ISO 10993 compliant Sterilization Autoclave compatible Autoclave compatible Dimensional accuracy High High Sleeve retention Excellent Excellent The choice between the two is a clinical decision based on case requirements, not a significant quality differential. Both are purpose-built surgical guide materials that outperform adapted general 3D printing resins on every relevant metric. Guide Types and Clinical Indications Surgical guides are classified by their support base the anatomy they seat against during surgery. Each type serves different clinical scenarios and has distinct design requirements. Tooth-supported guides Seat against remaining natural teeth and are the most mechanically stable guide type. Tooth structure provides consistent, rigid reference points that resist intraoperative movement. These are the preferred guide type when sufficient dentition remains to provide stable seating. Tissue-supported guides Seat against soft tissue in partially or fully edentulous patients. They are more susceptible to positional movement than tooth-supported guides because soft tissue compresses and shifts under pressure. Stabilization screws are often used to secure tissue-supported guides against the bone, and their accuracy is correspondingly lower than tooth-supported designs. Bone-supported guides Are used in fully edentulous patients after mucoperiosteal flap reflection. They seat directly on exposed bone, providing stable reference anatomy. Bone-supported guides require a flap procedure eliminating the flapless surgery option — but deliver reliable accuracy in fully edentulous cases. Dual-use guides Incorporate both implant placement guidance and prosthetic reference — allowing the final restoration design to be verified against implant positions intraoperatively. These are standard in All-on-4 and full-arch immediate load protocols. What Labs Need to Build a Surgical Guide Workflow? For dental labs adding surgical guide production to an existing digital workflow, the equipment requirements are modest compared to the fixed restoration milling setup. The primary investments are a dental 3D printer compatible with biocompatible resins, a post-cure light unit calibrated for the specific resin chemistry, and a cleaning station for IPA washing of printed parts. Labs that already function as a zirconia materials distributor usa stocking zirconia blocks, zirconia blank inventory, and zirconia dental blanks for fixed restoration production have the digital infrastructure in place. The scanning workflow, digital design capability, and quality control processes that apply to zirconia blocks dental restoration production transfer directly to surgical guide production. The addition of a 3D printer and guide resin extends the lab's service range without requiring a fundamentally different production model. The key workflow addition specific to surgical guide production is CBCT data handling and implant planning software access either through the referring clinician's digital plan or through an in-house planning subscription. Labs that can receive approved STL files from the clinician's planning software and go directly to print are positioned for high-volume guide production with minimal case planning overhead. The 3D printed surgical guide is the link between digital implant planning and accurate clinical execution. Its value is not theoretical the accuracy improvement over freehand technique is consistent, measurable, and clinically significant across case types and complexity levels. For dental labs, surgical guide production is a natural extension of the digital workflow already in place for fixed zirconia restorations, and the material investment required to begin is modest compared to the clinical value delivered. The resin you print with determines the accuracy of the guide you deliver. Sourcing biocompatible, purpose-built surgical guide resins from a reliable US supplier is not a secondary consideration it is the foundational material decision in a surgical guide production workflow.
Learn more
Top Tips for Milling Dental PMMA Discs for Accurate Restorations
PMMA is one of the most forgiving materials in a dental lab until it isn't. It mills fast, finishes cleanly, and produces natural-looking restorations that patients accept without hesitation. But the same softness that makes it easy to work with also makes it sensitive to milling errors that harder materials like zirconia would simply absorb. A toolpath that is slightly too aggressive, a worn bur that generates too much heat, or a disc that wasn't properly secured in the adapter any of these produces a PMMA restoration that doesn't fit, doesn't look right, or chips during delivery. Most labs that struggle with PMMA accuracy are dealing with setup and parameter issues, not material quality problems. The material can perform at a very high level when the milling workflow is configured correctly. This guide covers the practical steps that make the difference between PMMA restorations that come out of the mill ready to deliver and ones that require significant rework. Why PMMA Milling Requires a Different Mindset Than Zirconia? Before getting into the tips, it's worth understanding why PMMA behaves differently in the mill than zirconia blocks dental or other ceramic materials because that difference drives most of the parameter decisions. Zirconia blocks are milled in their pre-sintered chalk state, which is relatively soft and forgiving of moderate milling aggressiveness. The sintering step that follows compensates for many minor surface irregularities by densifying the material. Zirconia dental blanks also have a hard, uniform matrix that resists heat-related deformation during milling. PMMA has neither of these properties. It is already in its final state when it enters the mill there is no post-milling processing step that will correct surface defects or dimensional errors. And because PMMA is a thermoplastic, it responds to heat by softening. If your milling generates enough frictional heat, the material softens at the cutting interface, smears across the tool flute, and re-solidifies in the wrong place producing rough surfaces, dimensional inaccuracies, and increased bur wear all at once. This is the core challenge of PMMA milling, and almost every milling tip for PMMA traces back to managing this thermal sensitivity. Understanding PMMA as a heat-sensitive final-state material rather than treating it like a pre-sintered zirconia blank that you can push through quickly is the mindset shift that makes everything else in this guide make sense. Tip 1: Start with a Quality Disc — Material Quality Sets the Ceiling No milling parameter optimization compensates for a poorly manufactured disc. CAD/CAM PMMA quality varies significantly across suppliers, and the differences show up directly in milling behavior and final restoration quality. The key manufacturing variable is pre-polymerization quality. Industrial pre-polymerization under high pressure produces a dense, homogeneous polymer matrix with near-zero porosity and residual monomer below 0.5%. Lower-quality discs manufactured under less controlled conditions have higher porosity, uneven density across the disc, and elevated residual monomer. In the mill, these differences show up as inconsistent chip formation, rough milled surfaces that require excessive finishing, and dimensional variability across the disc. Aidite denture pmma discs are manufactured to consistent industrial pre-polymerization standards which means the chip formation during milling is predictable, the surface quality off the mill is consistently smooth, and the dimensional accuracy is reliable across the full disc from center to edge. For labs that have switched to Aidite from generic PMMA and found that their existing milling parameters started producing better results without any parameter change, this material consistency is the explanation. When evaluating any new PMMA disc, mill a test restoration from the center of the disc and from the edge zone, and compare surface quality and dimensional accuracy between both. Discs with uneven pre-polymerization will show measurable differences between center and edge performance a reliable indicator of manufacturing quality problems. Tip 2: Match Your Bur Selection to PMMA — Not to Zirconia The bur you use for zirconia is not the correct bur for PMMA. This is one of the most common milling setup errors in labs that run both materials. For dental zirconia discs and ceramic materials, diamond-coated burs are the standard the abrasive grit cuts through the hard ceramic matrix effectively. For PMMA, diamond burs generate more frictional heat than necessary and tend to produce a smeared, rough surface finish rather than clean chip formation. The correct tooling for PMMA is a carbide bur specifically, a carbide with a geometry designed for acrylic and composite materials. The key bur properties for PMMA milling: Helix angle - A higher helix angle (40–45°) promotes efficient chip evacuation, which keeps chips from re-cutting and generating secondary heat. Low helix angles trap chips in the cutting zone and increase thermal load. Number of flutes - Two-flute designs are generally preferred for PMMA over four-flute designs. Fewer flutes mean larger chip space per flute, better evacuation, and lower heat generation. Four-flute burs work better in harder materials where chip load per flute needs to be distributed. Bur sharpness - A dull carbide bur on PMMA generates dramatically more heat than a sharp one the blunt edge deforms and smears the thermoplastic rather than cutting it cleanly. Replace PMMA burs at the first sign of increased surface roughness or elevated milling temperatures. PMMA burs are inexpensive relative to the cost of remakes from dull-bur milling errors. Tip 3: Configure Toolpath Parameters for PMMA — Default Ceramic Settings Will Cause Problems Most CAD/CAM milling systems ship with default toolpath presets for common materials. If your system's PMMA preset was configured for generic acrylic or not verified against your specific disc type, it may be driving parameters that produce suboptimal results. The following parameters need to be specifically set for PMMA. Spindle speed - PMMA mills best at moderate spindle speeds typically 15,000–20,000 RPM depending on bur diameter and system. Higher spindle speeds generate more heat. Lower speeds reduce cutting efficiency and increase vibration marks on the milled surface. Feed rate - PMMA tolerates higher feed rates than ceramic materials because of its softness. However, excessively high feed rates produce surface chatter and dimensional inaccuracies at curved surfaces and margins. A feed rate of 800–1,200 mm/min is a practical starting range for most PMMA disc formulations with standard carbide tooling. Step-down depth - Deeper step-down passes increase chip load per pass and thermal output. For PMMA, step-down depths of 0.5–1.0 mm per pass are appropriate for rough milling. Finish passes should use shallower step-down values of 0.1–0.3 mm to achieve clean surface quality at margins. Cutting direction - Climb milling (where the cutter rotation direction matches the feed direction) generally produces better surface finish on PMMA than conventional milling. If your CAM software allows cutting direction selection, specify climb milling for finish passes. Aidite multilayer pmma discs have a slightly varying hardness across the disc gradient the cervical zone is formulated with different properties than the incisal zone. For multilayer discs, running a single fixed feed rate across the full restoration can produce marginally different surface quality between zones. Setting a slightly reduced feed rate for finish passes across the full restoration compensates for this variation and produces uniform surface quality across the gradient. Tip 4: Control Heat at Every Stage — PMMA's Number One Enemy Every milling parameter decision for PMMA ultimately comes back to heat management. Here is where heat enters the process and what to do about it at each stage. Bur friction - Already covered above sharp carbide tooling with appropriate helix angle is the primary heat management tool. A sharp bur cuts cleanly. A dull bur deforms and drags, converting mechanical energy into heat rather than chip formation. Chip re-cutting - When chips are not evacuated efficiently from the cutting zone, the rotating bur re-contacts and re-cuts them, generating secondary heat and roughening the work surface. Chip evacuation is managed through bur geometry (helix angle), feed rate (sufficient to carry chips away), and air blast. If your milling system has a compressed air nozzle at the cutting head, ensure it is active during PMMA milling. The air blast does double duty: it cools the cutting zone and blows chips away from the bur. Cooling system - Some milling systems use coolant mist or water cooling for ceramic materials. For PMMA, water cooling can cause issues moisture absorption at the freshly milled surface can affect dimensional accuracy of thin margins. Dry milling with air blast is the preferred approach for PMMA in most systems. Ambient temperature - In labs where the milling room runs hot, PMMA surfaces near the cutting zone reach softening temperatures more easily. If you are seeing consistent smearing or surface roughness that doesn't respond to parameter adjustments, check ambient temperature in the milling area and ensure adequate ventilation. Tip 5: Secure the Disc Correctly — Fit Errors Often Start Before Milling Begins A surprising number of PMMA fit errors trace back to disc mounting rather than milling parameters. PMMA is light and low-density compared to dental zirconia discs and ceramic blanks it does not seat into the milling chuck with the same positive mechanical feedback that heavier materials provide. This makes it easier to mount at a slight misalignment or with insufficient clamping force, and the resulting movement during milling produces dimensional errors that no parameter adjustment will fix. For aidite clear pmma and other clear PMMA formulations used for splints and clear appliances, this issue is compounded by the transparency of the material it can be difficult to visually confirm correct seating in some adapter designs. Always verify disc engagement by tactile check before initiating any PMMA milling cycle, regardless of how routine the mounting procedure feels. Disc mounting best practices: Check the adapter fit before every session, not just at start of shift. PMMA chips and small debris from previous milling cycles can accumulate in the adapter seat and prevent full disc engagement. Confirm that the disc locking mechanism has engaged completely before starting the milling cycle. On systems with electronic locking confirmation, wait for the positive indicator. On manual locking systems, apply firm, consistent torque to the locking ring. For partial discs discs that have been used and stored inspect the remaining material around the sprue attachment points before mounting. PMMA partial discs can develop micro-cracks at sprue attachment points after multiple milling cycles, which can cause the disc to shift under milling load. Tip 6: Optimize Post-Milling Separation and Cleanup How the restoration is separated from the disc affects the final margin quality as much as the milling parameters themselves. Aggressive separation snapping sprues with pliers or twisting the restoration off the disc transmits mechanical shock to the margins that can produce micro-fractures invisible to the naked eye but visible to the practitioner when the restoration is delivered. The correct approach is to cut sprues with a thin disk or separating bur, working progressively closer to the restoration surface. Leave a small sprue stub and refine it with a fine carbide bur or acrylic trimming bur at low speed before finishing to the final margin line. PMMA at the margin is thin and supported only by the restoration geometry mechanical shock at this stage is where margin chips originate. After separation, clean the restoration surface with isopropyl alcohol and a soft brush before polishing. PMMA chips and grinding dust left on the surface can become embedded during polishing and produce visible surface defects in the final gloss finish. Tip 7: Polish to Clinical Standard The Final Step That Patients See PMMA polishes to a high gloss with appropriate technique, and this surface quality is what patients evaluate when they assess the quality of the restoration. The polishing sequence matters. Start with pumice slurry on a soft wheel at low speed this removes milling marks and surface roughness without cutting deeply into the PMMA surface. Follow with a fine acrylic polishing compound on a clean wheel. Final gloss is achieved with a polishing agent such as aluminum oxide paste on a soft muslin wheel at low RPM. Do not use high rotational speed at any stage heat generated during polishing will produce the same smearing and surface distortion that aggressive milling does. For temporaries that will be worn for more than four weeks, apply a surface sealant after polishing. The sealant fills residual surface micro-porosity and significantly reduces biofilm accumulation during the provisional period a measurable benefit for patient comfort and tissue health at the provisional margins. PMMA and Zirconia: Running Both Materials in the Same Lab Efficiently Most full-service dental labs mill both PMMA and zirconia blocks and the workflow differences between the two materials require intentional management. The temptation is to run PMMA on whatever tooling is loaded from the previous zirconia job. Resist this. PMMA and zirconia burs are different tools for different material properties, and cross-using them consistently produces suboptimal results in both materials. Establish separate tooling sets for PMMA and zirconia. Label them clearly. Track bur wear separately for each material PMMA burs wear differently than zirconia burs, and the wear indicators for one do not apply to the other. As a zirconia materials distributor usa serving labs across the country, ZirconiaGuys carries the full range of aidite cad cam materials including the complete Aidite PMMA range alongside Aidite zirconia dental blanks and multilayer dental zirconia discs so labs can consolidate PMMA and zirconia procurement through a single US supplier with consistent batch quality and fast domestic shipping. Accurate PMMA milling is a workflow discipline, not a material limitation. The material is capable of producing restorations with excellent fit accuracy, clean margins, and natural surface quality when the milling setup treats it correctly as a heat-sensitive, final-state thermoplastic that rewards sharp tooling, conservative parameters, and careful disc management. Invest in a quality disc from a consistent supplier, configure your parameters specifically for PMMA rather than borrowing ceramic settings, manage heat at every stage, and separate and polish with the same care you apply to your zirconia work. The payoff is PMMA restorations that arrive at the chair without rework, fit on the first seating, and deliver the natural appearance that makes patients and practitioners confident in the outcome.
Learn more
Why the Aidite Clear Dental PMMA Disc Is a Game-Changer for Modern Dental Labs?
Modern dental labs are under continuous pressure to produce more, faster, with fewer remakes and lower material cost per case. The tools and materials that meet that pressure are not always the most technically complex sometimes the most impactful upgrade in a lab's workflow is a better disc in a category the lab already uses every day. Aidite's Clear Dental PMMA Disc is exactly that kind of upgrade. It is not a new material category. It is a dramatically better execution of a material category that every full-service dental lab already depends on. Clear PMMA is used across multiple high-value lab applications: occlusal splints, night guards, orthodontic retainers, diagnostic models, and clear appliances. In every one of these applications, the optical and mechanical quality of the PMMA disc determines the clinical outcome. Poor clarity, poor surface finish, or inconsistent dimensional behavior across a batch translates directly into patient complaints, adjustment time, and remakes. Aidite's Clear PMMA Disc addresses all three failure points in a single product and this guide explains exactly how. What Is Aidite Clear PMMA and What Makes It Different? PMMA polymethyl methacrylate is the base polymer for virtually all CAD/CAM clear dental appliances. It has been used in dentistry for decades, and the conventional understanding is that clear PMMA is a commodity: one disc is much like another. That assumption is wrong, and understanding why requires looking at how PMMA discs are manufactured and where the quality variation actually lives. All CAD/CAM PMMA discs start with the same polymer chemistry. The meaningful differences between products come from three manufacturing variables: polymerization pressure, optical additive formulation, and pigment exclusion precision. aidite clear pmma discs are manufactured under high-pressure industrial conditions typically 100 bar or higher which eliminates the internal porosity that lower-pressure processes leave behind. Porosity in a clear disc does not just affect clarity. It creates stress concentration points that reduce impact resistance, produces micro-voids that accumulate staining agents over time, and results in rougher milled surfaces that require more finishing labor to achieve clinical polish. The optical clarity of Aidite Clear PMMA is a direct product of that high-pressure manufacturing. The disc is formulated to maximize light transmission without optical haze the cloudy, slightly milky appearance that characterizes lower-quality clear PMMA discs and that patients notice immediately, particularly in full-coverage splints visible during speech. Aidite's formulation achieves glass-like clarity in the sintered disc that distinguishes high-quality CAD/CAM clear appliances from products that look like they were made from generic plastic. The second distinguishing property is milling behavior. Clear PMMA requires clean, chip-free milling to produce the smooth surface finish that clear appliances demand. A disc with inconsistent density — typical of lower-pressure-manufactured products produces surface tearing and micro-chipping during milling, particularly at thin sections like splint edges and retainer clasps. Aidite Clear PMMA mills cleanly at standard PMMA cutting parameters with minimal surface defects, reducing the post-milling polishing workload significantly. The Clinical Applications Where Aidite Clear PMMA Delivers the Most Value Understanding where Aidite Clear PMMA creates measurable workflow improvement requires looking at each application on its own terms. The disc is not a universal material — it is specifically formulated for applications where optical clarity is the primary material requirement. These are the four applications where it delivers the greatest value. Occlusal Splints and Night Guards The aidite denture pmma discs range covers tissue-contact applications, but clear PMMA is the correct formulation for hard occlusal splints and night guards where transparency is the patient-facing esthetic priority. Patients who wear full-coverage hard splints for bruxism management are acutely aware of the appliance's appearance a cloudy or yellowish splint communicates cheap material even when the fit and function are excellent. Aidite Clear PMMA produces splints with glass-like transparency that patients consistently receive more positively than appliances made from generic clear material. The dimensional accuracy of Aidite Clear PMMA in splint applications is equally important. Occlusal splints are precision restorations the occlusal surface must accurately reproduce the prescribed contacts, and the fitting surface must maintain close adaptation to the model. Dimensional drift during milling or post-milling warping compromises both. Aidite's pre-polymerized disc format delivers consistent dimensional behavior from the mill, with minimal stress-release warping after separation from the blank. Orthodontic Retainers Milled PMMA retainers from digital models are increasingly replacing pressure-formed thermoplastic retainers in labs running full digital workflows. The accuracy advantage of milled retainers over pressure-formed alternatives is significant particularly at interproximal and subgingival areas where pressure forming cannot faithfully reproduce model detail. Aidite Clear PMMA mills these fine detail areas cleanly, producing retainer fits that are measurably more accurate than pressure-formed equivalents. The clarity of the retainer also affects patient compliance. Patients are significantly more likely to wear a retainer consistently when it is optically clear and visually unobtrusive. A cloudy retainer draws more attention and generates more compliance-related complaints. This is a patient experience variable, but it is a real one that labs can address through material selection. Diagnostic Models and Study Casts Clear PMMA diagnostic models provide a visibility advantage that opaque models do not internal anatomy, tooth contours, and prepared margin details are visible through the model in clear PMMA, enabling more accurate assessment during case planning. For complex restorative cases, implant planning, or orthodontic evaluation, clear diagnostic models reduce the number of cases where anatomy ambiguity causes planning errors downstream. Clear Removable Appliances Clear PMMA is also used for removable partial denture frameworks in cases where metal is contraindicated or the patient requests an all-clear esthetic result. The material's combination of clarity, biocompatibility, and milling accuracy makes it well-suited for this application though labs should note that PMMA's flexural strength (80–120 MPa) does not match metal framework strength, and the application should be selected accordingly. How Aidite Clear PMMA Fits Into a Full CAD/CAM Material Workflow? The efficiency case for Aidite Clear PMMA is strongest when it is evaluated as part of a complete Aidite material ecosystem rather than as a standalone product. Labs that stock the full range of aidite dental materials clear PMMA, denture base PMMA, multilayer PMMA, zirconia discs, stain and glaze eliminate multi-vendor ordering complexity and gain access to a coherent set of materials with documented compatibility across applications. This matters in practice because labs frequently produce multiple material types on the same case. A full-mouth rehabilitation case might require a multilayer zirconia disc for permanent anterior crowns, a monolithic zirconia disc for posterior bridges, a multilayer PMMA disc for temporaries, and a clear PMMA disc for the accompanying occlusal splint. When those materials come from a single supplier with consistent batch documentation and compatible sintering and milling parameters, the production workflow is simpler and the quality control process is more straightforward. The contrast with generic clear PMMA from unverified sources is significant. Zirconia blocks dental labs that have standardized their zirconia supply on documented, batch-certified products often undermine that quality discipline by sourcing clear PMMA from the cheapest available option. The result is a material quality mismatch precision zirconia restorations delivered alongside clear appliances made from material with inconsistent clarity and unpredictable milling behavior. Standardizing the full material range through a single reliable source closes that gap. Aidite Clear PMMA vs. Competing Clear PMMA Products: What Labs Actually Report Labs that have compared Aidite Clear PMMA directly against generic clear PMMA alternatives consistently report three specific advantages that show up in production metrics rather than on spec sheets. Post-milling polishing time- Aidite Clear PMMA achieves clinical-grade surface polish in approximately 30–40% less time than generic clear PMMA alternatives in the same milling parameters. The cleaner milling surface requires fewer polishing steps to achieve the high-gloss finish that clear appliances require. For labs producing 10–20 splints or retainers per week, this time reduction is meaningful at the scale of monthly production. Clarity retention over time- Clear PMMA appliances that patients wear for extended periods splints worn nightly for bruxism management, retainers worn indefinitely are subject to thermal cycling, chemical exposure from oral fluids, and mechanical stress from cleaning. Aidite's formulation resists yellowing and surface hazing under these conditions more effectively than generic alternatives, which often show visible clarity degradation within six months of delivery. Labs that use Aidite report fewer patient complaints about appliance discoloration over time. Batch consistency- The most disruptive quality problem in clear PMMA production is batch-to-batch variation where the same disc format from the same supplier produces visibly different clarity or milling behavior across different production runs. Aidite's industrial manufacturing process and batch documentation eliminate this variable, enabling labs to build production standards around consistent material behavior rather than compensating for variability on every case. Sourcing Aidite Clear PMMA in the US: What Labs Need to Know For US dental labs, the sourcing question is straightforward. As a leading zirconia materials distributor usa and full-range Aidite stocking partner, ZirconiaGuys carries Aidite Clear PMMA from US inventory no international shipping, no unpredictable lead times, no import documentation complexity. Labs that are evaluating aidite cad cam products for the first time can source clear PMMA alongside the full Aidite zirconia range including zirconia blank formats in 3Y, 4Y, and 5Y grades, dental zirconia discs in flat and multilayer configurations, and zirconia dental blanks in pre-shaded and white formats from a single US inventory point. This consolidation simplifies ordering, reduces minimum order complexity, and ensures that all products arrive with the batch documentation needed for quality management workflows. The zirconia blocks price relationship is also worth noting for labs tracking per-case material cost across their full portfolio. Aidite Clear PMMA discs are priced competitively relative to comparable clear PMMA products from other suppliers and when the total cost calculation accounts for reduced polishing time and lower remake rates, the per-case economics consistently favor the higher-quality product over nominal-cost alternatives. Aidite Clear PMMA is not a revolutionary new material it is a superior execution of a material category that dental labs already depend on daily. The difference between a generic clear PMMA disc and Aidite's formulation shows up in every single appliance produced from it: in the glass-like clarity patients see when they first receive the appliance, in the polishing time technicians save on every unit, and in the absence of discoloration complaints at the six-month follow-up. For labs that have accepted generic clear PMMA as a commodity purchase, switching to Aidite's formulation is one of the lowest-friction, highest-return material upgrades available in a modern CAD/CAM workflow.
Learn more
5 Reasons Why the Best Multilayer Zirconia Block Is Essential for Dental Labs
The material you mill from determines the outcome of every restoration your lab produces. That statement sounds obvious, but it is violated constantly in dental labs that evaluate zirconia blocks on price alone, stock whatever is available at short notice, or default to the same monolithic grade for every indication regardless of the clinical requirements of the case. The result is predictable: remakes, staining corrections, chair time spent compensating for what the material didn't deliver on its own. Multilayer zirconia blocks represent the most significant advancement in dental zirconia discs technology of the past decade. They are not simply a premium version of standard monolithic blocks they are a fundamentally different approach to how color, translucency, and shade gradient are built into a restoration. For dental labs that produce anterior crowns and bridges at any meaningful volume, understanding why multilayer blocks outperform monolithic alternatives is not optional knowledge. It is the foundation of a material selection strategy that produces better clinical outcomes with less finishing labor. Here are five specific reasons why the best multilayer zirconia block has become essential to modern dental lab production. Reason 1: The Shade Gradient Is Built Into the Material Not Applied After Milling The single most important advantage of multilayer zirconia over standard monolithic blocks is the internal shade gradient. In a multilayer disc, the manufacturer builds distinct chromatic and translucency zones into the material during production transitioning from a warmer, more opaque dentin-like zone at the cervical end to a cooler, more translucent enamel-like zone at the incisal end. This gradient is present in every blank milled from the disc before any staining or glazing takes place. In a monolithic zirconia blank, no such internal structure exists. The disc is uniform in shade and translucency from edge to edge. Every anterior crown milled from a monolithic disc exits sintering as a single-shade, single-translucency restoration that must then be corrected through external staining to look like a natural tooth. That correction process adds bench time, introduces operator variability, and creates batch-to-batch inconsistency when stain concentrations vary between technicians or firing cycles. With a multilayer block, the correction step is largely eliminated for standard A–D shade cases. The crown exits sintering with the dentin zone at the cervical margin and the enamel zone at the incisal edge already present in the material. For labs processing anterior cases at volume, this difference translates directly into reduced staining labor on every single unit. At ten units per day, the time saving is material. At fifty units per day, it is transformational. The clinical outcome is also more consistent. When the gradient is in the material rather than applied by a technician, the result is the same regardless of who milled the case, which shift produced it, or how the stain batch was mixed. Process consistency at that level is difficult to achieve through manual staining regardless of technician skill. Reason 2: Multilayer Blocks Reduce Post-Sintering Finishing Time Without Sacrificing Shade Accuracy Labs that transition from monolithic to multilayer zirconia blocks dental production consistently report the same thing: the staining step is no longer a bottleneck. For standard anterior cases, the multilayer block delivers a result that requires glaze and polish but not shade reconstruction. The difference between glazing a restoration and staining one is not trivial — staining requires multiple firing cycles, evaluation under multiple light sources, potential re-firing, and the kind of experienced judgment that cannot be easily delegated or standardized. Zirconia dental blanks in multilayer format eliminate this bottleneck by moving the shade work from the lab bench to the manufacturing process. The disc producer has already done the shade gradient calibration at an industrial level with controlled yttrium oxide gradients, precisely pigmented slurry layers, and quality-controlled batch testing across thousands of discs. That is a level of shade engineering that no bench staining protocol can replicate at the case level. The practical implications for lab workflow are significant. When post-sintering finishing is reduced to glazing and polishing, technicians can be deployed on higher-value tasks. Throughput increases without adding headcount. Remake rates drop because staining errors wrong concentration, uneven application, over-firing are simply removed from the process for standard cases. Multilayer blocks do not eliminate the staining step for every case, but they eliminate it for the majority: typically 70–80% of standard anterior A–D shade cases. For the remaining 20–30% of complex cases unusual shade requests, high-chroma B or C shades, characterization cases white monolithic blanks remain the appropriate choice. A well-run lab stocks both and uses each for what it does best. Reason 3: Super-Translucency Grades Deliver Anterior Esthetics That Monolithic 3Y Cannot Match The translucency ceiling of standard 3Y monolithic zirconia is a clinical limitation. In younger patients, patients with naturally highly translucent teeth, or cases adjacent to e.max veneers and feldspathic porcelain work, a 3Y monolithic crown will look flat and artificial regardless of the staining effort applied. The material's tetragonal crystal phase scatters light in a way that produces the characteristic opaque appearance of early-generation zirconia — an appearance that no surface treatment fully corrects. The st multilayer zirconia disc format addresses this limitation directly. Super-translucency (ST) grade multilayer discs are formulated with higher yttria content in the incisal zone increasing the cubic phase fraction and therefore the light transmission through the material in exactly the zone where translucency matters most for anterior esthetics. The result is an incisal edge that transmits light in a manner much closer to natural enamel than any 3Y monolithic format can produce. This optical difference is not subtle. Under mixed lighting conditions the combination of fluorescent, natural, and incandescent light that patients encounter daily — the translucency of the incisal zone is one of the most visible differentiators between a restoration that looks natural and one that looks artificial. Labs that still produce high-volume anterior work on 3Y monolithic blanks are consistently visible to observant patients and referring dentists. The strength tradeoff in ST-grade multilayer discs is real but manageable. Super-translucency grades typically deliver 600–750 MPa flexural strength adequate for single units and short-span anterior bridges, but not appropriate for posterior bridges of 3+ units where 3Y-TZP structural grades are required. The clinical rule is straightforward: use ST-grade multilayer for anterior esthetic cases, use high-strength monolithic 3Y for posterior bridge structural cases. Reason 4: CAD/CAM Orientation Alignment Enables Consistent Shade Placement Across Every Unit A multilayer block delivers its shade gradient correctly only when the CAD/CAM toolpath is aligned with the disc's internal zone architecture. This sounds technical, but it is a simple workflow step that, once standardized, produces consistent shade placement across every restoration milled from the disc. Dental zirconia discs in multilayer format are directionally marked an engraved arrow or printed indicator on the disc identifies the gingival-to-incisal axis. When the disc is mounted with this axis correctly oriented in the milling chuck, and when the CAD design aligns preparation margins and cusp tips with the corresponding disc zones, the milled crown will automatically carry the cervical dentin shade at the margin and the incisal enamel shade at the edge. This orientation-dependent shade placement is the mechanism that gives multilayer blocks their consistency advantage. It is also the source of the most common error labs make with multilayer discs: reversed orientation. A disc mounted backwards places the incisal-grade high-translucency material at the cervical margin, producing a crown that looks bright white at the gum line. Identifying this error requires only one test piece from each new batch a minor process step that eliminates the most disruptive multilayer workflow problem. Modern CAM software including exocad and 3Shape includes disc layer visualization tools that display the crown position relative to the disc's internal zones before committing to the toolpath. For labs running any multilayer format, these tools should be used on every anterior case as a standard quality step, not only on cases where shade problems are anticipated. The disc orientation workflow also applies to zirconia dental blanks in pre-shaded multilayer format. Pre-shaded blanks carry VITA-compatible shade gradients that are directionally dependent in the same way. Standardizing orientation verification across all multilayer disc formats regardless of grade or brand takes one step but eliminates the most common source of multilayer shade errors. Reason 5: Sourcing Multilayer Blocks From a Reliable US Distributor Eliminates Lead Time and Batch Variability Risk For US dental labs, material sourcing decisions have supply chain implications that go beyond per-disc cost. A multilayer disc ordered from an overseas supplier at a lower per-unit price carries risks that are invisible until they materialize: delayed shipments that create production gaps, batch documentation that is unavailable or not aligned with US quality standards, and shade drift between batches that is difficult to trace or resolve without supplier proximity. As a reliable zirconia materials distributor usa, ZirconiaGuys stocks the full multilayer zirconia range including upcera dental zirconia in multilayer formats and Aidite multilayer grades from US inventory. Same-day and next-day shipping on in-stock items means labs can maintain leaner inventory without exposure to production gaps from international lead times. Batch documentation is available for every order, enabling shade tracking across production runs and rapid issue resolution when questions arise. The consistency of multilayer disc production is particularly dependent on batch-to-batch manufacturing quality. Unlike monolithic white discs where shade is applied externally and batch-level shade drift has limited impact, multilayer discs carry their shade gradient internally. If a batch is manufactured with a shifted cervical shade or a different gradient transition point, every blank milled from that batch will produce the same shift in every crown. Identifying and resolving that kind of systemic batch issue requires direct communication with a supplier who can pull batch certificates, trace production records, and resolve discrepancies in real time not a 48-hour support ticket cycle across time zones. The real value of a US-based zirconia blocks supplier relationship for multilayer material is not in any single order. It is in the confidence that every batch will perform to the same standard, every shipment will arrive when the production schedule requires it, and every technical question will be resolved by someone who understands the production context. The shift to multilayer zirconia blank formats is not a luxury upgrade for labs with premium workflows it is a production efficiency decision that pays for itself in reduced finishing labor on every anterior case. The internal shade gradient eliminates the staining step for the majority of standard cases. The super-translucency grade options deliver esthetic outcomes that 3Y monolithic material cannot match. The CAD/CAM orientation workflow standardizes shade placement across every technician and every shift. Sourcing the right dental zirconia discs from a consistent, US-based supply chain protects those efficiency gains by ensuring batch consistency and production continuity. For dental labs producing anterior crowns and bridges at any meaningful volume, these five reasons are not abstract arguments they are measurable workflow improvements that show up in case time, remake rates, and clinical outcomes on every production day.
Learn more
7 Things You Must Know About Zirconia Blocks
Every dental lab that mills restorations works with zirconia. But working with a material and understanding it are two different things. Most labs know that zirconia is strong and that it comes in different grades but the decisions that actually determine clinical outcomes go deeper than that. The right blank for the wrong indication produces remakes. The wrong sintering profile on the right disc produces cloudier, weaker restorations. Choosing a supplier based on price per disc without understanding batch consistency leads to shade drift that costs more in rework than the savings were worth. This guide covers the seven things that genuinely matter about zirconia blocks the information that separates labs that make consistently correct material decisions from labs that compensate for avoidable errors case by case. 1. "Zirconia Block" and "Zirconia Disc" Are Not the Same Thing and the Difference Matters for Your Equipment The most persistent source of confusion in zirconia blocks dental procurement is the terminology. "Block" and "disc" are used interchangeably in casual conversation, but they refer to distinct physical formats that are compatible with different milling equipment. Ordering the wrong format means the material cannot be mounted in your milling system. Zirconia blocks are rectangular blanks typically in formats like 14 mm × 18 mm × 20 mm or similar dimensions designed for chaiside CAD/CAM mills. CEREC by Dentsply Sirona is the most widely used chairside system that accepts block format material. Blocks are the correct format for in-office milling workflows and for lab mills specifically engineered for rectangular blanks. They produce a limited number of units per blank typically one to two single units per block depending on size making them less economical for high-volume lab production. Zirconia discs also called pucks or zirconia dental blanks in disc format are round blanks typically 98 mm in diameter and available in multiple thicknesses (10 mm, 12 mm, 14 mm, 18 mm). They are designed for full-arch lab milling systems: Roland DWX, Amann Girrbach Ceramill, Zirkonzahn, VHF, Sirona inLab, and other open-system lab mills. A single 98 mm disc can produce 10–20 or more individual units depending on the case size and thickness, making discs dramatically more economical for lab production volume. Dental zirconia discs in the 98 mm format are the standard for professional dental lab workflows. Blocks are relevant for chairside or small-volume use cases. If you are running a full-service dental lab, you are almost certainly in the disc market, not the block market and the material specifications, pricing, and supplier relationships are structured accordingly. Key action: Before evaluating any zirconia product, confirm whether your milling system accepts block, disc, or both formats. Purchasing disc material for a block-only milling system or vice versa is a procurement error that no amount of technical performance justifies. 2. The Yttria Grade Determines Everything: Strength, Translucency, and Indication Range The single most important specification in any zirconia blank is the yttria (Y₂O₃) content expressed as 3Y, 4Y, or 5Y. This number controls the ratio of crystal phases present in the sintered material, which directly determines flexural strength and optical translucency. Every other performance characteristic of a zirconia product is secondary to this fundamental material variable. 3Y zirconia contains approximately 3 mol% yttria, producing a predominantly tetragonal crystal microstructure. Transformation toughening the mechanism where tetragonal phase transforms to monoclinic under stress, absorbing fracture energy gives 3Y its exceptional flexural strength of 900–1200+ MPa. This is the correct grade for posterior bridges of 3 or more units, high-load posterior crowns, and any application where structural performance is the primary clinical requirement. Translucency is moderate sufficient for posterior esthetic zones but not for demanding anterior esthetic work without significant staining effort. 4Y zirconia produces a mixed tetragonal-cubic microstructure. Flexural strength of 600–800 MPa adequate for single units and short-span bridges. Translucency is meaningfully higher than 3Y, enabling natural-looking anterior restorations with minimal or no external staining. 4Y is the most versatile daily-production grade and the most widely stocked format in professional dental labs worldwide. 5Y zirconia is predominantly cubic phase. Flexural strength of 500–650 MPa. Translucency is very high the closest any zirconia formulation gets to natural enamel optical behavior. 5Y is the correct choice for anterior single crowns and cases where shade matching to highly translucent natural dentition is the overriding clinical priority. It is not appropriate for posterior bridges where connector strength requirements cannot be met at this flexural strength level. Sourcing aidite zirconia blocks across the full 3Y, 4Y, and 5Y range allows labs to maintain a clinically complete inventory covering every indication from high-load posterior bridges to demanding anterior esthetic cases without switching suppliers for different grade requirements. Grade Flexural Strength Translucency Best Indication 3Y-TZP 900–1200+ MPa Moderate Posterior bridges, high-load crowns 4Y 600–800 MPa High Anterior/premolar daily production 5Y 500–650 MPa Very high Anterior esthetic priority cases 3. Pre-Sintered vs. Sintered: Understanding Why You Mill Chalk, Not Ceramic One of the most important and least explained facts about dental zirconia discs is that they are never milled in their final state. Every zirconia blank you receive and mill is in a pre-sintered condition: a chalk-like, partially processed form that is deliberately soft to enable precision machining. Pre-sintered zirconia is manufactured by pressing and partially sintering zirconia powder to create a stable, machinable form at approximately 20–25% larger than the final restoration dimensions. The material at this stage has a consistency similar to compressed chalk hard enough to hold its shape, soft enough to mill with standard carbide burs at practical speeds without destroying tooling. This is why zirconia milling burs have reasonable service lives they are cutting pre-sintered ceramic, not the 1200+ MPa final material. After milling, the oversized pre-sintered restoration is placed in a sintering furnace and fired to its final temperature typically 1480–1550°C depending on the specific product. During sintering, the material undergoes controlled densification: it shrinks by approximately 20–25% in linear dimension, the crystal microstructure matures to its final phase composition, and the material achieves its final mechanical and optical properties. The pre-sintered chalk becomes the dense, hard, translucent ceramic that enters the patient's mouth. The explore functional zirconia disc format is one of the most widely used pre-sintered open-system blanks for labs running mixed anterior and posterior workflows delivering consistent pre-sintered density that enables clean milling across the full disc surface, with reliable shrinkage behavior that maintains restoration dimensions within CAD/CAM design tolerances after sintering. Critical implication: The pre-sintered state means that disc quality is invisible at the procurement stage. You cannot evaluate the final mechanical and optical properties of a zirconia disc by looking at it, touching it, or milling from it before sintering. The sintered result is what matters and batch-to-batch consistency in the sintered result is what distinguishes reliable suppliers fom unreliable ones. This is why zirconia materials distributor USA relationships built on documented batch quality matter more than price-per-disc comparisons between unverified products. 4. Sintering Is Not a Generic Process Every Disc Has a Specific Profile That Must Be Followed This is one of the most commonly violated rules in dental lab zirconia workflows, and the violations consistently produce worse clinical outcomes. Every zirconia disc has a manufacturer-specified sintering profile ramp rate, peak temperature, hold time, and cool-down rate that is engineered to produce the disc's specified mechanical and optical properties. Deviating from this profile, in either direction, changes what the sintered material actually is. Ramp rate controls how quickly the material heats to peak temperature. Esthetic-grade 4Y and 5Y discs require slow ramp rates typically ≤5°C/min through the critical temperature range to allow controlled grain growth that produces the cubic phase fraction responsible for translucency. Rapid ramp rates produce uncontrolled grain growth that creates a cloudier, more opaque result and potentially introduces internal stress and microcracking at the interlayer interfaces of multilayer discs. Peak temperature and hold time determine the final density and crystal phase composition of the sintered material. Too low a peak temperature or too short a hold produces an under-sintered material with lower than specified strength. Too high a peak temperature in 5Y grades can drive excessive grain growth that actually reduces strength below specification. The manufacturer's published profile is the result of materials science optimization not a suggestion. Cool-down rate affects residual stress in the sintered material. Rapid quench cooling can introduce thermal stress that compromises long-term fracture resistance. Most premium disc manufacturers specify controlled cool-down rates to room temperature for the same reason they specify controlled ramp-up. Accelerated sintering programs are available on most modern dental furnaces and are appropriate for some zirconia products specifically engineered for fast sintering. They are not appropriate for standard esthetic-grade discs unless the manufacturer explicitly validates the accelerated profile for that specific product. Using an accelerated program on a disc designed for standard sintering produces a materially different result than the manufacturer's specification — and the difference is optical and mechanical degradation that the lab cannot reverse. Practical rule: When you add a new zirconia product to your inventory, obtain the manufacturer's sintering profile before milling a single restoration. Input the correct profile into your furnace's memory under a product-specific program name. Never run a new disc on a generic or copied profile from a different product. 5. Batch Consistency Is the Real Performance Metric Not the Spec Sheet Every zirconia manufacturer produces a technical data sheet with impressive strength numbers. 3Y-TZP at 1100 MPa. 5Y at 650 MPa. Shade-matched to VITA Classic within ΔE < 1. These specifications describe the best-case performance of the material under controlled conditions. What they do not describe is how consistently the product delivers that performance across 10, 20, or 50 consecutive batches in real production conditions. Batch consistency is the performance metric that determines whether a zirconia product is usable at production scale. The specific failures that batch inconsistency causes are: Shade drift - The same shade designation produces visibly different color from one batch to the next. This forces labs to re-shade-match every case rather than trusting a standard. In a multi-unit case where some units are milled from one batch and others from a second batch, shade drift can produce visible shade mismatch within the same case. Pre-sintered density variation - If the pre-sintered disc density is inconsistent between batches, the milling behavior changes bur wear rates, surface finish quality, and edge integrity vary unexpectedly. Labs set their milling parameters for a specific disc density; when that density varies, the optimized parameters no longer produce optimal results. Sintering shrinkage variation - The CAD/CAM design compensates for a specific sintering shrinkage factor. If shrinkage varies between batches, the restoration dimensions after sintering drift from the design producing fit issues that require additional chairside adjustment. The upcera dental zirconia range is one of the most consistently documented product lines available to US dental labs with batch certificates that specify shade compliance, mechanical property verification, and sintering shrinkage factor for each production batch. This documentation transforms batch consistency from a promise into a verifiable, traceable quality standard. What to ask any supplier: Request batch documentation before committing to a new product. A supplier that cannot provide batch-level quality certificates is asking you to accept undocumented material quality in a clinical production process. That is an unnecessary risk when documented alternatives are available. 6. White vs. Pre-Shaded: The Format Decision That Drives Lab Workflow Efficiency Every zirconia blank is available in two fundamental formats: white (unshaded) and pre-shaded. The format decision determines how much post-sintering finishing work the restoration requires — and choosing the wrong format for a given case type is one of the most reliably avoidable sources of unnecessary lab labor. White zirconia blanks are uncolored at manufacture. The lab applies shade through external liquid staining either by immersion in shade solution or by surface painting with stain after milling and before sintering. White blanks give the technician complete manual control over shade, characterization, and optical effects. They are the correct choice for: unusual shade requests outside the standard VITA A-D range, cases requiring specific characterization effects (craze lines, fluorosis simulation, hypocalcification), and complex anterior cases where the technician's shade artistry is the primary esthetic driver. The st white zirconia disc format super-translucency grade, white is the standard stocking format for labs that handle complex custom anterior cases where manual shade control is the production priority. The super-translucency base formula gives the technician a starting point with higher light transmission than standard white discs, enabling stain layering to build shade depth without fighting the opacity of a lower-grade white blank. Pre-shaded zirconia blanks are pigmented to match specific VITA shade values during manufacturing. The shade gradient from cervical chroma to incisal translucency in multilayer formats is built into the material. For standard A1–D4 shade cases, which represent the large majority of daily anterior production, pre-shaded discs eliminate the external staining step entirely. The restoration exits the sintering furnace with its shade already developed, requiring only glaze application for surface finish. The workflow efficiency advantage of pre-shaded discs at production scale is substantial. A lab producing 20 anterior crowns per day on white blanks spends 10–15 minutes per unit on staining, staging, and stain firing. The same volume on pre-shaded multilayer discs requires glaze application only reducing finishing time by 60–70% on standard shade cases. At production volume, that time difference compounds directly into either higher output or lower labor cost per unit. Practical stocking strategy for most labs: Pre-shaded multilayer discs as the production default for standard A-D shade anterior cases. White discs in the appropriate grade as the secondary stock for custom and complex cases. The ratio in most labs runs approximately 70-80% pre-shaded, 20-30% white. 7. Sourcing from a Verified US Distributor Is Not Just Convenience It Is Quality Control The final thing dental labs must know about zirconia dental blanks is that where you source them from is as important as which product you select. The zirconia disc market includes a significant volume of unverified, undocumented material from sources that do not provide batch certification, cannot confirm product specifications against claimed values, and offer no supply chain transparency between the manufacturing facility and the lab's milling machine. Sourcing from a verified zirconia materials distributor USA provides specific, measurable protections that unverified channels cannot match: Documented supply chain - US distributors sourcing from verified manufacturers maintain traceable purchase records that link every batch of discs to a specific manufacturing lot with associated quality documentation. When a quality issue appears, the affected batch can be identified and isolated without uncertainty. US inventory availability - International procurement introduces lead time variability, import process delays, and customs unpredictability that US-stocked inventory eliminates. For labs running production schedules that depend on material availability within days rather than weeks, domestic stock is not a preference it is an operational requirement. Regulatory compliance - Dental materials sold for clinical use in the US are subject to FDA regulatory requirements. Verified US distributors work with products that meet applicable FDA requirements for dental devices. Unverified offshore sources may not be able to document FDA compliance status creating potential regulatory exposure for labs using those materials in clinical production. Technical support - Sintering profile guidance, milling parameter recommendations, troubleshooting support for unexpected results these services are available from established US distributors and absent from transactional offshore sources. When a new disc is producing unexpected shade outcomes or unusual milling behavior, having direct access to technical support from a distributor who knows the product resolves problems faster and at lower cost than trial-and-error. Consistent reorder availability - Zirconia zirconia blocks dental procurement works on a reorder schedule labs build workflows around specific products and need those products to be consistently available. US distributors with reliable domestic inventory eliminate the supply uncertainty that forces labs to substitute materials mid-production run. ZirconiaGuys operates as a dedicated zirconia materials distributor USA stocking Aidite, Upcera, and other leading zirconia brands from US inventory with full batch documentation, technical support, and consistent reorder availability for labs building reliable CAD/CAM production workflows. Zirconia blocks and discs are not commodity materials — they are engineered products whose clinical performance depends on correct grade selection, correct format for your milling system, correct sintering protocol, and consistent supply chain documentation. The seven things covered in this guide are not advanced technical knowledge reserved for materials scientists. They are the practical baseline that every dental lab running a CAD/CAM zirconia workflow should operate from. Labs that understand their zirconia dental blanks at this level make better procurement decisions, produce fewer remakes, run more efficient production workflows, and deliver more consistent clinical outcomes than labs that treat zirconia as a generic input where the lowest price wins.
Learn more
How Dental Labs Choose Hard Resin for Bite Splints?
Bite splints represent one of the highest-stakes applications in dental lab production. A poorly selected material fails in ways that are immediately apparent to the patient a splint that cracks under nocturnal bruxism forces, one that warps during post-cure, or one that produces surface roughness that irritates soft tissue and those failures reflect directly on the lab that made it. The material selection decision for hard resin bite splints is not a minor procurement choice. It determines clinical performance, patient comfort, production efficiency, and remake rate in a single decision. The shift from milled PMMA to 3D printed resin for bite splint production has accelerated significantly over the past five years. Modern 3D printing workflows offer faster production cycles, less material waste, and the ability to produce complex occlusal geometries that milling struggles to execute cleanly. But 3D printing introduces its own material selection complexity not all resins that print well also perform well clinically, and the properties that determine print quality are not the same properties that determine long-term splint performance. Understanding both sets of requirements is what separates labs that produce reliable bite splints from labs that manage recurring remake requests. What a Bite Splint Actually Demands from Its Material? Before evaluating any specific resin, labs need clarity on exactly what a hard bite splint requires from its material. The clinical function of the splint determines the material specification and the clinical demands of bite splint applications are more rigorous than most temporary restoration or model applications. Hardness and wear resistance. A bite splint works by providing a controlled occlusal surface against which the opposing arch functions. If the splint material is too soft, it develops wear facets that alter the occlusal scheme over weeks of use, defeating the therapeutic purpose of the appliance. Hard resin for splints must resist wear under repeated occlusal contact typically through a combination of surface hardness and flexural resistance. Dimensional accuracy. The splint must seat accurately on the model it was designed for and fit the patient's dentition without adjustment-intensive rework. Dimensional accuracy is controlled by the resin's post-cure shrinkage characteristics and the stability of the material during and after light curing. Resins with high post-cure shrinkage produce splints that require significant occlusal adjustment after fitting adding chairside time and undermining the precision advantage of the digital workflow. Biocompatibility. A bite splint sits in direct tissue contact for 6–10 hours per night. The material must be ISO 10993-compliant for long-term oral contact. Residual monomer content, photoinitiator leaching, and colorant stability all affect biocompatibility compliance. Labs should verify ISO 10993 certification from the manufacturer for any resin specified for overnight tissue-contact applications. Polishability. Hard resin bite splints must be polished to a smooth, high-gloss surface before delivery. Surface roughness on the tissue side causes soft tissue irritation. Surface roughness on the occlusal surface causes elevated friction and a sensation patients describe as uncomfortable or gritty. The resin's polymer chemistry determines how easily it polishes and what surface finish is achievable some formulations achieve high gloss with minimal effort, while others require extensive polishing sequences. Optical clarity (for clear splints). Many patients and practitioners prefer clear or transparent splints for esthetic reasons. A resin formulated for clear splint production must maintain optical clarity through the full print, post-wash, and post-cure workflow avoiding the yellowing, haziness, or whitish opacity that affects resins not designed for this requirement. Fracture resistance under impact. Splints are removed and reinserted daily, flexed during function, and periodically dropped. The material must tolerate both cyclic fatigue stress and impact stress without brittle fracture. Highly crosslinked resins that optimize surface hardness can become brittle a high flexural modulus without adequate fracture toughness produces splints that survive occlusal contact but fracture when dropped on a hard floor. The Key Properties Labs Use to Evaluate Splint Resins When a dental lab evaluates a hard resin for bite splint production, experienced technicians and lab managers assess five core material properties. Understanding these properties and where to find them in manufacturer documentation enables systematic comparison rather than trial-and-error purchasing. Flexural strength is the property most directly correlated with splint durability. Measured in MPa, flexural strength determines the force required to fracture the material under bending load. For bite splints, flexural strength values above 80 MPa are generally considered clinically acceptable for standard bruxism cases. Heavy bruxers patients who fracture conventional PMMA splints regularly benefit from resins in the 100–130+ MPa range. Flexural modulus (stiffness) complements flexural strength. A high flexural modulus produces a rigid splint that maintains its occlusal scheme under load. A lower modulus produces a more flexible appliance appropriate for some therapeutic applications but not for full-coverage hard bite splints where occlusal rigidity is the clinical goal. Shore D hardness is the surface hardness measurement most commonly reported for dental resins. For hard bite splints, Shore D values in the 80–90 range are typical. Values below 75 indicate a material that will develop occlusal wear facets with extended use. Post-cure shrinkage should be as low as possible for dimensional accuracy. Manufacturer-reported values below 2% post-cure shrinkage are acceptable for most splint applications. Values above 3–4% will produce measurable dimensional distortion that requires occlusal adjustment at fitting. Biocompatibility certification. The only reliable indicator of biocompatibility compliance is independent third-party certification specifically ISO 10993 Part 5 (cytotoxicity) and Part 10 (sensitization) testing from a recognized testing body. Self-reported claims from manufacturers without independent certification documentation should not be accepted for tissue-contact applications. How 3D Printing Has Changed Bite Splint Production? The transition to 3D printed bite splints has fundamentally altered material requirements compared to milled PMMA. Understanding the differences helps labs avoid applying PMMA-based evaluation criteria to 3D printed resin products a common mistake that leads to incorrect material selection and poor clinical outcomes. Milled PMMA splints are produced from pre-polymerized industrial discs the polymerization is complete before the material ever enters the lab workflow. The lab's job is to mill accurately and polish efficiently. The material properties are fixed at the manufacturing stage and essentially identical across every disc in a batch from a reputable supplier. 3D printed resins undergo polymerization during and after the printing process. The final material properties of a 3D printed splint are a function of the resin chemistry, the print parameters (layer thickness, exposure time, light intensity), the wash protocol, and the post-cure parameters (light intensity, temperature, duration). This means the same resin can produce dramatically different mechanical properties depending on how it is processed a reality that has no equivalent in milled PMMA workflows. The practical implication: for splint resin for 3d printing, labs must treat the resin and the processing protocol as a single system. Validating a new resin product means validating it through your specific printer, wash unit, and post-cure unit using the manufacturer's recommended parameters not assuming that the published mechanical properties will transfer to your workflow without process-specific testing. Labs that validate systematically produce consistent results. Labs that assume print parameters from previous resins transfer directly to new products encounter fit and fracture problems that are difficult to diagnose without understanding this dependency. Print layer adhesion is an additional consideration unique to 3D printed materials. The layer-by-layer build process creates potential delamination planes between print layers a failure mode that does not exist in milled materials. High-quality splint resins are formulated to maximize interlayer bonding, minimizing the risk of layer separation under the cyclic stress of occlusal function. When evaluating a 3D printed resin for bite splints, ask the manufacturer specifically about interlayer adhesion testing data. Hard vs. Clear Hard Resin: Choosing the Right Formulation for the Case Not all hard splint resins are identical in their optical properties, and the choice between an opaque hard formulation and a clear hard formulation should be driven by clinical and patient factors not just material availability. Opaque hard resin formulations prioritize mechanical properties hardness, flexural strength, dimensional accuracy over optical clarity. These are the correct choice for posterior bite splints, NTI-style anterior splints for heavy bruxers, and any case where therapeutic function takes priority over esthetics. Opaque formulations typically achieve higher Shore D hardness values and better wear resistance than clear formulations because the pigmentation additives in opaque resins can contribute to polymer crosslinking density. The key splint hard clear resin formulation addresses the significant patient demand for clear or transparent bite splints without sacrificing the hardness and dimensional stability that splint applications require. Clear formulations use photoinitiator and monomer systems selected specifically for their ability to maintain optical transparency through deep-section curing a technical challenge in light-activated systems where opacity can develop when light penetration is insufficient in thicker sections. For anterior full-coverage or thinner splint designs where patient esthetic preference is a factor, clear hard resin is the clinically appropriate choice. Key considerations when choosing between opaque and clear: The patient's esthetic preference matters patients who are self-conscious about wearing a visible appliance accept treatment more consistently when the appliance is less noticeable. Patient compliance with splint therapy directly affects therapeutic outcomes, and material selection that improves compliance has clinical value. Splint thickness affects clear resin performance in sections thicker than 4–5 mm, some clear formulations develop internal haziness due to incomplete light penetration during post-cure. Verify that the clear resin you specify has been tested and validated at the thickness range your typical splint designs require. Color stability over time is a consideration for clear formulations some clear resins yellow with prolonged UV exposure or stain from food and beverages. Ask for accelerated aging data from the manufacturer if long-term clarity is a patient expectation. Sport Guards and Protective Appliances: When to Use a Different Resin Bite splints and sport mouthguards share some functional requirements occlusal coverage, tissue contact, patient compliance but their material requirements diverge significantly in the impact resistance dimension. Understanding this distinction prevents labs from specifying the same resin for both applications. Hard bite splints are designed to resist the cyclic, sustained forces of nocturnal bruxism relatively slow force application, high frequency, low peak force per contact. The material response required is hardness and fatigue resistance under moderate cyclic loading. Sport mouthguards must resist the sudden, high-peak-force impact of contact sports the brief but intense force of a direct blow or collision. The material response required for this application is energy absorption and impact resistance properties that favor a lower modulus, more flexible material rather than the high rigidity of a bite splint. For labs producing both bite splints and sport guards in a single digital workflow, the key guard sportguard resin is specifically formulated for the impact resistance requirements of athletic protection applications distinct from the hardness-optimized formulation of dedicated bite splint resins. Stocking both formulations and using each in its correct clinical application is the production standard for full-service appliance labs. The failure mode of using bite splint resin for sport guards is brittle fracture on impact the hard, highly crosslinked polymer that makes bite splints durable under occlusal cycling becomes a brittle fracture risk when subjected to the sudden force of a sports impact. The failure mode of using sport guard resin for bite splints is excessive wear and occlusal scheme deterioration the softer, more impact-absorbent material wears too quickly under the sustained friction of nocturnal bruxism. The Splint Resin Workflow: From Digital Design to Delivery Material selection is only one part of producing high-quality 3D printed bite splints. The full workflow from design parameters through post-processing determines the clinical outcome as much as the resin chemistry itself. Digital design considerations. Uniform wall thickness throughout the splint body produces more consistent mechanical properties and more predictable print results than variable-thickness designs. Avoid abrupt thickness transitions that create stress concentrations. Occlusal coverage geometry should be designed to distribute occlusal load across the full arch rather than concentrating contact at specific points. Print orientation. Splint orientation on the build platform affects both mechanical properties and dimensional accuracy. Printing at 45° to the build platform is the most commonly recommended orientation for splint applications it distributes layer boundaries away from areas of highest clinical stress and minimizes support mark artifacts on the tissue surface. Always orient the tissue surface to minimize support contact, as support marks on the tissue side require additional polishing effort. Wash protocol. Thorough removal of uncured resin from all surfaces particularly the tissue surface and any occlusal anatomy features is essential before post-cure. Residual uncured resin on the surface inhibits the post-cure reaction at that surface and leaves biocompatibility-compromising monomer available for tissue contact. Use fresh IPA at the correct concentration and follow the manufacturer's recommended wash duration and agitation protocol. Post-cure parameters. Post-cure duration and light intensity directly determine the final mechanical properties of the splint. Under-curing leaves residual monomer and produces lower hardness and strength than the material is capable of. Over-curing can produce surface brittleness and discoloration in some resin formulations. Use the manufacturer's published post-cure parameters validated for your specific post-cure unit do not assume parameters from a previous resin transfer to a new product. Polishing sequence. Hard resin bite splints polish best with a graduated sequence: start with a medium pumice slurry on a rag wheel to remove layer lines and surface irregularities, follow with a fine pumice or acrylic polishing compound, finish with a high-gloss polish on a clean cotton buff. The tissue surface should achieve a mirror-like finish before delivery. The occlusal surface should be smooth and free of rough areas that will concentrate friction during function. Sourcing Splint Resins and Zirconia Materials in the US: Consolidating Your Supply For full-service dental labs that produce both digital appliances (splints, guards, trays) and fixed ceramic restorations, supply consolidation through a single reliable US distributor reduces ordering complexity, simplifies inventory management, and ensures consistent batch documentation across the full material range. ZirconiaGuys operates as a zirconia materials distributor usa stocking Keystone splint and guard resins alongside a full range of dental zirconia discs, zirconia blocks, and related CAD/CAM ceramic materials from US inventory. For labs sourcing both appliance resins and ceramic milling blanks, this consolidated stocking model eliminates the need to manage multiple supplier relationships and international shipping timelines. For labs that also want to expand into fixed zirconia blank and ceramic production, ZirconiaGuys stocks the full Aidite zirconia blocks dental range including multilayer, pre-shaded, and white formats alongside Upcera's esthetic disc lineup. For labs looking to evaluate or purchase buy aidite zirconia blocks wholesale usa, the full range is available from US inventory with no international lead times. The zirconia dental blanks range covers 3Y structural grades for posterior bridges through 5Y esthetic grades for anterior crowns the full spectrum of fixed restoration material requirements under one roof. This consolidated supply approach means a full-service lab running both a resin printer for appliances and a CAD/CAM mill for fixed dental zirconia restorations can manage its entire material supply through a single US-based order consistent lead times, consistent documentation, and technical support for both material categories from a team that works with dental labs daily. Common Mistakes Labs Make When Selecting Splint Resin Choosing on price alone without validating properties. The lowest-cost hard resin on the market may not meet biocompatibility certification requirements for overnight tissue contact, may have inadequate published mechanical data, or may perform inconsistently across batches. The cost of a single remake material, labor, patient inconvenience, and potential loss of referral exceeds the price difference between a budget resin and a quality-validated product on dozens of cases. Using the same resin for splints and sport guards. As detailed above, hardness-optimized bite splint resin is a brittle fracture risk for sport guard applications. Flexibility-optimized sport guard resin produces poor wear resistance in bite splint applications. These are distinct products for distinct clinical requirements. Not validating post-cure parameters for each new resin. Mechanical properties reported by manufacturers are achieved under specific, controlled post-cure conditions. If your post-cure unit delivers different light intensity or spectral output than the conditions used in manufacturer testing, your results will differ. Validate each new resin product through your specific post-cure equipment before committing it to clinical production. Skipping the wash step or using contaminated IPA. Uncured resin left on the splint surface after printing inhibits post-cure at that surface and presents a biocompatibility risk. IPA wash solution becomes saturated with dissolved resin over time contaminated wash solution cleans poorly and leaves resin film on the surface. Replace wash IPA regularly and use a two-stage wash protocol (rough wash then finish wash in fresh IPA) for reliable surface preparation. Not checking batch documentation. Resin batches can vary in photoinitiator concentration, monomer ratio, and pigment formulation. A new batch of the same product can produce different print results if batch composition has shifted. Reputable suppliers provide batch certificates that enable labs to track and respond to material variation across orders. Selecting the right hard resin for bite splint production is a decision that compounds across every appliance in a lab's production schedule. A material that meets biocompatibility requirements, delivers consistent dimensional accuracy, polishes efficiently, and survives the mechanical demands of nocturnal bruxism reduces remakes, improves patient outcomes, and builds the referral reputation that drives long-term lab growth. The shift to 3D printed splint resin for 3d printing workflows has expanded material options significantly but it has also expanded the number of ways a material selection decision can go wrong. Validating resin products systematically, matching formulations to clinical applications, and sourcing from a US-based distributor that provides batch documentation and technical support are the practical steps that separate consistent splint production from avoidable variation. As a zirconia materials distributor usa stocking both digital appliance resins and the full range of zirconia blocks, zirconia dental blanks, and dental zirconia discs, ZirconiaGuys provides the consolidated supply infrastructure that full-service dental labs need to run both workflows from a single, reliable source.
Learn more
Top Materials Used in Modern Dental Labs
The quality of a dental restoration is determined before any milling begins it is determined at the point of material selection. A crown milled from the wrong zirconia grade, a provisional fabricated from a poorly formulated PMMA disc, or a denture base produced from a material with inadequate biocompatibility documentation will create clinical problems that no amount of skill at the bench can fully correct. Material selection is the highest-leverage decision in any dental lab production workflow. Modern dental labs work with a wider range of materials than at any previous point in the industry's history. CAD/CAM technology has enabled precision fabrication from materials that were either impractical or inaccessible to lab workflows a decade ago. Understanding what each material does, where it performs best, and where its limits are is the foundation of producing consistent, predictable clinical outcomes at production volume. 1. Zirconia The Dominant CAD/CAM Ceramic Zirconia is the defining material of the modern dental lab. No other material combines clinical-grade strength, long-term biocompatibility, esthetic versatility, and CAD/CAM machinability in the way that zirconia does. It has displaced porcelain-fused-to-metal as the default choice for crowns and bridges and is now the standard for implant-supported restorations, full-arch fixed prostheses, and any application where long-term mechanical performance is the clinical priority. The material's dominance is not based on a single property but on a combination that no competitor matches: flexural strength of 500–1200+ MPa depending on grade, chemical inertness in oral environments, ISO 6872 biocompatibility, and an optical character that can be formulated — through yttria content manipulation — to deliver anything from opaque high-strength posterior material to translucent anterior esthetic grades that closely approximate natural enamel. Sourcing quality dental lab materials from a reliable US-based supplier is the first step in building a zirconia workflow that delivers consistent clinical results. Batch documentation, sintering profile support, and verified shade consistency across orders are non-negotiable when zirconia is your primary production material. Zirconia grades every lab should understand: 3Y-TZP (3 mol% yttria): Predominantly tetragonal crystal phase. Flexural strength 900–1200+ MPa. The correct choice for posterior bridges of 3+ units, high-load posterior single crowns, and implant-supported posterior frameworks. Moderate translucency — requires staining for anterior esthetic applications. The zirconia blocks dental labs specify for posterior structural work are almost universally 3Y-TZP, because no other grade reliably meets the structural demands of multi-unit posterior spans under full occlusal loading. 4Y zirconia (4 mol% yttria): Mixed tetragonal-cubic microstructure. Flexural strength 600–800 MPa. The most versatile daily-use grade adequate strength for anterior crowns and short-span bridges, with meaningfully higher translucency than 3Y. Pre-shaded multilayer 4Y formats are the default production standard for anterior crown volume in high-throughput labs because they eliminate post-sintering staining on standard A-D shade cases. 5Y zirconia (5 mol% yttria): Predominantly cubic crystal phase. Flexural strength 500–650 MPa. Maximum translucency the optical behavior closest to natural enamel in the zirconia family. The correct choice for anterior single crowns and veneers where shade matching to highly translucent natural dentition is the overriding clinical priority. Not suitable for posterior bridges. When evaluating zirconia dental blanks for anterior esthetic work, the format decision — white unshaded vs. pre-shaded, monolithic vs. multilayer — is as important as the grade decision. White blanks give full manual shade control for complex custom cases. Pre-shaded multilayer blanks deliver reproducible results on standard cases without the staining step, reducing bench time significantly at production volume. Zirconia Grade Strength Best For Limitation 3Y-TZP 900–1200 MPa Posterior bridges, high-load crowns Moderate translucency 4Y multilayer 600–800 MPa Daily anterior/premolar production Not for 4+ unit posterior bridges 5Y high-translucency 500–650 MPa Anterior esthetic priority cases Not for posterior bridges 2. PMMA — The Temporary and Removable Restoration Standard PMMA (polymethyl methacrylate) is the second most important material in a modern dental lab's inventory. It handles everything temporary and removable — provisional crowns and bridges, full and partial denture bases, occlusal splints, night guards, and clear orthodontic appliances. No other material class matches PMMA's combination of machinability, biocompatibility, repairability, and cost efficiency for these applications. The distinction between modern CAD/CAM PMMA and conventional bench-mixed acrylic is significant and clinically important. CAD/CAM PMMA discs are pre-polymerized under industrial conditions high pressure (50–200 bar) and elevated temperature producing a material with near-zero porosity, residual monomer below 0.5% (well within ISO 20795-1 biocompatibility thresholds), and consistent mechanical properties throughout the disc. Conventional bench-mixed acrylic cannot match any of these properties, which is why it has been displaced in labs running digital workflows. Key PMMA formats for dental lab production: Multilayer PMMA — Pre-shaded with a dentine-to-incisal gradient. The standard format for anterior temporary crowns and bridge provisionals. Eliminates post-milling staining on standard A-D shade cases. Reduces finishing time per unit significantly at production volume. Denture base PMMA — Pigmented to simulate gingival tissue tones. Engineered for full and partial denture bases biocompatibility, dimensional stability, and polishability are the priority properties. Not interchangeable with crown and bridge PMMA. Clear PMMA — Formulated for maximum optical clarity. Used in occlusal splints, night guards, orthodontic retainers, and clear appliances where transparency is the functional requirement. PMMA's clinical role is explicitly temporary. At 80–120 MPa flexural strength, it is not a replacement for zirconia in permanent fixed restorations. Its value is in the provisional phase — protecting the prepared tooth, previewing esthetic outcomes, and giving the patient time to evaluate shape and function before the permanent restoration is placed. 3. Lithium Disilicate (IPS e.max) Lithium disilicate marketed primarily as IPS e.max by Ivoclar — occupies a specific niche in the dental lab material ecosystem: single-unit anterior crowns and veneers where maximum esthetic integration is the clinical priority and occlusal load is not heavy. The material delivers approximately 400 MPa flexural strength with excellent translucency and a bond-to-tooth-structure characteristic that makes it particularly suitable for minimally invasive preparation protocols. In cases where the preparation is thin and bonding to enamel provides meaningful support to the restoration, lithium disilicate has a genuine clinical advantage over zirconia which relies primarily on cementation rather than bonding for retention. The material is available in both pressable (hot-press) and CAD/CAM millable formats. The CAD/CAM format (e.max CAD) mills from a partially crystallized blue block, then undergoes a crystallization firing that produces the final translucency and strength. The pressable format is used in labs with press furnaces for layering and pressed restorations. Where lithium disilicate falls short: it should not be used for posterior bridges of 3 or more units, for high-load posterior single crowns in patients with bruxism, or for any application where flexural strength below 500 MPa creates fracture risk. For those indications, 3Y or 4Y zirconia is the correct choice. 4. Titanium — The Implant Framework Standard Titanium is the foundational material for dental implant components implant fixtures, abutments, and implant-supported framework bars. Its clinical dominance in implant dentistry traces to three properties: exceptional biocompatibility with osseointegration support, high strength-to-weight ratio, and corrosion resistance in oral environments. Grade 4 commercially pure titanium and Grade 5 titanium alloy (Ti-6Al-4V) are the two most commonly used implant-grade titanium classifications. Grade 5 alloy is stronger and preferred for framework applications where structural demands are highest. Grade 4 is used in components where maximum biocompatibility is the priority. In modern dental labs, titanium appears primarily in two contexts: pre-fabricated implant abutments and components supplied by the implant manufacturer, and CAD/CAM-milled titanium frameworks for implant-supported full-arch prostheses. The full-arch titanium bar framework milled from a solid titanium disc is the structural backbone of screw-retained full-arch zirconia prostheses, where its combination of strength, precise milling accuracy, and osseointegration compatibility makes it the correct choice for the substructure. 5. Porcelain and Feldspathic Ceramic — The Layering Material Feldspathic porcelain remains in use in modern dental labs as a layering material applied over zirconia or metal substructures to add surface esthetic detail, characterization, and occlusal anatomy. In fully monolithic zirconia workflows which represent the majority of modern crown and bridge production feldspathic layering is largely unnecessary because the zirconia itself provides the esthetic outcome. But in cases requiring maximum anterior esthetic precision, selective porcelain layering over a zirconia coping remains the highest esthetic workflow available. The material's primary limitation is its flexural strength of 60–100 MPa far below zirconia which makes chipping risk the central clinical challenge in porcelain-layered zirconia restorations. This is why monolithic zirconia has displaced layered porcelain-on-zirconia in most lab workflows: eliminating the layering step eliminates the chipping risk entirely, while modern translucent zirconia grades deliver esthetic results that approach the quality of layered porcelain. 6. Composite Resin — The Direct and CAD/CAM Indirect Material Composite resin in the dental lab context means primarily CAD/CAM composite blocks used for milled indirect restorations inlays, onlays, veneers, and single-unit crowns. These differ significantly from chairside direct composite in their degree of polymerization: CAD/CAM composite blocks are fully or near-fully pre-polymerized under controlled conditions, producing superior mechanical properties compared to chairside-cured composite. Hybrid composite ceramics materials that blend composite polymer matrix with ceramic fillers represent the most advanced formulations in this category. They deliver flexural strength of 150–200 MPa, improved machinability compared to glass ceramics, and a degree of esthetic flexibility that makes them useful for thin veneers and minimally invasive indirect restorations. The primary advantage of composite over full ceramic or zirconia in specific applications is its lower hardness — it wears at a rate closer to natural tooth enamel than zirconia does, which is clinically relevant in patients where wear matching between the restoration and opposing dentition is a concern. 7. Dental Zirconia Discs — Format Matters as Much as Material Understanding zirconia as a material is only half the production decision. The disc format diameter, thickness, shade format, and architecture determines how that material performs in an actual milling workflow. A high-quality 5Y zirconia in the wrong disc format, mounted incorrectly in the milling chuck, produces a worse clinical result than a mid-range 4Y disc used correctly. The full range of available to US labs today covers standard 98 mm diameter formats in thicknesses from 10 mm to 20 mm, in white unshaded, single-shade pre-shaded, and multilayer pre-shaded configurations, across 3Y, 4Y, and 5Y grade designations. The combinations are not interchangeable — each combination of grade, thickness, shade format, and architecture serves a specific indication range. Standard 98 mm disc — the production format. Compatible with all major open-system mills. The format used for the significant majority of crown, bridge, and framework production in full-service dental labs. Thickness selection. 10–12 mm for anterior single units and short-span bridges. 14–16 mm for posterior single units with adequate occlusal clearance. 18–20 mm for full-contour posterior cases with maximum material reserve or full-arch framework applications. White vs. pre-shaded. White for custom characterization and unusual shade cases. Pre-shaded for standard A-D shade daily production — eliminates the staining step on the majority of cases. Multilayer vs. monolithic. Multilayer for anterior esthetic cases where the gradient architecture delivers natural shade gradation from cervical to incisal. Monolithic for posterior structural cases where uniform composition through the disc is the priority. 8. Wax and Resin Diagnostic and Casting Materials Dental waxes and resins remain in use in specific lab applications despite the widespread adoption of digital workflows. Casting wax is used in traditional lost-wax casting workflows for metal frameworks, clasps, and partial denture components. Bite registration wax provides a physical record of occlusal relationships for cases where digital bite registration is not available. In modern labs running primarily digital workflows, wax has been largely displaced by CAD/CAM design software for framework planning and diagnostic wax-up simulation. However, for labs that produce metal partial dentures, precision attachments, and cast metal components, wax-working skills and quality wax materials remain part of the production toolkit. 3D printing resins have entered this space as a partial replacement photopolymer resins used in dental 3D printers can produce diagnostic models, surgical guides, temporary crowns, occlusal splints, and try-in restorations with accuracy that approaches or matches milled PMMA for many applications at lower material and tooling cost. 9. Glass Ionomer and Resin-Modified Glass Ionomer Glass ionomer cement occupies a specific and limited role in dental lab production primarily as a luting cement for definitive cementation of crown and bridge restorations and as a base or liner material in restorative workflows. Its clinical value lies in its chemical adhesion to tooth structure (no separate bonding agent required), fluoride release, and coefficient of thermal expansion close to that of natural tooth structure. Resin-modified glass ionomer adds a resin component that improves mechanical properties and reduces moisture sensitivity during setting. For luting zirconia or metal-ceramic restorations where bonding is not the primary retention mechanism, resin-modified glass ionomer is a clinically appropriate and technically simpler cementation choice than adhesive resin cement systems. 10. Metal Alloys Still Present in Specific Applications Metal alloys have been substantially displaced in modern dental lab production by zirconia, lithium disilicate, and other ceramics for crown and bridge work. However, they remain in use in specific applications where no other material provides equivalent clinical performance. Cobalt-chromium alloy is the standard for removable partial denture frameworks, precision attachments, and implant-supported bar frameworks where thin cross-sections must carry significant structural load. Its combination of high strength (yield strength 500–600 MPa), excellent castability, and established clinical track record makes it the default choice for metal removable frameworks. Precious metal alloys (gold-based, high-noble, noble) are still used in specific clinical scenarios typically in practices where the clinician or patient specifies metal substructures for full-coverage restorations, or in posterior areas where maximum ductility and minimal preparation depth are prioritized. How to Evaluate a Zirconia Materials Distributor in the USA For US dental labs, the sourcing relationship matters as much as the product. A zirconia materials distributor USA relationship should deliver more than a transaction it should deliver consistent batch documentation, reliable inventory without international lead times, verified shade consistency across orders, and technical support for sintering profiles and milling parameters. The criteria for evaluating a distributor: US inventory. Not drop-shipped from overseas. Not subject to international lead times or import variability. In-stock product that ships same day or next day means production schedules are not held hostage to shipping uncertainty. Batch documentation. Every order should include or provide access to batch certificates documenting shade specification, mechanical property verification, and biocompatibility compliance. Labs that track quality across orders need this data to identify material drift before it reaches clinical production. Product range depth. A distributor that stocks only one or two products in each category forces labs to manage multiple supplier relationships. A distributor covering zirconia across grades (3Y, 4Y, 5Y), formats (white, pre-shaded, multilayer), thicknesses, and brands alongside PMMA, stain and glaze, and CAD/CAM accessories enables consolidated ordering that reduces overhead. Technical support. Labs switching to a new zirconia product need sintering profile guidance, milling parameter recommendations, and access to someone who understands the material technically not just a fulfillment operation. Why Material Selection Compounds Across Every Case? Every material decision made at the procurement level multiplies across the entire production schedule. A multilayer zirconia disc that eliminates staining on 80% of anterior cases reduces finishing labor cost by that percentage on every one of those cases. A PMMA formulation that polishes in 12 minutes instead of 25 delivers that time saving on every denture in the production run. A zirconia blank that maintains shade specification across batches prevents the shade-drift remakes that disrupt scheduling and consume material cost. The inverse is equally true. Poor batch consistency in zirconia blocks causes shade-matching variability that forces labs to re-evaluate every case instead of trusting a standard. Low-quality PMMA that machines with fibrous, rough surfaces adds manual polishing time to every unit. Materials without biocompatibility documentation expose labs to liability in cases involving sensitive patients. Dental zirconia selection is not a single decision it is a procurement policy. The policy you set determines the quality floor for every restoration your lab produces until you change it. Modern dental labs operate with a material toolkit that has no historical precedent in the industry. The combination of CAD/CAM technology with materials like multilayer zirconia, pre-polymerized PMMA, and lithium disilicate has made it possible to produce restorations of consistently higher quality, more predictably, and at greater production volume than any previous generation of lab technology allowed. The labs that consistently produce the best clinical outcomes are not necessarily the ones with the most advanced equipment they are the ones who understand their materials at a level that enables correct selection, correct processing, and correct quality evaluation. That understanding starts with knowing what each material does, where its performance limits are, and how to source it from a supply chain that delivers consistency rather than variability.
Learn more