PMMA is one of the most forgiving CAD/CAM materials to mill until it isn't. Labs that are new to PMMA milling typically discover the same problems in the same sequence: rough tissue surfaces that take longer to polish than expected, micro-chipping at margins on thinner restorations, bur wear that outpaces what the material's softness would suggest, and occasional warping on full-arch cases that exit the mill dimensionally inaccurate. None of these are material failures. They are workflow failures problems that trace back to incorrect parameters, wrong tooling selection, or skipped setup steps that experienced PMMA labs have long since standardized.
This guide covers the practical techniques, parameter decisions, and quality checks that produce clean, accurate, ready-to-finish PMMA restorations consistently from every production run. Whether you are milling temporary crowns, denture bases, occlusal splints, or full-arch provisionals, the same core principles apply and getting them right from the start eliminates the most common sources of rework in PMMA production.
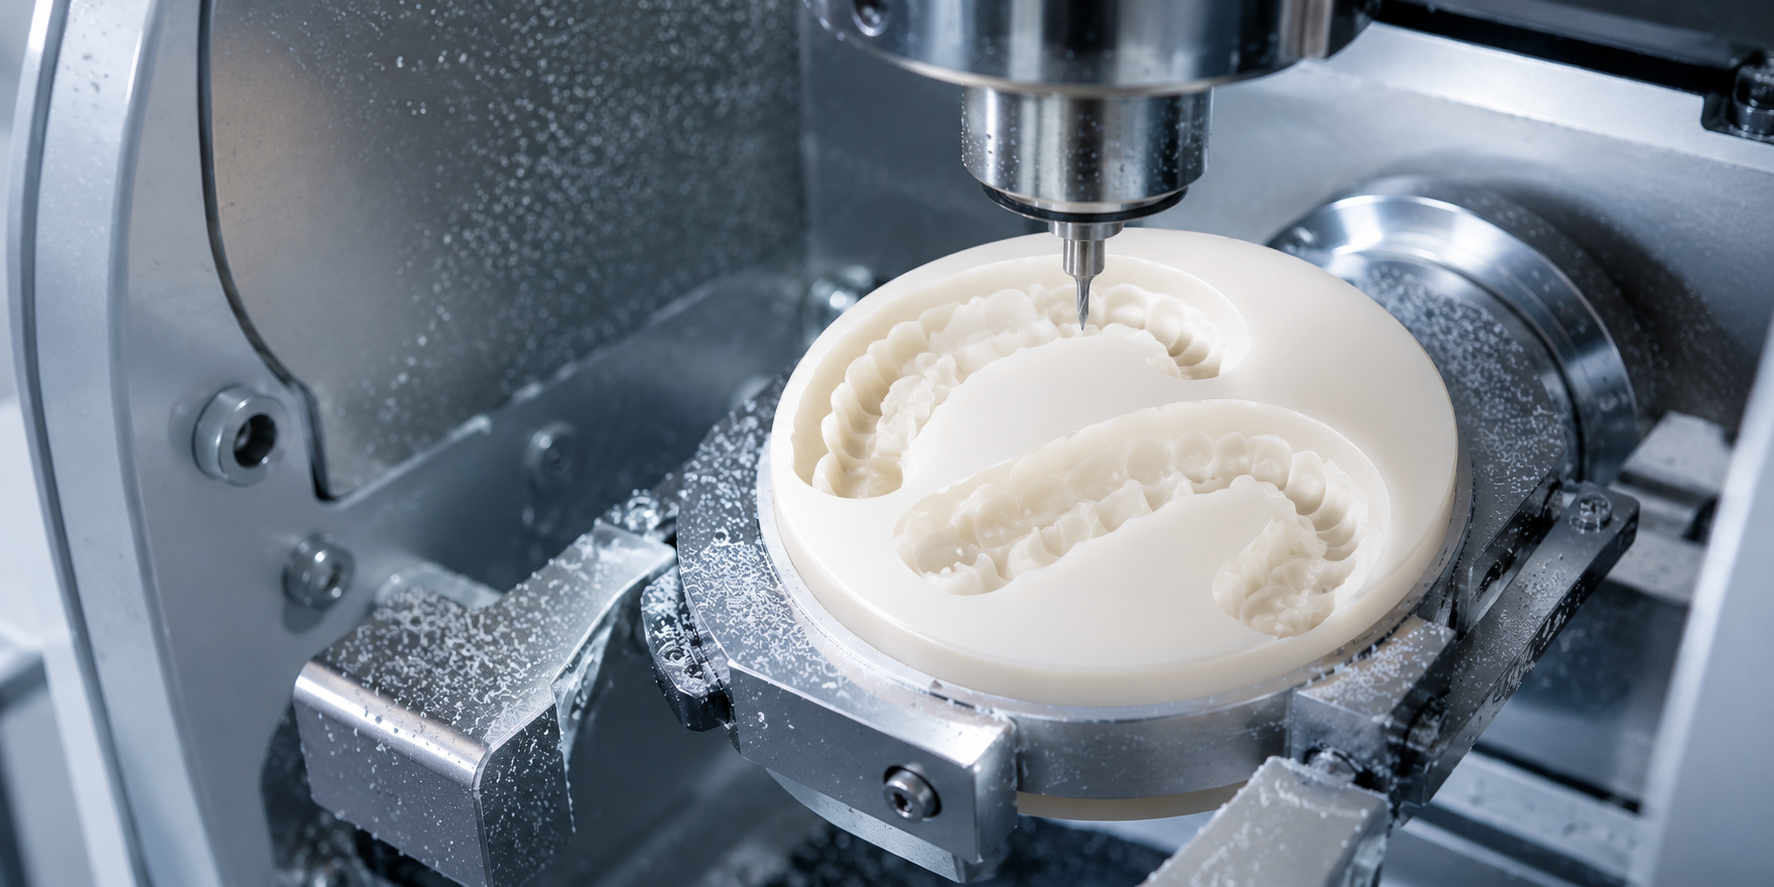
Understand the PMMA Disc You Are Using Before You Mill
The single most common source of PMMA milling problems is running a disc on parameters calibrated for a different PMMA formulation. PMMA is not one material it is a class of acrylic polymer that encompasses meaningfully different formulations depending on the application. Denture base PMMA, multilayer crown and bridge PMMA, clear splint PMMA, and high-impact PMMA for full-arch cases all have different hardness values, chip formation behavior, and optimal cutting parameters.
A multilayer pmma disc for temporary crowns has gradient hardness built into its architecture — the cervical zone is formulated to a different composition than the incisal zone. Running uniform cutting parameters that are calibrated for a monolayer disc can produce inconsistent surface quality across the gradient layers, particularly at the layer transition zones where chip formation behavior changes slightly. Most CAM software handles this automatically when the disc type is correctly specified, but manual parameter entry should reflect the specific disc formulation, not a generic PMMA default.
Always confirm the following before milling a batch:
- The disc formulation matches what is specified in the CAM file. Swapping a multilayer disc for a monolayer without updating the software causes toolpath depth and speed errors that are not always immediately obvious but consistently degrade surface quality.
- Check that the disc is mounted in the correct orientation. Multilayer discs are directionally coded cervical-to-incisal orientation must match the CAD design's expectation, or the shade gradient will be reversed in the finished restoration.
- Verify the disc has been stored correctly. PMMA absorbs moisture from the air. A disc that has been left unsealed in a humid lab environment mills differently chipping more readily and producing a rougher milled surface than a disc stored in its sealed packaging until use.
Set Milling Parameters for PMMA Specifically Not by Default
Most milling machines arrive with preset material libraries that include a PMMA profile. These presets are a reasonable starting point, but they are rarely optimized for the specific disc product you are running. The three parameters that most directly affect PMMA milling quality are spindle speed, feed rate, and step-over distance.
Spindle speed for PMMA should typically run in the range of 20,000–30,000 RPM for finishing passes. PMMA is a thermoplastic it melts rather than fractures under heat. Running spindle speeds too low generates heat at the tool tip through friction rather than dissipating it through chip formation. The result is a smeared, slightly translucent surface in the milled area material that has partially melted and re-solidified rather than cutting cleanly. If your milled PMMA surfaces look waxy or slightly glazed, spindle speed is the first parameter to check.
Feed rate directly controls chip load per tooth and determines whether the material is cut cleanly or torn. Too slow a feed rate on PMMA produces built-up edge on the bur — material adhesion that degrades surface finish progressively through the milling cycle. Too fast a feed rate increases the risk of vibration-induced chipping on thin margins. The optimal range varies by bur diameter and disc hardness, but a good starting point for 2 mm finishing burs on standard PMMA is 800–1200 mm/min. Adjust in 10% increments and evaluate surface quality with each change.
Step-over distance on finishing passes determines how visible the scalloping pattern is on curved surfaces. For tissue surfaces of denture bases and the axial walls of crown temporaries, a step-over of 0.05–0.08 mm typically produces a surface finish that requires minimal polishing. Step-over above 0.15 mm leaves visible machining marks that add significant polishing time particularly on concave tissue surfaces where access is limited.
Use the Right Burs and Replace Them on Schedule
PMMA is soft relative to zirconia blocks dental ceramics, but it is abrasive in a different way. The continuous chip formation in PMMA production loads bur flutes with acrylic debris that builds up and causes the same degradation in cut quality as a worn cutting edge. Labs that track bur life by unit count and replace on schedule consistently produce better PMMA surface quality than labs that run burs until visible failure.
For aidite pmma dental discs, the recommended tooling is standard two-flute PMMA burs in 2 mm roughing and 1 mm finishing diameters for most crown and bridge temporaries. Denture base cases with large tissue surface areas benefit from a 2 mm ball-nose finishing pass that covers more surface area per pass and reduces total milling time without sacrificing finish quality.
Replace PMMA burs every 20–25 disc units for standard crown and bridge work. For full-arch denture base cases which subject burs to significantly longer continuous cutting paths reduce the interval to 10–15 full-arch cases. Running worn burs on PMMA produces the characteristic rough, fibrous milled surface that requires extensive polishing to resolve. The bur cost per case is a fraction of the additional polishing labor cost it avoids.
A few tooling rules that consistently improve results:
- Never use zirconia burs for PMMA milling. The geometry differs zirconia blank cutting tools are designed for the different chip formation mechanism of ceramic. Running ceramic-optimized burs on PMMA produces poor chip evacuation, heat buildup, and rapid bur loading.
- Keep separate bur sets for PMMA and ceramic milling and do not cross-use them.
- Check bur runout before milling critical cases. A bur with even 0.01 mm runout produces a visible vibration artifact on the milled surface of thin-walled PMMA temporaries. Runout check takes 30 seconds and eliminates a common source of unexplained surface quality variation.
Control the Milling Environment: Dust, Temperature, and Fixturing
PMMA generates fine acrylic dust during milling that accumulates rapidly in the milling chamber. Unlike dental zirconia discs and zirconia ceramic dust, PMMA dust is lightweight and electrostatically charged it adheres to chamber walls, sensors, and spindle housings, and migrates further through the machine than ceramic dust in the same conditions.
Clean the milling chamber after every PMMA session, not at end-of-day. Acrylic dust that sits in the chamber between sessions is picked up by air circulation during the next milling cycle and redeposited on the disc surface during cutting — producing contamination artifacts on the milled surface that look like smearing or micro-inclusions. A 2-minute chamber clean between cases costs less than the polishing time required to remove contamination artifacts.
Temperature affects PMMA milling quality more than most labs account for. In cold lab environments below 18°C, PMMA becomes more brittle and chips more readily at thin margins. In warm environments above 28°C, the material's thermoplastic behavior is more pronounced and smearing is more likely. Keep lab temperature stable in the 20–24°C range for consistent PMMA milling results. If your lab runs warm in summer months, this one environmental adjustment often resolves milling quality variation that technicians have been attributing to disc quality or machine calibration.
Fixturing security is critical for full-arch PMMA cases. A denture base disc held in an adapter that has even slight play will vibrate during the long cutting paths of a full-arch milling cycle. The vibration produces consistent surface irregularities across the tissue surface that are difficult to distinguish from parameter-related issues. Before any full-arch PMMA case, confirm the adapter fit is secure and that the disc seating is fully engaged.
Post-Milling: Separation, Cleanup, and Polishing Sequence
How you handle PMMA restorations after they exit the mill affects final quality as much as the milling parameters themselves. The separation step is where most of the edge chipping in PMMA cases occurs not during milling.
Separate PMMA restorations from sprues using a fine disc or oscillating saw rather than bending or snapping. PMMA is more brittle at sprue attachment points than its bulk flexibility suggests, and mechanical separation by flexing almost always produces a fracture that propagates unpredictably. Cut the sprue cleanly, then trim the attachment point with a tungsten carbide bur at low speed.
For labs sourcing aidite dental materials including the full Aidite PMMA range the post-milling polishing sequence consistently recommended by Aidite is: coarse pumice slurry at low lathe speed to address machining marks, followed by fine pumice, followed by acrylic polishing compound to final gloss. Rag wheel at medium speed for final polish. This three-step sequence produces clinical-grade surface finish in approximately 10–15 minutes per unit when the milled surface is clean from a correctly parameterized milling cycle.
For multilayer PMMA crown cases, avoid aggressive grinding of the tissue surface during cleanup. Grinding through the incisal layer into the body layer of a multilayer disc reverses the shade gradient at that point producing a visible shade anomaly that requires a remake to correct. Confine any post-milling surface work to the margin areas and leave the main anatomical surfaces as-milled.
Stocking PMMA and Zirconia Together: The Full CAD/CAM Material Strategy
PMMA milling efficiency is not just about individual case parameters it is about how PMMA fits into your broader material workflow. Labs running both PMMA temporaries and permanent dental zirconia discs for fixed restorations benefit from a coordinated stocking strategy that treats both material classes as part of the same production system.
For US dental labs looking to consolidate their CAD/CAM material supply, ZirconiaGuys stocks the complete Aidite PMMA range multilayer, denture base, and clear formulations alongside zirconia dental blanks, zirconia blocks from Upcera and Aidite, and accessories from US inventory. Labs can also buy aidite zirconia blocks wholesale usa directly through ZirconiaGuys with no international lead times, consistent batch documentation, and full technical support for both PMMA and zirconia milling parameters.
The key material stocking principle for labs running both workflows: treat PMMA as your temporary production standard and zirconia as your permanent production standard, and stock both with the same quality discipline. A zirconia materials distributor usa relationship that also covers your PMMA supply consolidates vendor management, simplifies inventory tracking, and ensures that both material classes are supported by the same technical documentation chain.


